Microsoft Edge tab groups: Organize Browsing sessions easily

Among the all existed web browsers, Microsoft Edge comes with fantastic features and feeling user friendly while browsing. In that, Microsoft Edge Tab groups feature is one of the best feature to try for organized browsing experience.
This feature allows you to organize your tabs into groups. This feature, called tab groups, is designed to help you manage your browsing sessions more efficiently and productively.
With the increasing number of tabs open in web browsers, it can become overwhelming and difficult to keep track of different browsing sessions. It is where the new tab groups feature in Microsoft Edge comes to the rescue. This feature allows users to organize their tabs into groups, making switching between different sessions easier and keeping everything well-organized.
This article will explore why organizing browsing sessions is important and provide an overview of Microsoft Edge’s new tab groups feature.
- Microsoft Edge vs Chrome: 8 Comprehensive Comparisons for you
- How to enable Microsoft Edge vertical tabs for better Browsing Experience?
What are tab groups?
Tab groups are a way to group related tabs together in your browser. You can create as many tab groups as you want, and assign them different names and colors.
For example, you can create a tab group for your work project, another one for your personal email and social media, and another one for your online shopping. This way, you can easily switch between different contexts and find the tabs you need.
How to create a tab group?
To create a tab group in Microsoft Edge, you need to right-click on any tab and select “Add tab to new group”.
A small dot will appear next to the tab, indicating that it belongs to a group. You can then click on the dot to name your group and choose a color for it. You can also drag and drop tabs to add them to existing groups or create new ones.
Creating and Managing Microsoft Edge Tab Groups
Microsoft Edge tab groups feature allows users to organize browsing sessions better and keep related tabs together.
Here are some key functions for creating and managing tab groups:
How to Create and Name a Tab Group
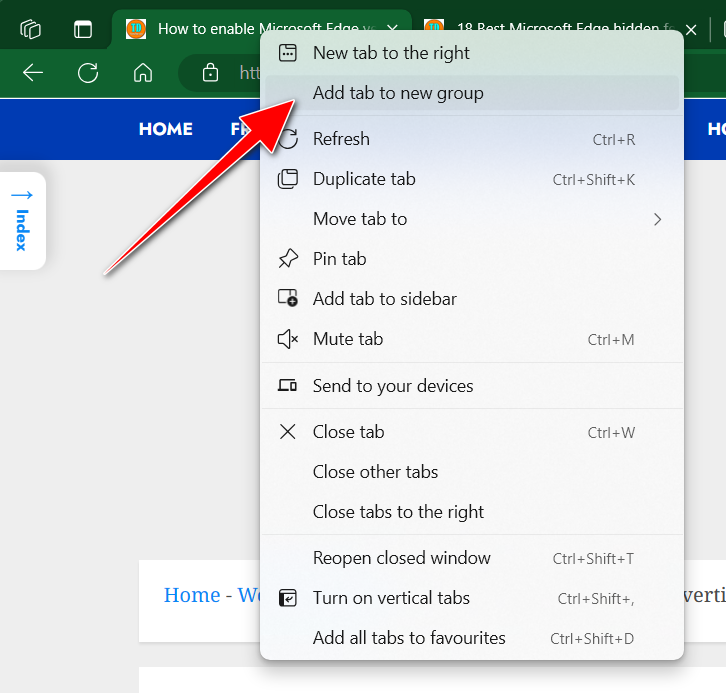
To create a new tab group, right-click on a tab and select “Add tab to new group.” You can then name the tab group by right-clicking on the group header and selecting “Name group.”
Adding Tabs to a Tab Group

To add tabs to the tab group, drag and drop them onto the group header.
Rearranging Tabs within a Tab Group

To rearrange tabs within a tab group, drag and drop them to your desired order.
Closing and Removing Tabs from a Tab Group
To close a tab within a tab group, click on the close button on the tab. To remove a tab from a tab group, drag and drop it outside the group header.

Using these features, you can effectively organize browsing sessions and improve productivity using Microsoft Edge’s tab groups.
Customizing Tab Groups
Microsoft Edge’s new tab groups feature allows you to customize your browsing experience and organize your tabs more efficiently. Here are a couple of ways to customize your tab groups:
Changing the Color of a Tab Group

You can easily change the colour of a tab group by right-clicking on the group header and selecting “Change Group Color.” This feature allows you to differentiate between different tab groups visually and makes it easier to navigate your browsing sessions.
Collapsing and Expanding Tab Groups
If you have multiple tabs within a tab group and want to save space, you can collapse the group by clicking on the arrow icon next to the group header. It collapses the group and shows only the group header, giving you more screen real estate for your active tab.

These customization options allow you to personalize your browsing experience and use Microsoft Edge’s tab groups feature better.
Syncing Tab Groups How to Sync Tab Groups across Devices
One of the great features of Microsoft Edge’s new tab groups is the ability to sync them across devices. Here’s how you can do it:
- Sign in to your Microsoft account on all your devices.
- Open Microsoft Edge and create tab groups on one device.
- Open Microsoft Edge on another device where you’re signed in with the same account.
- Go to the “Settings” menu and enable the “Sync” option.
- Your tab groups will now be synced across all your devices.
Benefits of Syncing Tab Groups
Syncing tab groups offer several benefits:
- You can access your organized browsing sessions on any device with Microsoft Edge, making switching between devices convenient.
- It allows for a seamless browsing experience, as you can continue your work or leisure activities without searching for the right tabs.
- Syncing ensures you don’t lose important tabs or information when transitioning between devices.
Start using Microsoft Edge’s tab groups feature today and enjoy a more organized and efficient browsing experience!
How to use Microsoft Edge tab groups
The new tab groups feature in Microsoft Edge can greatly improve your browsing experience and help you stay organized. Here are some tips and tricks for using tab groups efficiently:
Keyboard Shortcuts for Tab Groups
- Ctrl + T: Opens a new tab
- Ctrl + Click: Opens a link in a new tab
- Ctrl + Shift + E: Creates a new tab group
- Ctrl + Shift + Period (.): Switches between tab groups
Using Drag and Drop to Move Tabs to a Different Group
Click and hold a tab, then drag it to a different tab group to move it. It allows you to organize your tabs based on your preferences easily.
Creating Multiple Tab Groups for Different Projects
You can create separate tab groups for each if you’re working on multiple projects or tasks. It helps you keep all the relevant tabs together, making it easier to switch between projects without losing track.
Using these tips and tricks, you can make the most of Microsoft Edge’s tab groups feature and streamline your browsing sessions.
Why use tab groups?
Tab groups are a great way to improve your productivity and focus when browsing the web. They can help you:
- Organize your tabs by topic, project, task, or any other criteria that makes sense for you.
- Reduce clutter and distraction by collapsing the groups that you are not using at the moment.
- Find the tabs you need faster by using custom names and colors.
- Switch between different contexts more easily by moving or closing entire groups of tabs.
Tab groups are one of the many features that make Microsoft Edge a powerful and versatile browser. If you haven’t tried it yet, I highly recommend you give it a try.
Conclusion
In conclusion, Microsoft Edge’s new tab groups feature is a game-changer for organizing your browsing sessions. It allows you to group related tabs, making it easier to switch between tasks and stay organized. The benefits of using tab groups include enhanced productivity, reduced clutter, and improved multitasking.
To maximize productivity with tab groups, consider using keyboard shortcuts, customizing group names, and utilizing the collapse and expand feature. With the tab groups feature, Microsoft Edge provides users a powerful tool for efficient and organized browsing.


