Are you facing issues with your Windows 11 operating system and need to reset it? Resetting your Windows 11 computer can be a powerful solution to tackle various software-related problems and bring your system back to its default settings. Whether you’re facing frequent crashes, performance slowdowns, or the need to eliminate malware and unwanted software, a reset can effectively resolve these issues.
In this article, we will provide you with a comprehensive step-by-step guide on how to reset Windows 11, ensuring a smooth and hassle-free experience.
By following these instructions and taking the necessary precautions, you’ll be able to restore your computer to a clean and optimized state. So, let’s dive in and learn how to reset Windows 11!
What is Windows 11?
Windows 11 is the latest operating system developed by Microsoft. It is the successor to Windows 10 and was officially announced on June 24, 2021.
Windows 11 brings a fresh new interface with a centered Start Menu, redesigned Taskbar, and new features such as Snap layouts, Virtual Desktops, and Direct integration with Microsoft Teams.
It also includes performance improvements, enhanced gaming capabilities, and better support for touch, pen, and voice inputs.
Windows 11 aims to offer a more intuitive and productive user experience across a wide range of devices, including desktops, laptops, and tablets.
- Microsoft’s AI Powered features in Windows 11 and Windows 12 for a great PC interaction
- 10 Best Windows 11 performance optimization tips to run your PC Faster

Here are some of the key features of Windows 11:
Redesigned Start Menu: Windows 11 introduces a centered Start Menu, providing a cleaner and more streamlined user interface.
- Snap Layouts and Snap Groups: The new Snap Layouts feature allows you to quickly organize and snap multiple windows in customizable layouts, enabling efficient multitasking. Snap Groups, on the other hand, remembers your app configurations and helps you switch between tasks seamlessly.
Virtual Desktops: Windows 11 enhances the virtual desktop experience, allowing you to create and customize multiple desktops to keep your workspaces organized and improve productivity.
- Microsoft Store Revamp: The Microsoft Store has been redesigned in Windows 11 to offer a faster and more curated experience, featuring a broader range of apps, including Microsoft’s own Android apps.
Microsoft Teams Integration: Windows 11 integrates Microsoft Teams directly into the taskbar, making it easier to connect and communicate with friends, family, and colleagues through video calls, chat, and collaboration.
Enhanced Gaming Experience: Windows 11 comes with several gaming-focused features, including DirectStorage for faster load times, Auto HDR for improved visuals, and support for Xbox Game Pass.
- Improved Touch and Pen Input: Windows 11 introduces new capabilities for touch and pen input, providing a more intuitive and natural way to interact with your device.
Widgets: Windows 11 brings back widgets, allowing you to personalize your desktop with glanceable and customizable information, such as news, weather, calendar, and more.
These are just a few highlights among many other features that make Windows 11 a compelling operating system for both productivity and entertainment.
Why Would You Need to Reset Windows 11?
There are several reasons why you need to reset Windows 11. Some of the common scenarios include:
- System performance issues: Over time, your computer may become slow or unresponsive due to accumulated temporary files, corrupted system files, or conflicting software installations. Resetting Windows 11 can help clean up the system and improve overall performance.
- Malware or virus infections: If your computer is infected with malware or viruses, it can significantly affect its performance and compromise your data security. Resetting Windows 11 can remove these malicious programs and restore the system to a clean state.
- Software conflicts: Sometimes, incompatible or improperly installed software can cause conflicts, leading to system instability or crashes. By resetting Windows 11, you can resolve these conflicts and ensure smooth operation of your computer.
- Forgotten passwords or user accounts: If you have forgotten your Windows 11 password or are unable to access your user account, resetting the operating system can help regain access to your files and settings.
- Selling or donating your computer: Before selling or donating your Windows 11 computer, resetting it to its factory settings ensures that all your personal data and information are erased, protecting your privacy.
- Operating system errors: In certain cases, Windows 11 may encounter errors or become corrupted, making it difficult to troubleshoot and fix specific issues.
Resetting the operating system can resolve these errors and provide a fresh start. Remember to back up your important files and data before resetting Windows 11, as the process will remove all installed applications and settings.
How to Reset Windows 11: Step-by-Step Guide
This section will provide a detailed step-by-step guide to resetting Windows 11. Before proceeding with the reset process, backing up your important data to avoid potential loss is crucial.
Step 1: Backing Up Your Important Data
Before resetting Windows 11, creating a backup of your important files and data is essential. It ensures you retain valuable information during the reset process. You can back up your data by following these steps:
- Connect an external storage device to your computer, such as a USB flash drive or an external hard drive.
- Open the File Explorer by pressing the Windows key + E.
- Navigate to the files and folders you want to back up.
- Select the files and folders you wish to back up by holding the Ctrl key and clicking each item.
- Right-click on the selected files and choose the “Copy” option.
- Open the external storage device in File Explorer.
- Right-click inside the external storage device and choose the “Paste” option to copy the files.
Step 2: Accessing the Settings Menu
To reset Windows 11, you need to access the Settings menu.
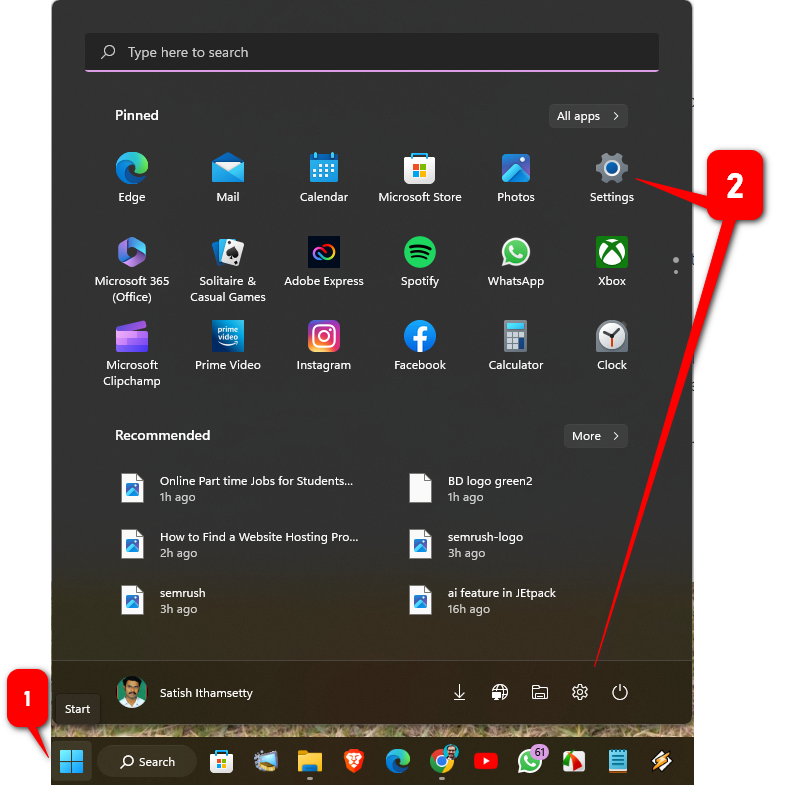
Follow these steps to access the Settings menu:
- Click on the Start button in your screen’s bottom left corner or press the Windows key.
- Click on the “Settings” icon from the Start menu, which resembles a gear.
Step 3: Selecting the “System” Option
Once you are in the Settings menu, follow these steps to select the “System” option:
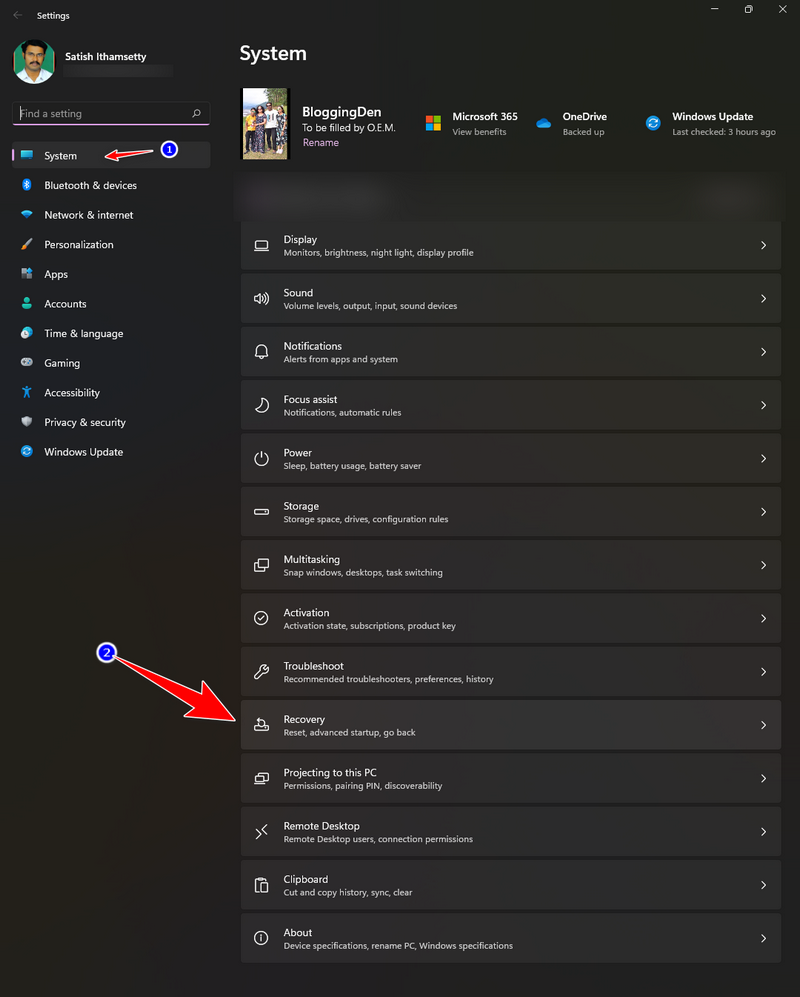
- In the Settings menu, click on the “System” option.
- In the right sidebar, click on the “Recovery” option.
Step 4: Clicking on the “Reset PC” Button
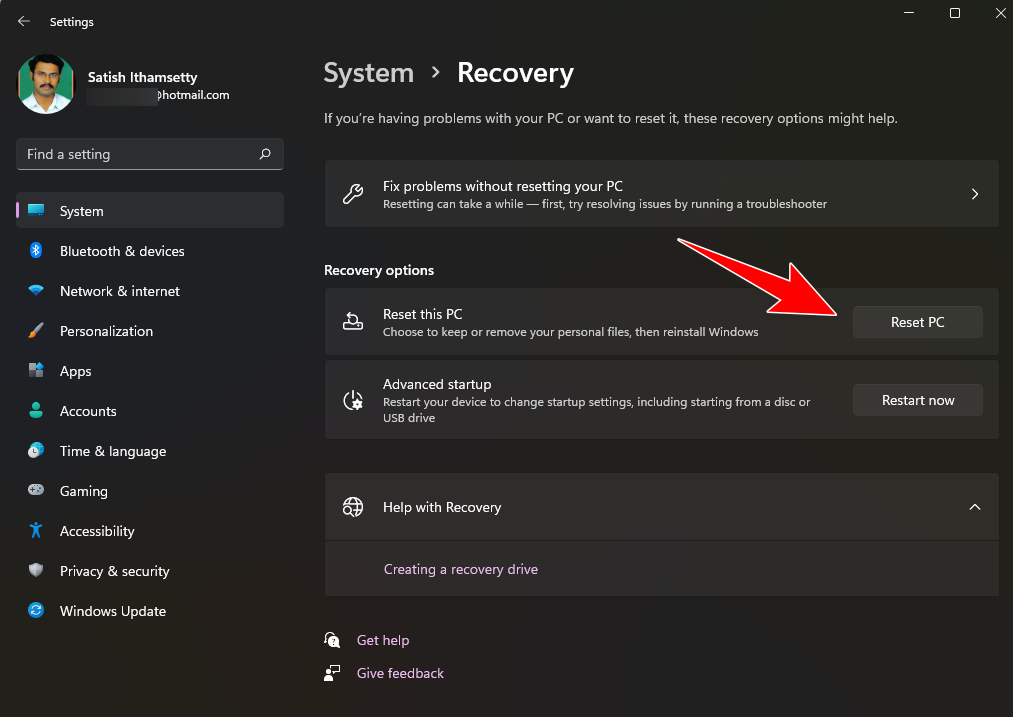
Click the “Reset PC” button under the “Reset this PC” section to initiate the reset process. This button is located towards the right side in the System page.
Once you click the button, a confirmation window will appear. Simply follow the instructions provided in the window to proceed with the reset.
Keep in mind that resetting your PC will remove all personal files, apps, and settings, so be sure to backup any important data before proceeding.
Step 5: Selecting the Reset Option
After clicking on the “Reset PC” button, you will be presented with two reset options: “Keep my files” and “Remove everything.” Choose the option that suits your requirements.
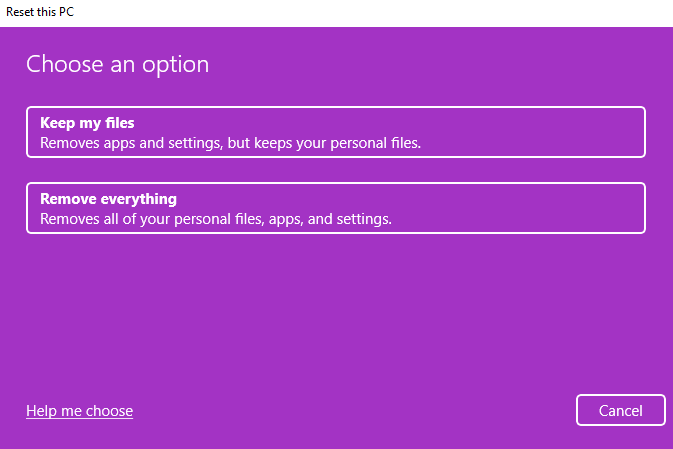
- Keep my Files: If you choose the this option, Windows 11 will reinstall the operating system while keeping your files intact. This means that all your important documents, pictures, and other personal files will remain safe and accessible. It provides peace of mind, knowing that your data will be preserved during the operating system reinstallation process.
- Remove everything: If you are selecting the “Remove everything” option goes a step further. This option will not only remove the operating system but also erase all your personal files, applications, and settings. It is a more drastic measure, often used when you want to start from scratch or when you are planning to sell or donate your computer.
However, it is important to note that once you choose this option, all your files will be permanently deleted, so it is crucial to back up any important data beforehand.
Understanding the distinction between these two options is essential when performing a system reset or reinstalling Windows 11.
Whether you decide to keep your files or remove everything, make sure to make an informed choice based on your specific needs and requirements.
Step 6: Confirming the Reset
After selecting the reset option, you will receive a warning message informing you that your files will be deleted during the reset process. Choose the Windows 11 OS location from the screen then go. There are two locations – Cloud download and Local install. It’s important to carefully consider which option you prefer as it will impact the overall reset process.
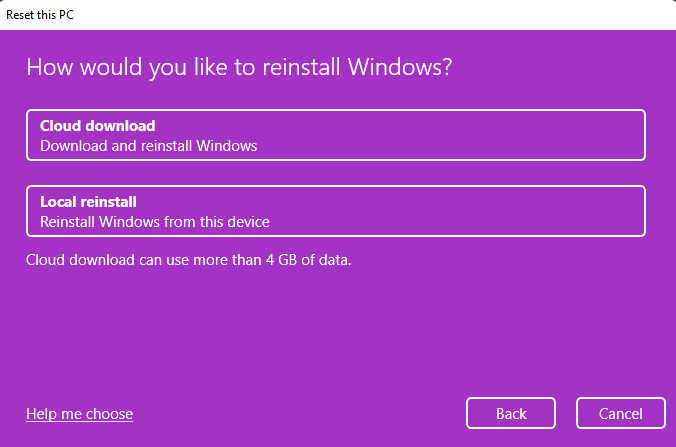
- Cloud download: This option allows you to reinstall Windows 11 directly from the cloud. It means that the operating system files will be downloaded and installed from Microsoft’s servers, ensuring that you have the most up-to-date version. It is a convenient choice, especially if you have a stable internet connection, as it eliminates the need for physical media or installation files.
- Local install: This option involves reinstalling Windows 11 from an installation media such as a USB drive or DVD. This method allows you to have a physical copy of the installation files, giving you more control over the process. It can be useful if you encounter any issues with the cloud download option or if you prefer to have a local backup of the installation files.
When making your decision, consider factors such as internet speed, convenience, and the availability of installation media. Once you have chosen your preferred OS location, proceed with the reset process, and follow the on-screen instructions to complete the reset. Remember to back up any important files before initiating the reset, as they will be permanently deleted during this process.
Step 7: Waiting for the Reset Process to Complete
Once you confirm the reset, Windows 11 will start the reset process. It may take some time, depending on the speed of your computer and the amount of data to be removed. It is important to continue the process and allow it to be completed.
During the reset, your computer may restart multiple times, and you may see progress indicators on the screen. Once the reset process is finished, Windows 11 will boot up to the initial setup screen.
Common FAQs Related to Resetting Windows 11
What happens when you reset Windows 11?
When you reset Windows 11, the operating system reinstalls itself, removing personal files, applications, and settings. It brings your computer back to its original state, similar to when you first purchased it.
Will resetting Windows 11 delete my files?
Yes, all your files will be deleted if you choose the “Remove everything” option while resetting Windows 11. It is crucial to back up your important data before proceeding with the reset.
How long does it take to reset Windows 11?
The time taken to reset Windows 11 varies depending on the speed of your computer and the amount of data to be removed. On average, the reset process can take anywhere from 30 minutes to a few hours.
Can I cancel the reset process once it has started?
Once you have initiated the reset process, it is recommended not to interrupt it. Cancelling the reset process midway can lead to system instability and potential data loss. It is best to let the process complete itself to avoid any complications.
Will resetting Windows 11 remove all my installed applications?
Yes, resetting Windows 11 will remove all the applications installed on your computer. After the reset, you must reinstall any applications you want to use.
Do I need to reinstall drivers after resetting Windows 11?
Windows 11 automatically installs most drivers during the reset process. However, it is recommended to check for any missing or outdated drivers after the reset and update them accordingly. It ensures optimal performance and compatibility with your hardware.
Conclusion
Resetting Windows 11 can be beneficial in various scenarios such as troubleshooting system problems, eliminating malware, preparing for resale, or simply wanting a fresh start. By following the instructions provided in this article, you will be able to reset Windows 11 and return your computer to its original settings. It is important to remember to back up your important data before embarking on the reset process and to select the reset option that best meets your needs. Ultimately, you can enjoy a clean and rejuvenated Windows 11 experience.


