How to Schedule Disk Defragmentation in Windows PC: A Comprehensive Guide

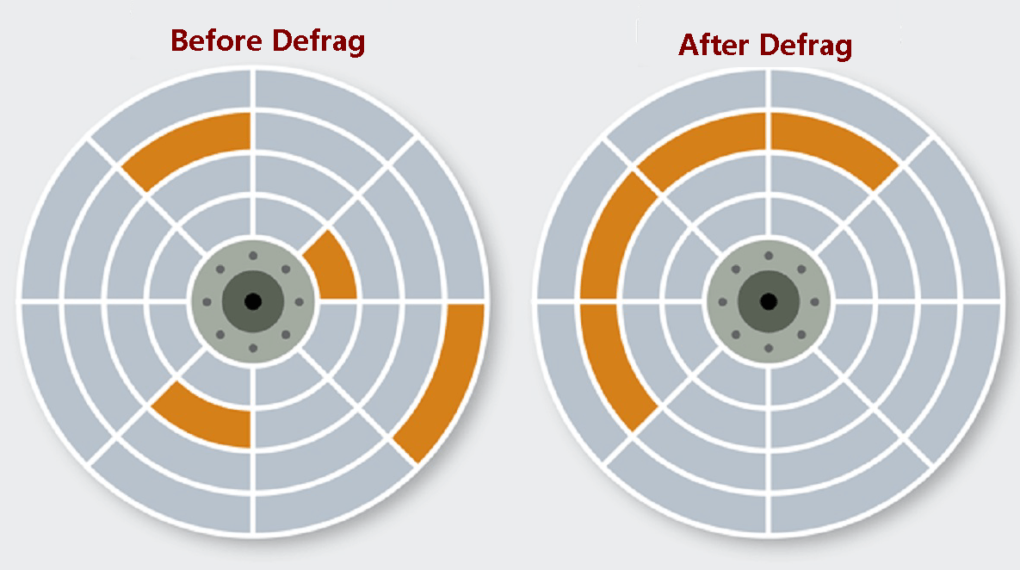
maintaining optimal computer performance is crucial. One of the most effective ways to ensure your PC runs smoothly is by scheduling disk defragmentation. A fragmented hard drive can significantly slow down your computer’s performance. Files become scattered across different locations on the hard drive.
This forces the computer to work harder to access those files, leading to sluggish performance. Fortunately, Windows includes a built-in disk defragmentation/optimization tool. This tool can reorganize fragmented files. It can also optimize your hard drive for better performance.
We’ll guide you through the process of scheduling disk defragmentation in Windows in this article. We will explain why it’s important. We’ll also introduce you to some third-party tools that can help you achieve even better results. By the end of this guide, you’ll have all the information you need. Your PC will run at its best.
Why Schedule Disk Defragmentation and Optimization?
Before diving into the steps, it’s essential to understand why scheduling disk defragmentation is beneficial. You can manually run the disk defragmenter whenever you notice a performance drop. However, scheduling it to run automatically is a more proactive approach. Here are some key reasons why you should schedule disk defragmentation/optimization:
- Automated Maintenance: By scheduling disk defragmentation, you don’t have to remember to run it manually. The process will happen automatically and regularly, optimizing your hard drive without your intervention. This is especially useful for busy individuals who may not have the time to perform manual maintenance.
- Improved Performance: Regular defragmentation helps maintain optimal performance by reducing the time it takes for your computer to access files. When files are stored contiguously, the system can read and write data more efficiently. This leads to faster load times and smoother operation.
- Extended Hard Drive Life: Fragmentation can stress your hard drive, causing it to work harder and potentially shortening its lifespan. By defragmenting regularly, you can reduce wear and tear on your hard drive, extending its life and preventing premature failure.
How to Schedule Disk Defragmentation/Optimization in Windows 10
Windows 10 makes it easy to schedule disk defragmentation. Follow these steps to set it up:
Step 1: Open the Disk Defragmenter or Optimize Drives Tool
- Press the Windows key + S to open the search bar.
- Type “defragment” or “optimize” and click on “Defragment and Optimize Drives” or “Optimize Drives” from the search results.

Step 2: Select the Drive
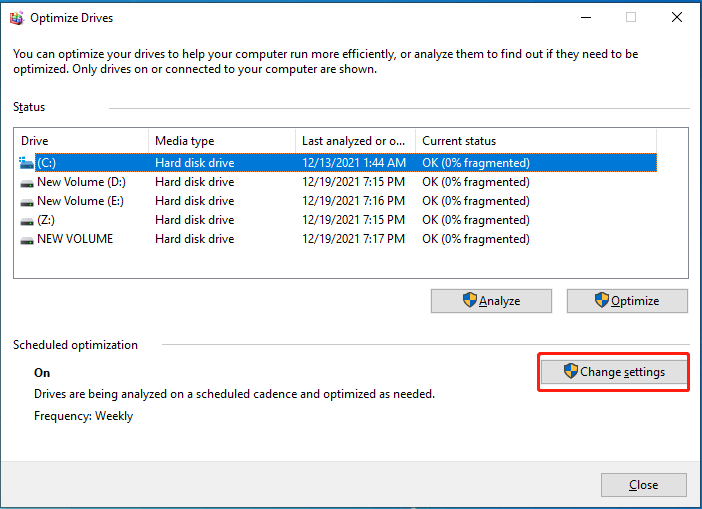
In the Optimize Drives window, you’ll see a list of all the drives on your computer. If you have multiple drives, you can choose to defragment/optimize them all or select individual drives. Click on the “Change settings” button to open the schedule options.
Step 3: Schedule Defragmentation/Optimization
In the Scheduled Optimization dialog box, you’ll have several options:
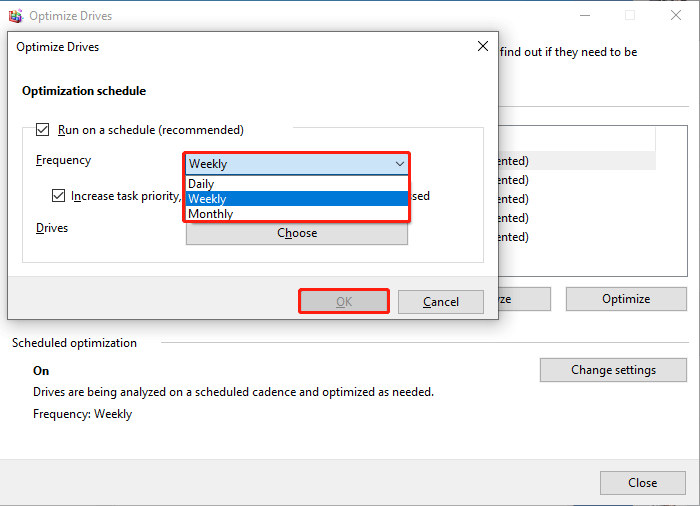
- Run on a schedule: Check this box to enable scheduled defragmentation/optimization.
- Frequency: Choose how often you want the defragmentation/optimization to run (e.g., daily, weekly, or monthly).
- Day: If you choose weekly or monthly, select the specific day(s) when you want the defragmentation/optimization to occur.
- Time: Set when you want the defragmentation/optimization to start.
Step 4: Configure Additional Settings (Optional)
You can also configure additional settings in this dialog box:
- Only defragment/optimize drives that are more than x% fragmented: Set a fragmentation threshold above which the defragmentation/optimization will run.
- Prevent defragmentation/optimization on the following drives: Exclude specific drives from being defragmented/optimized.
Step 5: Save Settings
After selecting your preferences, click “OK” to save the scheduled defragmentation and optimization settings.
How to Schedule Disk Defragmentation/Optimization in Windows 7, 8, and 11
The process of scheduling disk defragmentation in Windows 7, 8, and 11 is similar to Windows 10. There are minor differences in the user interface.
Step 1: Open the Disk Defragmenter/Optimize Drives Tool
- Windows 7: Click the Start button, type “disk defragmenter” in the search box, and select “Disk Defragmenter” from the results.

- Windows 8: Press the Windows key + Q to open the search charm. Then type “defragment.” Next, select “Defragment and Optimize Drives” from the results.

- Windows 11: Press the Windows key + S to open the search bar. Type “optimize.” Click “Optimize Drives” from the search results.
Step 2: Select the Drive
In the Disk Defragmenter/Optimize Drives window, select the drive you want to defragment/optimize.
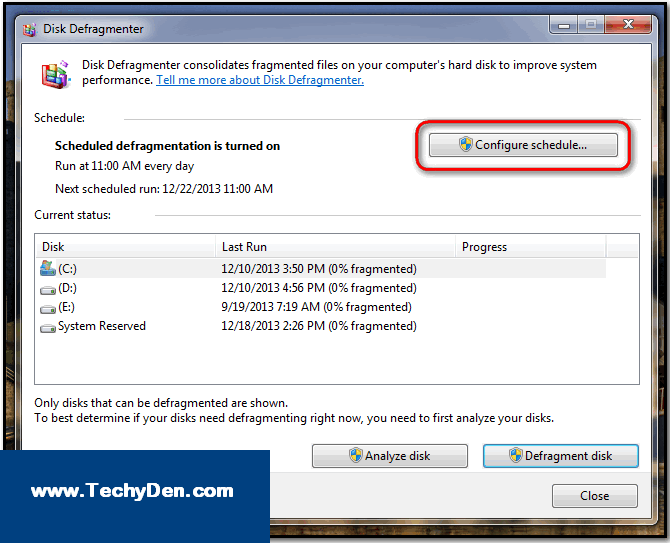
Step 3: Configure Schedule
To open the scheduling options, click the “Configure Schedule” button (or “Change Settings” in Windows 11).
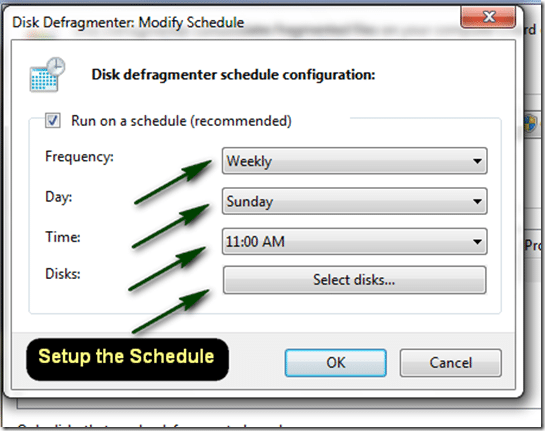
Step 4: Schedule Defragmentation/Optimization
In the Scheduled Disk Defragmenter/Scheduled Optimization dialog box, you’ll have similar options as in Windows 10:
- Run on a schedule: Check this box to enable scheduled defragmentation/optimization.
- Frequency: Choose how often you want the defragmentation/optimization to run.
- Day: If you choose weekly or monthly, select the specific day(s) when you want the defragmentation/optimization to occur.
- Time: Set when you want the defragmentation/optimization to start.
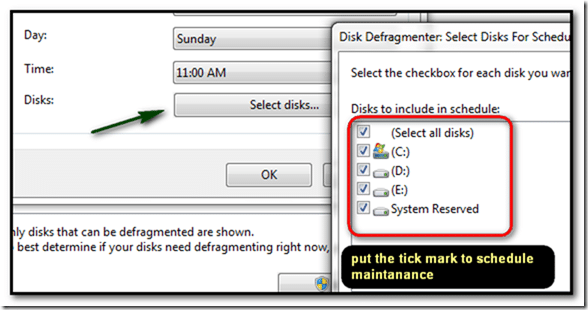
Step 5: Configure Additional Settings (Optional)
You can also configure additional settings, such as setting a fragmentation threshold or excluding specific drives.
Step 6: Save Settings
After selecting your preferences, click “OK” to save the scheduled defragmentation and optimization settings.
I have three drive on my computer, but you would see the list of all the drives here.
- Before clicking on the Configure schedule button, you can click on the Analyze disk button. This helps determine whether a specific disk really needs to be defragmented or not.
- If the disk that underwent the last defragmentation shows 10% or more under the Last Run column, defragment it again. Run the defragmentation process once more.
- Similarly check for other drives also.
- If anyone of them shows more than the required amount under the same column, then it needs to be defragmented.
Third-Party Disk Defragmenters and Schedulers for Windows
While Windows includes a built-in disk defragmentation tool, several third-party options offer additional features and more advanced customization. Here are some popular third-party disk defragmenters for Windows:
1. Auslogics Disk Defrag
Auslogics Disk Defrag is a powerful tool that works with all versions of Windows. It offers features like automatic and scheduled defragmentation, SSD optimization, file prioritization, and boot-time defragmentation. It also provides detailed reports on the defragmentation process.
- Automatic and scheduled defragmentation
- Disk optimization for SSDs and HDDs
- File prioritization for faster access to frequently used files
- Boot-time defragmentation for system files
- Defragmentation of individual files or folders
Auslogics Disk Defrag also provides a user-friendly interface and detailed reports on the defragmentation process.
2. O&O Defrag
O&O Defrag supports Windows 7, 8, 10, and 11. It includes features like SSD optimization with TRIM support. It also prioritizes frequently used files. Furthermore, there is a “ScreenSaver Mode” that defragments your hard drive while your computer is idle.
- Automatic and scheduled defragmentation
- SSD optimization with TRIM support
- Prioritization of frequently used files
- Defragmentation of individual files or folders
- Detailed analysis and reporting
O&O Defrag also includes a “ScreenSaver Mode” that allows you to defragment your hard drive while your computer is idle.
3. UltraDefrag
UltraDefrag is a free and open-source tool that offers automatic and scheduled defragmentation, SSD optimization, and boot-time defragmentation. It also supports command-line operations, making it ideal for advanced users.
- Automatic and scheduled defragmentation
- SSD optimization with TRIM support
- Defragmentation of individual files or folders
- Boot-time defragmentation for system files
- Detailed analysis and reporting
UltraDefrag also supports command-line operations, which can be helpful for advanced users and system administrators.
4. Defraggler
Defraggler, developed by Piriform, is a lightweight tool. It is easy to use. It offers automatic and scheduled defragmentation. SSD optimization is included. Additionally, it provides detailed analysis and reporting.
- Automatic and scheduled defragmentation
- SSD optimization with TRIM support
- Defragmentation of individual files or folders
- Detailed analysis and reporting
- Compact user interface
Defraggler is a lightweight and easy-to-use tool. It can be a good choice for users who want a simple disk defragmentation solution.
5. Smart Defrag
Smart Defrag 9 is a powerful utility designed to keep your hard drives running at peak performance. It offers features like automatic and scheduled defragmentation. It also includes SSD optimization and a “Smart Placement” feature that intelligently places files based on their usage patterns.
- Automatic and scheduled defragmentation
- SSD optimization with TRIM support
- File prioritization for faster access to frequently used files
- Boot-time defragmentation for system files
- Defragmentation of individual files or folders
Smart Defrag also includes a “Smart Placement” feature. It intelligently places files based on their usage patterns. This further improves overall system performance.
These third-party disk defragmentation tools offer additional features and customization options compared to the built-in Windows tool. However, it’s essential to research thoroughly. Choose a reputable tool from a trusted source. This ensures the safety and integrity of your data.
Frequently Asked Questions (FAQs)
How often should I defragment/optimize my hard drive?
There’s no one-size-fits-all answer, but a general guideline is to defragment/optimize your hard drive every month or when the fragmentation level reaches 10% or higher.
Does defragmentation/optimization affect my files or data?
No, defragmentation/optimization does not modify or delete your files or data. It simply reorganizes the existing files on your hard drive for better performance.
Can I use my computer while defragmentation/optimization is running?
Yes, you can use your computer during the process, but you may notice a slight performance decrease as the system is working on optimizing the hard drive.
Is defragmentation necessary for solid-state drives (SSDs)?
Traditional defragmentation is not necessary for SSDs, as they don’t suffer from fragmentation like conventional hard disk drives (HDDs). However, Windows optimizes SSDs using the TRIM command, which helps maintain their performance.
Will defragmentation/optimization improve my computer’s startup time?
Defragmentation/optimization can improve your computer’s startup time by reorganizing system files and programs that are loaded during the boot process. However, the improvement may be marginal, especially if your hard drive is already reasonably defragmented/optimized.
Final words on Scheduling Disk Defragmentation in Windows
By scheduling disk defragmentation/optimization in Windows, you can ensure peak performance of your hard drive. This process keeps it optimized without manual intervention. Regular defragmentation/optimization can extend the life of your hard drive and keep your computer running smoothly. Whether you use the built-in Windows tool or choose a third-party solution, it is beneficial to schedule this maintenance task. This effort will pay off in the long run.
So, no need to call your system admin or visit a computer repair shop to speed up your PC. Follow the steps in this guide. You’ll be on your way to maintaining a fast and efficient computer. If you’re using Windows Vista, 7, 8, 10, or 11, you can easily schedule disk defragmentation. This helps you enjoy the benefits of a well-optimized system.