
Losing important files can be a nightmare, especially when they contain precious memories or critical work documents. Fortunately, tools like Recuva can help you recover deleted files quickly and efficiently. In this comprehensive guide, we’ll explore everything you need to know about Recuva. This includes its features, how it works, and step-by-step instructions on how to use it to recover your lost data.

There are many data recovery software programs on the market. Most of them require payment. However, there are also free programs like this. This is free data recovery software that can recover deleted data (documents, videos, photos, music, etc.) from hard drives, memory cards, flash drives, or any removable media. In this article, we will explore Recuva’s features. We will explain how it works. Additionally, we will provide step-by-step instructions on using it effectively for file recovery.
What is Recuva?
Recuva is a powerful and user-friendly file recovery software. It is developed by Piriform, the same company behind popular tools like CCleaner and Defraggler. It is designed to help users recover deleted files. This includes data from various storage devices such as hard drives, USB drives, and memory cards. There are other options as well. If you’ve accidentally deleted a file, Recuva can help you retrieve your lost files. It also assists if you have formatted a drive or lost data due to a system crash.
Key Features of Recuva
- Fast and Lightweight: Recuva is fast and tiny. It takes only seconds to run. This makes it an efficient tool for file recovery.
- Deep Scan Mode: Recuva provides a deep scan option. It thoroughly searches the entire storage device, including unallocated space, for recoverable files. This feature is particularly useful when dealing with formatted drives or when a quick scan doesn’t yield the desired results.
- File Recovery Options: Recuva allows you to customize your file recovery by providing options to filter the results. You can recover files in specific formats or narrow the search by selecting a location on the storage device.
- Secure File Deletion: In addition to file recovery, Recuva also offers a secure deletion feature. This allows you to permanently delete sensitive files, ensuring they cannot be recovered. Recuva provides different secure deletion methods, including overwriting files with random data multiple times.
- User-Friendly Interface: Recuva’s interface is simple and intuitive, making it easy for even novice users to recover lost files. The software offers both a List view and a Tree view. This allows you to browse through recoverable files and folders easily.
- Portable Version: Recuva also comes in a portable version, which can be run from a USB thumb drive. This is particularly useful if you need to recover data from a computer that cannot boot up.
- Wide Range of Supported File Systems: Recuva supports several file systems. These include FAT12, FAT16, FAT32, exFAT, NTFS, NTFS5, and NTFS + EFS. This makes it compatible with a wide range of storage devices.
Recuva Overview
Reviewed by: Satish Ithamsetty
Recuva is a popular free file recovery tool from the makers of CCleaner. It allows users to recover deleted files from their Windows computer, external drives, memory cards, and more. It offers an easy-to-use interface. It can recover a wide variety of file types. The tool is effective even on damaged or formatted drives using its deep scan mode.
⭐⭐⭐⭐⭐
- Overall rating: 4.9/5
- Pricing: FREE
Pros
- Completely free for basic file recovery
- Supports unlimited file recoveries
- Can recover from damaged/formatted drives
- Deep scan mode to find remnants of deleted files
- Secure file deletion option
Cons
- Limited functionality in the free version compared to paid versions
- Cannot recover as many files as some higher-end data recovery tools
- No technical support for the free version
- Potential security risks if used by malicious actors to recover sensitive deleted files
It is available in free and professional versions and offers a wide range of features to suit different user needs.
How Recuva Works
When a file is deleted from your computer or storage device, it is not immediately removed from the storage medium. Instead, the file’s reference is removed from the file system, marking the space it occupied as available for reuse. The actual data remains on the storage device until it is overwritten by new data.
Recuva utilizes advanced algorithms to scan the storage device and locate these deleted files. It searches through the unallocated space on the drive and identifies recoverable files based on their unique signatures. This allows Recuva to recover files even if they have been deleted from the Recycle Bin. It can also recover files if the drive has been formatted.
The Importance of Acting Quickly
One of the most critical factors in successful file recovery is acting quickly. When you realize that you’ve lost important files, it’s essential to stop using the affected drive immediately. Continued use of the drive can overwrite the deleted files with new data. This makes recovery much more difficult or even impossible.
To maximize the chances of successful recovery, do not write new data to the drive. Wait until you have completed the recovery process. If you need to recover data from a hard drive, use Recuva. Choose its portable version. Run it from a USB flash drive. This way, you avoid using the disk from which you want to recover the data.
Step-by-Step Guide to Recovering Deleted Files with Recuva
Now that you understand how Recuva works, let’s walk through the process of recovering deleted files using this powerful tool.
Step 1: Download and Install Recuva
- Visit the Official Website: Open your web browser and visit the official Recuva website.
- Download the Software: Click on the “Download” button to start the download process. Recuva is available in both free and professional versions, so choose the one that best suits your needs.
- Install Recuva: Once the download is complete, locate the setup file (recuva.exe) and double-click on it to start the installation process. Follow the on-screen instructions to complete the installation.
Step 2: Launch Recuva and Start the Recovery Process
Open Recuva: After installation, launch Recuva by double-clicking on the desktop icon or searching for it in the Start menu.
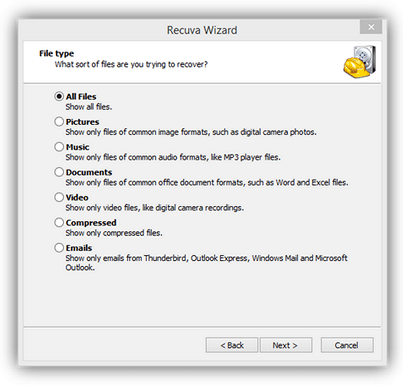
Choose the File Type: When Recuva starts, a wizard will appear. It will ask you to select the type of files you want to recover. You can choose from options like pictures, music, documents, videos, emails, or all files. If you’re unsure, leave the default selection to recover all file types.
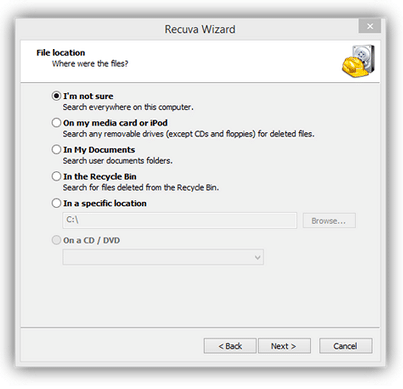
Select the Location: Next, choose the location where the deleted files were stored. This could be your computer’s hard drive, an external USB drive, or a memory card. If you’re unsure, you can select “I’m not sure” and Recuva will search all drives.
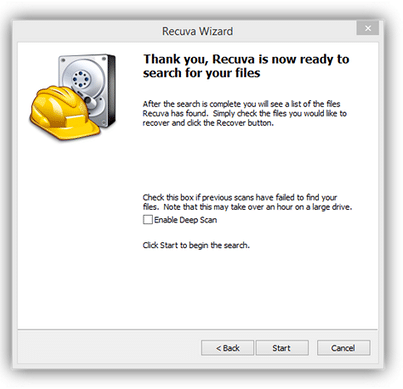
Step 3: Initiate the Scan
Start the Scan: Once you’ve selected the file type and location, click on the “Start” button to begin the scan. Recuva will start searching for deleted files in the selected location.

Monitor the Progress: You can monitor the scan’s progress in real-time. Depending on the size of the drive and the number of files, the scanning process may take some time. Recuva will display the files it finds as the scan progresses.
Step 4: Preview and Recover Files
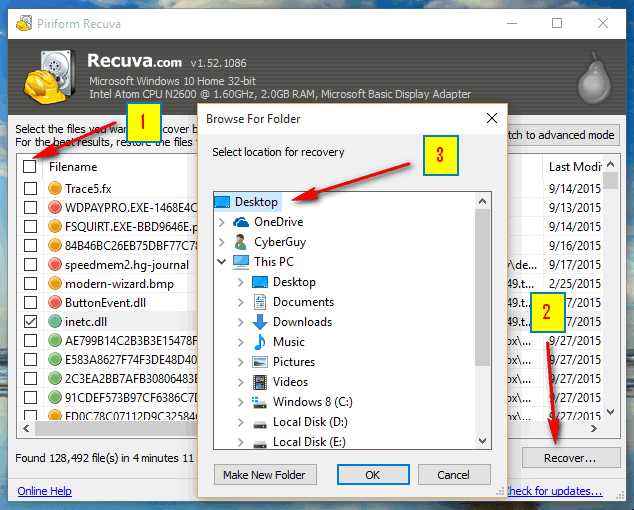
- Review the Results: Once the scan is complete, Recuva will display a list of recoverable files. You can browse through the files and folders to locate the ones you want to recover.
- Select Files for Recovery: Check the boxes next to the files you wish to recover. You can use the “Switch to Advanced Mode” option to get more detailed information about each file. This includes its recovery chance and file path.
- Choose a Recovery Location: Select a location on your computer. You can also use an external drive. This is where you want to save the recovered files. It’s important to choose a different drive than the one you’re recovering from to avoid overwriting the deleted files.
- Recover the Files: Click on the “Recover” button to initiate the file recovery process. Recuva will restore the selected files to the specified location. Once the recovery is complete, you can access your files as usual.
Step 5: Secure Deletion of Files (Optional)
If you want to permanently delete sensitive files, Recuva offers a secure deletion feature. This ensures they cannot be recovered. Here’s how to use it:
- Open Recuva and Select Files: Launch Recuva and select the files or folders you want to delete securely.
- Enable Secure Deletion: Click on the “Options” button at the top-right corner and select “Secure Deletion.” Check the box next to “Enable secure file deletion.”
- Choose the Overwrite Method: Click on the “Secure Overwrite” drop-down menu to choose the overwrite method. The more passes you select, the more secure the deletion will be. However, more passes also mean a longer deletion process.
- Permanently Delete Files: After selecting the files and the overwrite method, click the “Secure Delete” button. Recuva will ask for confirmation before proceeding. Click “OK” to permanently delete the selected files.
Tips for Successful File Recovery with Recuva
To maximize the chances of successful file recovery using Recuva, consider the following tips:
- Stop Using the Drive Immediately: When files are deleted, stop using the drive immediately. Continued use can overwrite the space previously occupied by the deleted files, making recovery more difficult.
- Use Deep Scan for Comprehensive Recovery: If a quick scan does not find your files, try the deep scan option. It takes longer but offers a more thorough search, especially for formatted drives or files with damaged systems.
- Save Recovered Files to a Different Drive: To prevent accidentally overwriting the lost files, save the recovered files to another location. Use a different drive to ensure safety. You can also use an external storage device.
Recuva Free vs. Recuva Professional
Recuva is available in both free and professional versions. While the free version offers robust file recovery capabilities, the professional version includes additional features and benefits. Here’s a comparison of the two:
Recuva Free
- Completely Free: The free version of Recuva is available at no cost and offers basic file recovery features.
- Unlimited File Recoveries: You can recover an unlimited number of files with the free version.
- Deep Scan Mode: The free version includes the deep scan mode for more thorough searches.
- Secure File Deletion: You can securely delete files to ensure they cannot be recovered.
Recuva Professional
- Virtual Hard Drive Support: The professional version supports virtual hard drives, allowing you to recover files from virtual machines.
- Automatic Updates: The professional version includes automatic updates, ensuring you always have the latest features and improvements.
- Premium Customer Support: Professional users have access to premium customer support for assistance with any issues.
- Advanced File Recovery Options: The professional version offers several advanced file recovery options. It includes the ability to recover files from more complex scenarios.
Pricing and Licensing
Recuva Professional is available as a yearly subscription. The pricing may vary depending on your region and currency. Visit the official Recuva website to learn more about the pricing and licensing details.
Frequently Asked Questions (FAQs)
Can Recuva recover files from formatted drives?
Yes, Recuva can recover files from formatted drives. By utilizing its deep scan feature, Recuva can search for and restore files even on drives that have been formatted.
Does Recuva work on macOS?
No, Recuva is designed specifically for Windows operating systems. However, similar file recovery programs are available for macOS, such as Disk Drill and Data Rescue.
Is Recuva safe to use?
Yes, Recuva is safe to use. It is developed by Piriform, a reputable software company known for creating reliable and secure applications. However, it’s always recommended to download software from official sources to ensure authenticity and avoid potential security risks.
Can Recuva recover deleted emails?
Recuva primarily focuses on recovering files from storage devices, so it may not be ideal for recovering deleted emails. However, you can try using specialized email recovery software or contact your email service provider for assistance in recovering deleted emails.
What should I do if Recuva cannot find my deleted files?
If Recuva cannot find your deleted files, there could be several reasons, including overwriting the files or physical damage to the storage device. In such cases, consulting professional data recovery services for further assistance is advisable.
Conclusion
Losing important files can be distressing. With Recuva, you have a powerful tool at your disposal. It helps you recover your lost data. Whether you’ve accidentally deleted files, formatted a drive, or experienced a system crash, Recuva’s capabilities are robust. Its intuitive design makes the recovery process straightforward and effective.
You can confidently recover your lost files by following the step-by-step instructions outlined in this guide. You will regain access to valuable data. Don’t let data loss keep you down—get Recuva today and ensure your files are always within your reach.
Recuva Free Data Recovery Software Review

Recuva is a popular free file recovery tool from the makers of CCleaner that allows users to recover deleted files from their Windows computer, external drives, memory cards, and more. It has an easy-to-use interface and can recover a wide variety of file types even from damaged or formatted drives, using its deep scan mode.
Product SKU: Recuva
Product Brand: Recuva
Product Price: FREE
Product In-Stock: InStock
5
Recuva is equipped with powerful features and a user-friendly design. It is an essential tool for anyone who wants to protect their data. It allows for quick and efficient recovery of lost files. Whether you’re a casual user or a professional, Recuva provides the necessary tools. It ensures that your files are always safe and recoverable.


Hi,
Nice article shared here…
Now technology has made things so much easier for us.
The steps that you have shared above will help so many people like me in retrieving data without any hassle who are not at all tech savvy.
Good Read!!