Keeping your computer’s date and time accurate is essential for many reasons. It ensures system updates run smoothly. It also maintains security protocols. Whether you’re using Windows 10 or the newer Windows 11, adjusting the date and time is a straightforward process. This guide will walk you through the steps for both operating systems. It will cover automatic and manual settings. You’ll also learn about time zone adjustments and more.
Why Is It Important to Have the Correct Date and Time?
Before diving into the steps, let’s briefly discuss why having the correct date and time is crucial:
- System Updates: Windows updates and software installations often rely on accurate time settings. An incorrect date or time could cause update failures or errors.
- Security: Many security protocols, such as SSL certificates and two-factor authentication, depend on precise timekeeping. An incorrect clock could compromise your system’s security.
- Synchronization: If you use cloud services, email, or collaborate with others, you need the correct time. It ensures that all actions are synchronized across devices and platforms.
- Notifications: Time-sensitive notifications, such as calendar reminders or alarms, rely on your system’s clock. An incorrect time could lead to missed appointments or deadlines.
We’ve covered the importance of accurate timekeeping. Now, let’s explore how to change the date and time in Windows 10. We’ll also look into how to do it in Windows 11.
How to Change the Date and Time in Windows 10
Windows 10 offers a variety of ways to manage your date and time settings. Use these methods for scheduling updates. Ensure time-sensitive notifications are accurate. Keep your system in sync with the world using these options. This guide will walk you through everything you need to know about changing the date and time in Windows 10. It includes automatic and manual adjustments. Learn how to change time zones and adjust formatting. You can even add clocks from different time zones.
How to Automatically Set the Date and Time in Windows 10
The simplest method for ensuring your system has the correct date and time is letting Windows 10 set it automatically. This method requires an internet connection, but it ensures that your time is accurate down to the second. Here’s how to enable automatic time settings:
- Open the Settings App: Press Win + I to open the Settings app.
- Go to Time & Language: Select Time & Language > Date & Time.
- Enable Automatic Time Settings: Toggle the switch next to Set time automatically to the On position.
- Enable Automatic Time Zone: Similarly, toggle the switch next to Set time zone automatically to On. This is especially important if you travel frequently or live in an area that observes daylight saving time.
- Adjust for Daylight Saving Time: If applicable, ensure that Adjust for daylight saving time automatically is enabled. This ensures your clock adjusts correctly during seasonal changes.
By enabling these automatic settings, Windows 10 will sync with internet time servers to keep your system clock accurate.
How to Manually Change the Date and Time in Windows 10
There may be situations where you need to manually adjust the date and time. This could be necessary when you’re offline. You might also need to set a specific time for testing purposes. Here’s how to manually change the date and time in Windows 10:
- Open the Settings App: Press Win + I to open the Settings app.
- Go to Time & Language: Select Time & Language > Date & Time.
- Disable Automatic Settings: Turn off the switches for Set time automatically and Set time zone automatically.
- Click the Change Button: Under Change date and time, click the Change button.
- Set the New Date and Time: A new window will appear, allowing you to adjust the date and time. Use the drop-down menus and fields to set the correct values.
- Confirm Changes: Once you’ve made the adjustments, click Change to save the new settings.

After completing these steps, your system clock will reflect the new date and time you’ve set.
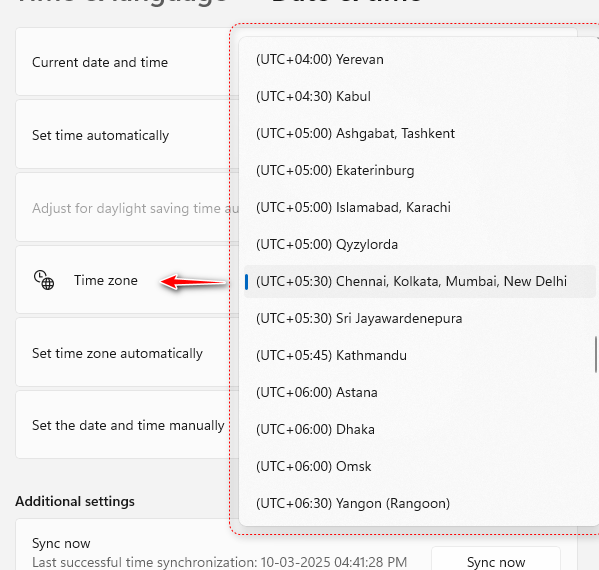
How to Change Your Time Zone in Windows 10
If you’ve moved to a new location or are traveling, you may need to change your time zone. Windows 10 makes it easy to adjust your time zone settings. Here’s how:
- Open the Settings App: Press
Win + Ito open the Settings app. - Go to Time & Language: Select Time & Language > Date & Time.
- Disable Automatic Time Zone: Turn off the switch for Set time zone automatically.
- Select a New Time Zone: Click the Time zone drop-down menu and select your new time zone. If you’re unsure which time zone to choose, look for the closest major city in the provided list.
- Enable Daylight Saving Time (if applicable): Check if your region observes daylight saving time. If it does, make sure to enable Adjust for daylight saving time automatically.
By changing your time zone, you ensure that your system clock reflects the local time. This is especially important for scheduling and communication.
How to Change the Date and Time Format in Windows 10
Windows 10 allows you to customize how the date and time are displayed. This is particularly useful if you prefer a specific format. It is also beneficial if you’ve moved to a country with different date and time conventions. Here’s how to change the date and time format:
- Open the Settings App: Press Win + I to open the Settings app.
- Go to Time & Language: Select Time & Language > Language & Region
- Click on Region: In the sidebar, click Region.
- Change Data Formats: Under Regional format data, click Change formats.
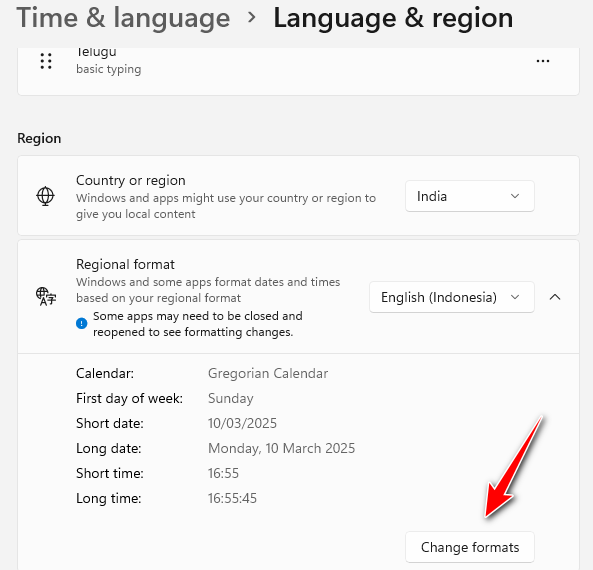
- Adjust Date and Time Formats: You’ll see options to adjust both short and long date and time formats. Customize these settings to your preference.
- Save Changes: Once you’ve made your adjustments, the changes will be applied automatically.
This feature is especially useful for users who work in international environments. It is also beneficial for those who prefer a specific date and time format.
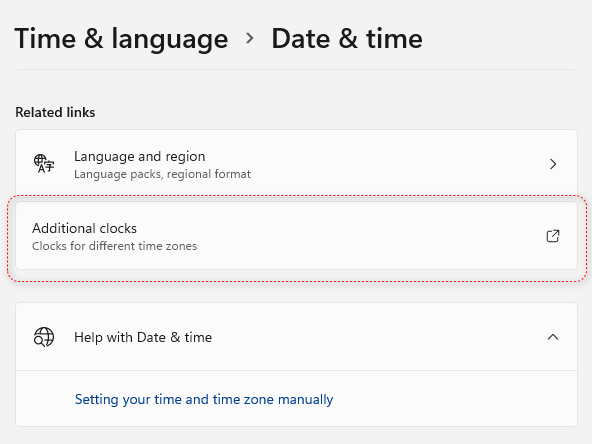
How to Add Clocks from Different Time Zones in Windows 10
You may work with people in different parts of the world. Maybe you frequently travel. In either case, you may find it helpful to add clocks from different time zones to your Windows 10 system. This allows you to quickly check the time in other regions without having to manually calculate time differences. Here’s how to add additional clocks:
- Open the Settings App: Press
Win + Ito open the Settings app. - Go to Time & Language: Select Time & Language > Date & Time.
- Add Additional Clocks: Scroll down and click Add clocks for different time zones.
- Enable Additional Clocks: Under the Additional Clocks tab, check the box next to Show this clock. Do this for each extra clock you want to add.
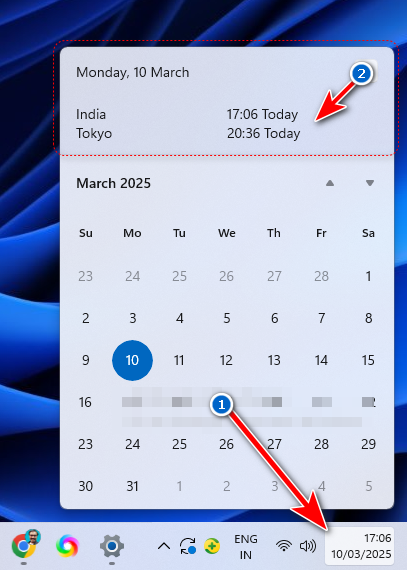
- Select Time Zones: Pick a time zone for each clock and give it a display name. For instance, if you have colleagues in Tokyo, label a clock as “Tokyo.” Then set it to Japan Standard Time.
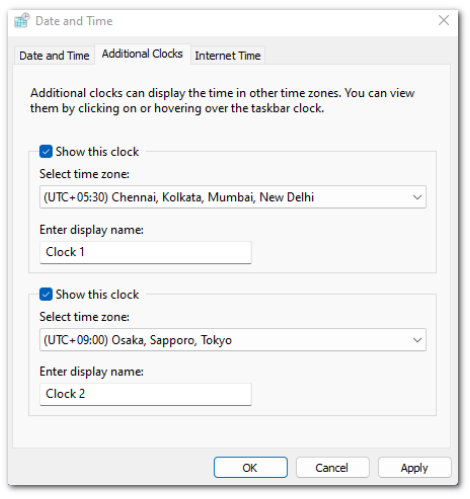
- Apply Changes: Click OK to save your settings.
Once you’ve added additional clocks, you can quickly view the time in different time zones. Do this by clicking on the clock in the taskbar.
How to Change the Date and Time in Windows 11
Windows 11, the latest operating system from Microsoft, brings a fresh and modern interface along with new features and improvements. One of the essential tasks you may need to perform is changing the date and time settings. Whether you’re traveling, troubleshooting, or you simply prefer manual control over your system clock, this guide will help you. It will walk you through how to change the date and time in Windows 11.
How to Automatically Set the Date and Time in Windows 11
The simplest method to keep your system’s date and time correct is by allowing Windows 11 to set it automatically. This method requires an internet connection, but it ensures that your time is accurate down to the second. Here’s how to enable automatic time settings:
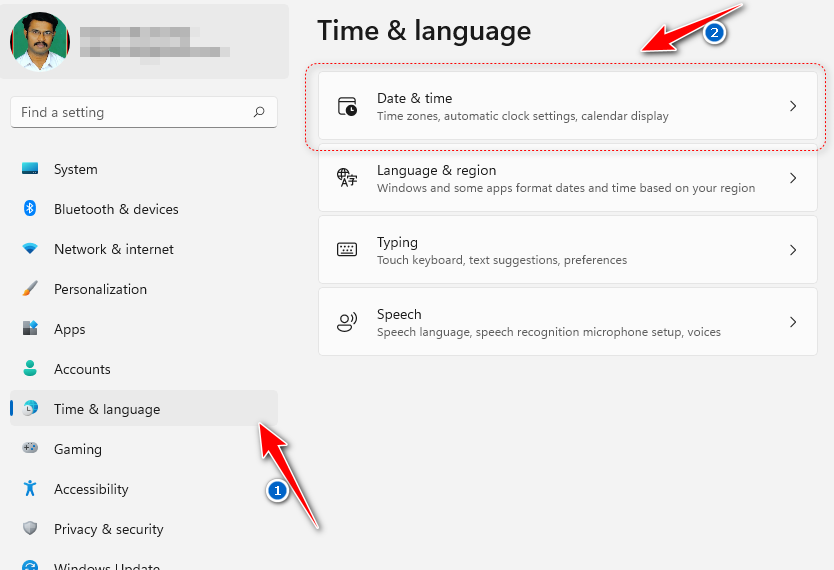
- Open the Settings App: Press
Win + Ito open the Settings app. - Go to Time & Language: Select Time & Language > Date & Time.
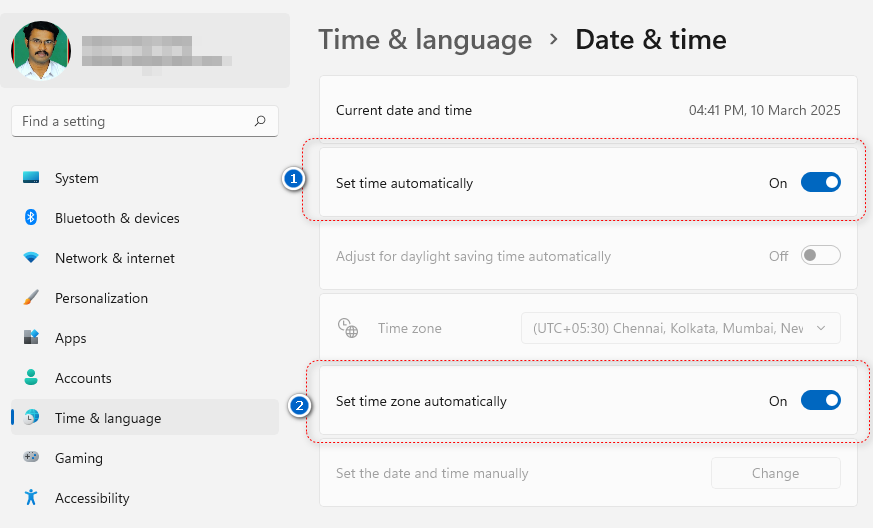
- Enable Automatic Time Settings: Toggle the switch next to Set time automatically to the On position.
- Enable Automatic Time Zone: Similarly, toggle the switch next to Set time zone automatically to On. This is especially important if you travel frequently or live in an area that observes daylight saving time.
- Adjust for Daylight Saving Time: If applicable, ensure that Adjust for daylight saving time automatically is enabled. This ensures your clock adjusts correctly during seasonal changes.
By enabling these automatic settings, Windows 11 will sync with internet time servers to keep your system clock accurate.
How to Manually Change the Date and Time in Windows 11
You might need to manually adjust the date and time in specific situations. This could happen when you’re offline. You may also need to set a specific time for testing purposes. Here’s how to manually change the date and time in Windows 11:
- Open the Settings App: Press
Win + Ito open the Settings app. - Go to Time & Language: Select Time & Language > Date & Time.
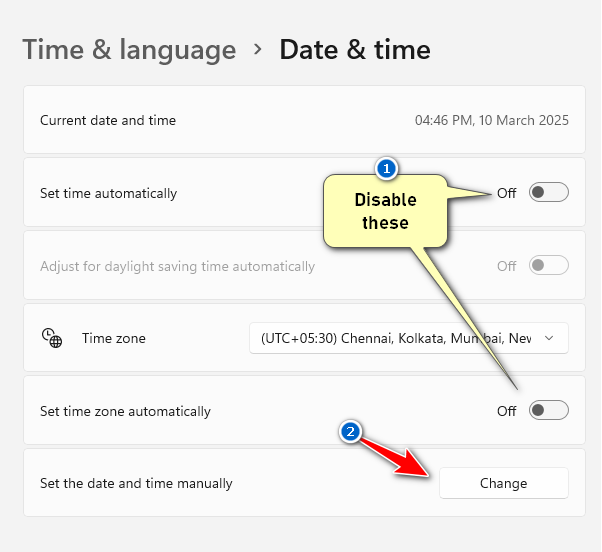
- Disable Automatic Settings: Turn off the switches for Set time automatically and Set time zone automatically.
- Click the Change Button: Under Set the date and time manually, click the Change button.
- Set the New Date and Time: A new window will appear, allowing you to adjust the date and time. Use the drop-down menus and fields to set the correct values.
- Confirm Changes: Once you’ve made the adjustments, click Change to save the new settings.
After completing these steps, your system clock will reflect the new date and time you’ve set.
How to Change Your Time Zone in Windows 11
If you’ve moved to a new location or are traveling, you may need to change your time zone. Windows 11 makes it easy to adjust your time zone settings. Here’s how:
- Open the Settings App: Press
Win + Ito open the Settings app. - Go to Time & Language: Select Time & Language > Date & Time.
- Disable Automatic Time Zone: Turn off the switch for Set time zone automatically.
- Select a New Time Zone: Click the Time zone drop-down menu and select your new time zone. If you’re unsure which time zone to choose, look for the closest major city in the provided list.
- Enable Daylight Saving Time (if applicable): If your region observes daylight saving time, ensure that it is enabled. Make sure that Adjust for daylight saving time automatically is enabled.
By changing your time zone, you ensure that your system clock reflects the local time. This is especially important for scheduling. It also aids in communication.
How to Change the Date and Time Format in Windows 11
Windows 11 allows you to customize how the date and time are displayed. This is particularly useful if you prefer a specific format. It is also helpful if you’ve moved to a country with different date and time conventions. Here’s how to change the date and time format:
- Open the Settings App: Press
Win + Ito open the Settings app. - Go to Time & Language: Select Time & Language.
- Click on Language & Region: In the sidebar, click Language & Region.
- Change Regional Format: Under Regional format, click the drop-down menu and select your preferred format. You can also click Change formats to customize the short and long date and time formats.
- Save Changes: Once you’ve made your adjustments, the changes will be applied automatically.
This feature is especially useful for users in international environments. It is also beneficial for those who prefer a specific date and time format.
How to Add Clocks from Different Time Zones in Windows 11
If you work with people globally, it may be helpful to add clocks from different time zones. This feature can be added to your Windows 11 system. You may also find it useful if you frequently travel. This allows you to quickly check the time in other regions without having to manually calculate time differences. Here’s how to add additional clocks:
- Open the Settings App: Press
Win + Ito open the Settings app. - Go to Time & Language: Select Time & Language > Date & Time.
- Add Additional Clocks: Scroll down and click Add clocks for different time zones.
- Enable Additional Clocks: Under the Additional Clocks tab, check the box next to Show this clock. Do this for each extra clock you want to add.
- Select Time Zones: Pick a time zone for each clock and give it a display name. For example, you might have colleagues in Tokyo. You could label a clock as “Tokyo” and set it to Japan Standard Time.
- Apply Changes: Click OK to save your settings.
First, add additional clocks. Then you can click on the clock in the taskbar. This allows you to quickly view the time in different time zones.
Troubleshooting Common Date and Time Issues in Windows 10 and 11
Windows 10 and Windows 11 generally do a good job of keeping your date and time accurate. However, there are some common issues that users may encounter. Here are a few troubleshooting tips:
- Incorrect Time After Traveling: You’ve traveled to a new time zone. If your clock hasn’t updated automatically, make sure that Set time zone automatically is enabled. If it’s already on, try turning it off and then back on again to force a refresh.
- Daylight Saving Time Not Adjusting: If your clock doesn’t adjust for daylight saving time, check if the option is enabled. The option to Adjust for daylight saving time automatically should be turned on. If this option is enabled and the issue persists, you may need to manually adjust the time.
- Time Not Syncing with Internet Servers:If your time isn’t syncing with internet time servers, check your internet connection. If you’re connected but still having issues, try syncing the time manually. Open the Control Panel. Navigate to Clock and Region, then Date and Time. Go to Internet Time and Change settings. Finally, click Update now.
- Incorrect Date and Time After a BIOS Update: Sometimes, a BIOS update can reset your system clock. If this happens, simply follow the steps above to manually set the correct date and time.
Final words on how to change the Date and Time in your Windows 10 and 11
Changing the date and time in both Windows 10 and Windows 11 is simple. You can choose automatic synchronization or manual control. Follow the steps outlined in this guide to ensure your system clock is always accurate. This is true no matter where you are or what your needs are.
Both operating systems offer a variety of options to help you stay on track. You can adjust time zones. You can also add additional clocks. Whether you travel often or collaborate with international teams, mastering these date and time settings is crucial. It will help you stay organized. If you simply want to keep your system running smoothly, it will help you remain efficient.