Running out of storage on your Windows PC can be frustrating, especially when your C: drive starts showing a low disk space warning. When there isn’t enough free storage available, Windows may have difficulty installing updates, saving files, running applications, or completing routine system tasks. In some cases, a nearly full drive can also contribute to slower system performance.
If you’re wondering how to free up disk space in Windows 11, the good news is that you don’t need to delete your important photos, documents, apps, or other personal files blindly. Windows includes several built-in tools that can help you identify what’s using your storage and safely remove unnecessary data. You can also free up space on your C drive by deleting temporary files, cleaning up Windows Update files, removing unused apps, and managing large files.
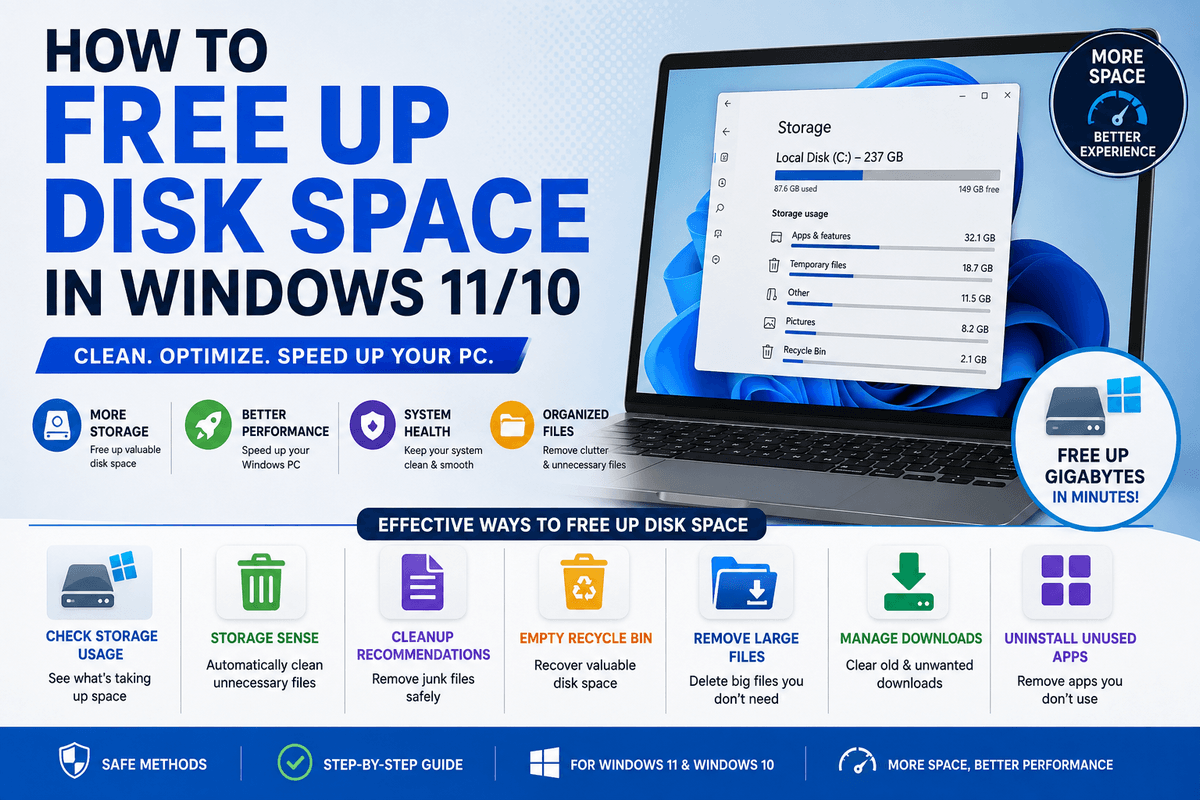
In this guide, we’ll show you how to free up disk space in Windows 11, with Windows 10 instructions where they still apply. You’ll learn how to use Storage Sense, Cleanup Recommendations, and Disk Cleanup; find large files; clean the Downloads folder; empty the Recycle Bin; uninstall apps you no longer use; and manage files stored locally by OneDrive.
We’ll also cover advanced ways to reclaim storage, including removing the Windows.old folder, managing hiberfil.sys, reducing unnecessary system Restore storage, and free up space when Windows says there isn’t enough room for an update.
Most importantly, this guide focuses on safe ways to free up disk space without deleting important files. Before removing personal files or changing advanced Windows settings, we’ll explain what each option does and what you should check first.
Quick Answer: How Do I Free Up Disk Space in Windows?
The quickest way to free up disk space in Windows 11 is to open Settings > System > Storage > Cleanup recommendations and remove unnecessary temporary files, large or unused files, and apps you no longer need. You can also enable Storage Sense to automatically clean up temporary files and other unnecessary data.
For a deeper cleanup, use Disk Cleanup to remove Windows system files, empty the Recycle Bin, and check folders such as Downloads for large files you no longer need. If OneDrive is using significant local storage, OneDrive Files On-Demand can help keep files in the cloud without storing every file on your PC.
Here are the most effective ways to free up space on your C drive:
- Run Cleanup Recommendations: Go to Settings > System > Storage > Cleanup recommendations to delete temporary and unused files.
- Empty the Recycle Bin: Right-click the desktop icon and select Empty Recycle Bin.
- Turn on Storage Sense: Enable automatic deletion under Settings > System > Storage.
- Run Disk Cleanup: Search for Disk Cleanup, click Clean up system files, and check Windows Update Cleanup.
- Uninstall Large Apps: Sort apps by size in Settings > Apps > Installed apps.
- Clear Temp Folders: Press
Win + R, type%temp%, and delete unnecessary cache files.
If your C drive is full or Windows displays a low disk space warning, start with Cleanup Recommendations and temporary files before moving on to the advanced cleanup methods covered in this guide.
How to Check Free Disk Space in Windows
Before you start trying to free up disk space, it helps to check how much storage is available and identify what’s using the most space.
Windows 11 provides two easy ways to check your available disk space: File Explorer and the Storage settings.
Checking your storage first can help you decide whether you need to remove temporary files, uninstall apps, move large files, or use other cleanup methods.
Check Disk Space Using File Explorer
The quickest way to check your available C drive storage is through File Explorer.
- Press Windows + E to open File Explorer.
- Select This PC from the left sidebar.
- Under Devices and drives, find your Windows drive, usually labeled Local Disk (C:).
- Check the storage bar displayed below the drive.
The bar gives you a quick visual indication of how much space is being used.
Windows displays the available free space and total capacity when you select or hover over the drive.
If the C: drive is nearly full, you may see a red storage bar instead of the usual indicator.
This is a sign that your PC has limited free space, and you should consider freeing up space on the C drive.
Tip: Don’t wait until your drive is completely full. Keeping a reasonable amount of free storage gives Windows room for temporary files, updates, applications, and normal system operations.
How to Check What is Taking Up Space on C: Drive
Windows 11 provides a more detailed view of your disk usage through the Storage settings.
This is particularly useful when you want to find out what is taking up space on your Windows PC.
To view your storage usage:
- Open Settings.
- Select System.
- Click Storage.
- Wait for Windows to calculate your storage usage.
You’ll see a breakdown of the space used by different categories.
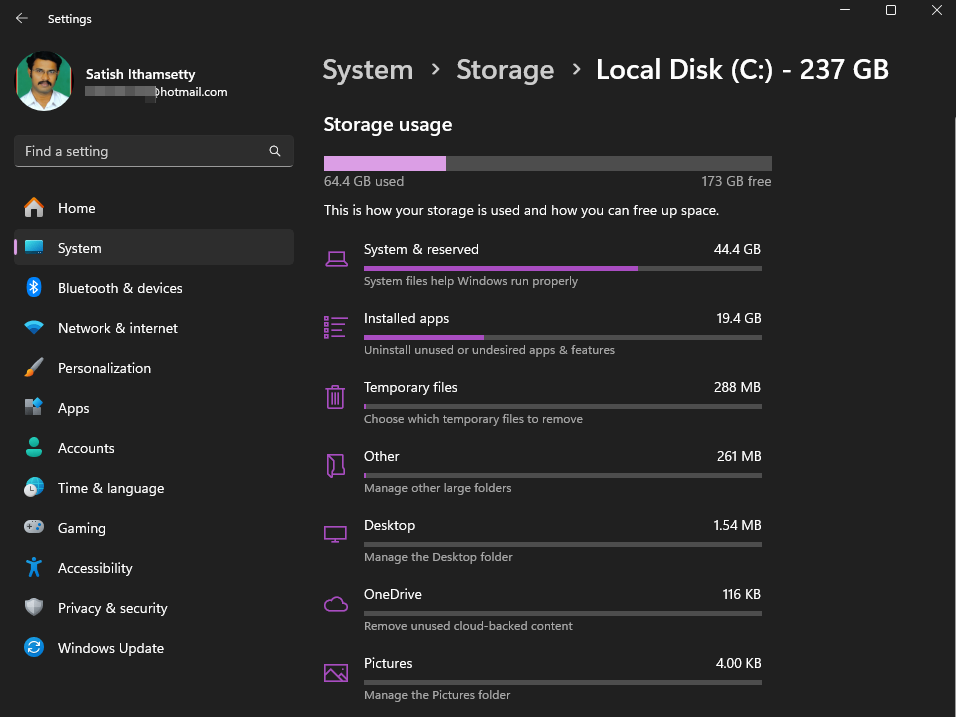
Depending on your PC and installed applications, these can include:
- Installed apps: Space used by applications and games.
- Temporary files: Temporary data, Windows Update files, thumbnails, and other removable system files.
- Documents: Files stored in your Documents folder.
- Pictures: Photos and other image files.
- Videos: Videos and other large media files.
- Other: Files and folders that don’t fit into the main storage categories.
- System & reserved: Space required by Windows and certain system components.
This storage breakdown is especially helpful if you’re experiencing a Windows low disk space warning because it shows which categories are consuming the most storage.
You can then focus your cleanup efforts instead of deleting files randomly.
How Much Free Disk Space Should You Keep?
There isn’t one fixed amount of free space that every Windows PC needs.
The amount you should keep depends on your drive capacity, installed software, workload, and how frequently you install Windows updates.
As a practical rule, try to keep at least 10–20% of your system drive free whenever possible.
For example, on a 500 GB SSD, maintaining roughly 50–100 GB of available space provides a useful buffer for Windows, applications, updates, and personal files.
Windows needs free disk space for several reasons, including:
- Installing Windows updates and security patches
- Creating temporary files
- Running applications and games
- Managing virtual memory and system files
- Completing maintenance and background tasks
- Storing temporary data during large file operations
If your storage is consistently close to full, Windows may display low-storage warnings, and you may have difficulty installing updates or large applications.
Why You Shouldn’t Completely Fill an SSD
You should also avoid filling an SSD to its maximum capacity. SSDs need some free space for efficient data management, including internal operations such as garbage collection and wear leveling. Keeping some unused capacity can help maintain consistent performance as the drive becomes heavily used.
You don’t need to obsess over a specific percentage, but leaving a healthy amount of free space is better than keeping an SSD almost completely full. If your Windows drive regularly reaches low storage, use the cleanup methods in the following sections to recover space and prevent the problem from returning.
Maintaining at least 10–20% free space helps prevent performance degradation and wear on solid-state drives; you can also check your SSD health and drive lifespan using built-in SMART attributes to ensure your drive is running optimally.
What Is Taking Up Space on Your Windows PC?
Before you start deleting files to free up disk space, it’s important to understand what is actually consuming your storage. A Windows PC can accumulate space-hungry system files, applications, personal media, cloud-synced files, backups, and temporary data over time.
On Windows 11, you can get a quick overview by going to Settings > System > Storage. Windows groups your disk usage into categories, making it easier to identify where your storage is going.
The most common storage consumers include:
- Windows system files: Windows itself requires significant storage for system components, drivers, recovery files, and other operating system data.
- Temporary files: Windows and applications create temporary data during normal operation. Some of these files can be safely removed using Windows’ built-in cleanup tools.
- Windows Update files: Downloaded update packages, previous update files, and related components can occupy considerable storage, particularly after major updates.
- Installed apps and games: Large applications and modern PC games can consume tens or even hundreds of gigabytes.
- Downloads: Old installers, ZIP archives, ISO images, documents, and downloaded videos can quietly accumulate in the Downloads folder.
- Videos and photos: Personal media files are often among the largest files on a PC, especially high-resolution videos.
- OneDrive files: Files synchronized to your PC through OneDrive can consume local storage even though they are also stored in the cloud.
- Recycle Bin: Files you delete normally remain in the Recycle Bin until it is emptied, so they continue using disk space.
- Windows.old: A previous Windows installation may be stored after an upgrade, allowing you to roll back to the previous version but potentially consuming several gigabytes.
- Hibernation file: Windows uses the
hiberfil.sysfile to support hibernation and related features. Its size can be significant on some systems. - System Restore: Restore points use a portion of your storage so Windows can restore system settings and files after certain problems.
- System and Reserved Storage: Windows reserves space for essential system operations, updates, caches, and other functions.
Identifying the largest categories first makes it much easier to free up space on your C drive without accidentally removing important files.
In rare cases where disk space depletes rapidly without obvious user activity, scan your PC to rule out common computer viruses and hidden malware that create rogue background files or bloat system logs.
How to Find Large Files in Windows 11
Large files are often the easiest place to recover significant storage. A few videos, game installers, disk images, or backup archives can consume more space than thousands of small documents.
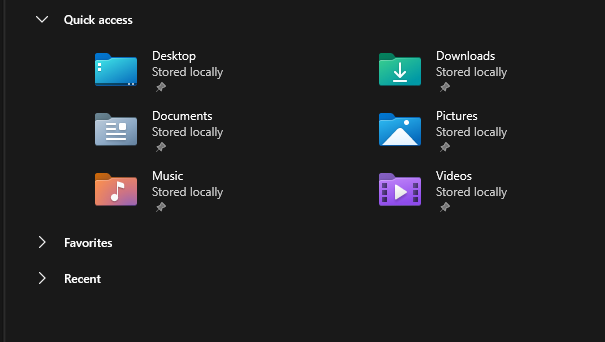
You don’t need to inspect every file manually. Start with your personal folders and sort or search for files based on their size.
Sort Files by Size
To find large files using File Explorer:
- Press Windows + E to open File Explorer.
- Navigate to a folder such as Downloads, Documents, or Videos.
- Right-click an empty area and select Sort by > Size.
- Review the largest files first.
Depending on your File Explorer view, you may also be able to use the Size column to identify large files quickly.
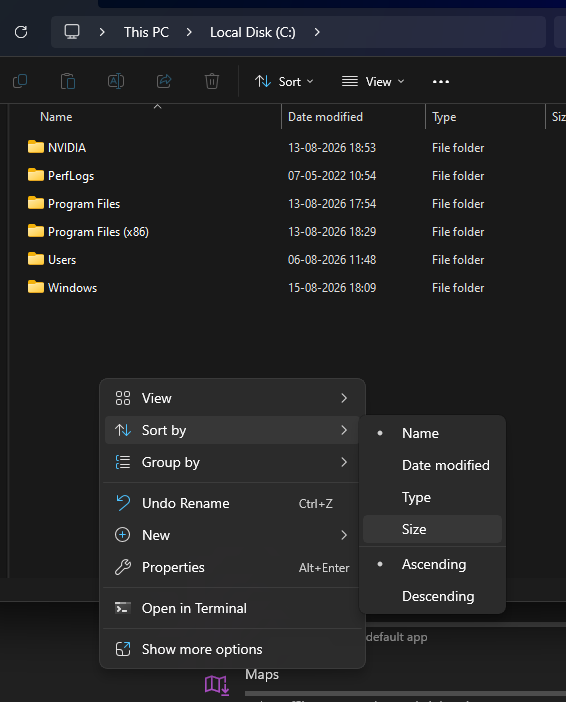
Before deleting anything, open the file or check its location and filename to make sure you no longer need it.
Search for Large Files
Windows File Explorer can also help you search for files based on their size. Open a folder or drive and use the search box to look for large files.

For example, you can search for:
size:largesize:huge
You can then review the results and determine whether the files are safe to delete or should be moved to another drive or cloud storage.
Important: Avoid deleting files simply because they are large. Large files inside Windows or application folders may be required for your system or software to work correctly.
Check the Downloads Folder
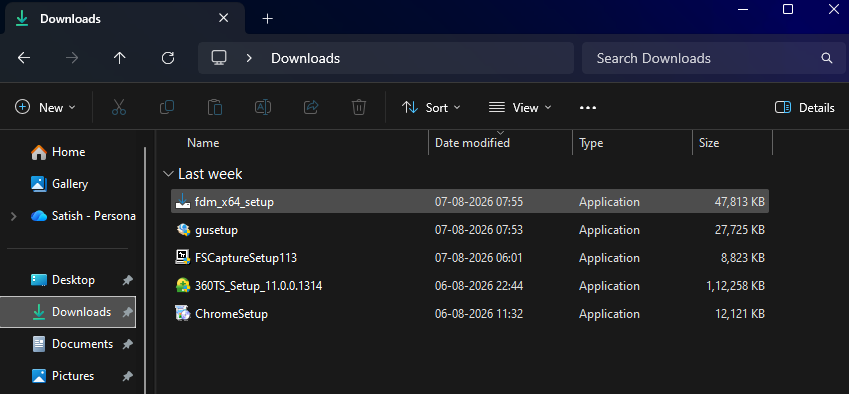
The Downloads folder is one of the first places to check when you’re trying to free up storage. It can contain old:
- Software installers
- ZIP and RAR archives
- ISO files
- PDF files
- Videos
- Images
- Documents
- Files downloaded for one-time use
Sort the folder by size and remove files you no longer need. If you want to keep a large file but don’t need it on your PC, consider moving it to an external drive or cloud storage instead.
Check the Videos Folder
Videos can consume a significant amount of disk space, particularly 4K recordings, screen recordings, movies, and edited video projects.
Review your Videos folder and look for files you have already backed up or no longer need. For important videos, make a backup before deleting the local copy.
Check the Documents Folder
Documents generally use less space than videos, but large PDFs, presentations, project files, databases, and compressed archives can still accumulate.
Sort the Documents folder by size and remove duplicate or outdated files. If you work with large project files, consider moving completed projects to another storage device.
Check the Desktop
Files saved on the Windows desktop are stored on your system drive, usually the C: drive.
Large files, installers, videos, and archives placed on the Desktop therefore consume valuable system-drive storage.
Review your Desktop regularly and move important files into an appropriate folder or another drive.
Identify Unnecessary ZIP, ISO, and Installer Files
Compressed archives and installation files can be surprisingly large. Common examples include:
.zip.rar.7z.iso.exe.msi
If you downloaded an installer, ISO image, or archive for a one-time installation and no longer need it, deleting it can quickly free up disk space.
However, don’t remove installers or ISO files that you still need for software installation, system recovery, backups, or future use.
What is the Safer Way to Clean Up Large Files
When you find a large file, ask three questions before deleting it:
- Do I still need this file?
- Is there another copy or backup?
- Would moving it to another drive or cloud storage be better than deleting it?
This approach helps you recover storage while protecting important personal data and system files. In the next sections, we’ll look at Windows’ built-in tools for safely removing unnecessary files, starting with Cleanup Recommendations.
How to Free Up Disk Space in Windows 11
If your Windows PC is running low on storage, start with the built-in cleanup features before manually deleting files.
Windows 11 includes Cleanup Recommendations, Storage Sense, and Disk Cleanup, which can help you safely identify and remove unnecessary data.
You can then recover additional space by cleaning your Downloads folder, uninstalling unused apps, moving large personal files, and using OneDrive Files On-Demand.
1. Use Cleanup Recommendations
Cleanup Recommendations is one of the easiest ways to identify files that Windows considers suitable for removal.
It analyzes your storage and presents recommendations instead of requiring you to search through system folders manually.
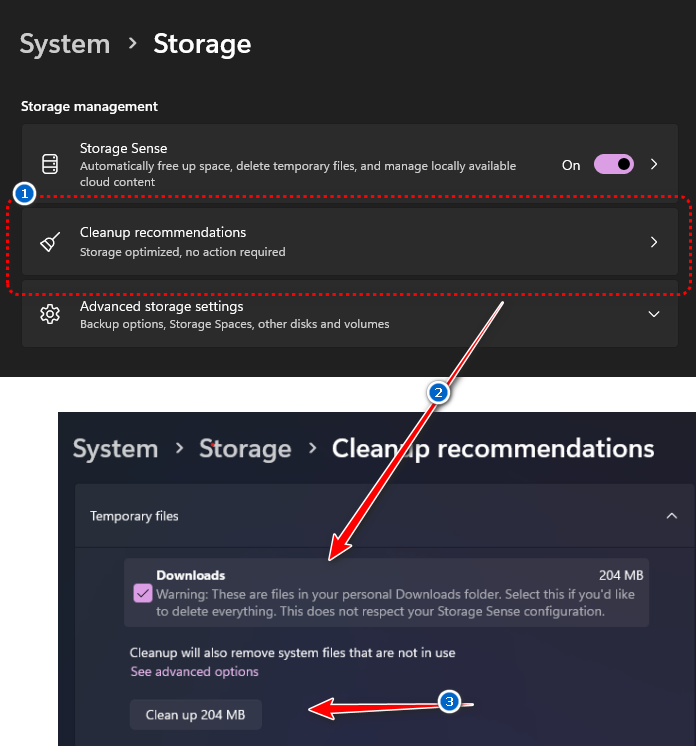
To open Cleanup Recommendations in Windows 11:
- Open Settings.
- Select System.
- Click Storage.
- Select Cleanup recommendations.
- Review the available categories.
- Select the items you want to remove.
- Click Clean up for the relevant category.
Windows can show recommendations under categories such as
- Temporary files
- Large or unused files
- Files synced to the cloud
- Unused apps
Windows also shows how much storage you can recover before you clean up the selected items.
What Is Safe to Remove?
The safest approach is to review each recommendation before deleting it. Temporary files and other clearly unnecessary system data are generally the best starting points. For personal files, such as large videos, documents, or downloads, make sure you no longer need them or have a backup before removing them.
Be particularly careful with Previous Windows installation(s). Removing these files deletes the Windows.old folder and eliminates the option to return to the previous Windows installation.
2. How to Safely Delete Windows Temporary & Cache Files
Temporary files are created by Windows and installed applications during everyday tasks. They can include cached data, installation files, update leftovers, thumbnails, error reports, and other temporary information.
Over time, these files can accumulate and consume a noticeable amount of storage. Removing unnecessary temporary data is therefore one of the simplest ways to free up disk space in Windows 11.
Common categories you may encounter include:
- Temporary files: Data created temporarily by Windows and applications.
- Windows Update Cleanup: Files left behind by Windows Update that are no longer required.
- Delivery Optimization Files: Cached update files that can sometimes be removed after they are no longer needed.
- Thumbnails: Cached previews of pictures, videos, and other files. Windows can recreate them when necessary.
- Temporary Internet files: Cached web-related data generated by Windows components or applications.
- Error reporting files: Information generated when Windows or an application encounters an error.
- Previous Windows installation(s): Files from an earlier Windows installation, when available. These can take up substantial space but should only be removed when you are sure you don’t need the rollback option.
How to Delete Temporary Files in Windows 11
The easiest method is through Windows Storage settings:
- Open Settings.
- Go to System > Storage.
- Select Temporary files.
- Wait for Windows to calculate the available cleanup options.
- Review the categories carefully.
- Select the types of files you want to remove.
- Click Remove files.
The exact categories and amount of recoverable space can vary between computers.
Tip: If you are trying to free up space quickly, check the estimated size shown beside each category. Start with the categories offering the most storage while avoiding personal files you still need.
Which Temporary Files Are Safe to Delete?
Most temporary-file categories presented by Windows’ built-in cleanup tools are intended for cleanup. However, you should still review the list before selecting everything.
- Temporary files: Generally safe to remove. Windows and applications can recreate necessary temporary data.
- Thumbnails: Generally safe to remove. Windows will recreate thumbnail previews when needed.
- Windows Update Cleanup: Generally safe to remove when offered by Windows. These files are related to previous update operations.
- Delivery Optimization Files: Generally safe to remove when Windows lists them as cleanup candidates. They are cached update-delivery data.
- Error reporting files: Usually safe to remove if you don’t need historical diagnostic information.
- Previous Windows installation(s): Remove only when you no longer need to roll back to the previous Windows version. This action cannot be undone through Windows’ normal rollback mechanism.
3. Turn On Storage Sense
Storage Sense is a built-in Windows feature that automatically manages disk space by removing certain unnecessary files. It can clean temporary files and Recycle Bin contents and can also manage locally stored cloud files according to your settings.
This makes Storage Sense particularly useful if your Windows storage keeps filling up after you perform a one-time cleanup.
What Is Storage Sense?
Storage Sense is designed to automatically reclaim storage when your Windows system drive is running low on space. By default, it can clean unnecessary temporary files and manage items in the Recycle Bin according to its configured rules.
Storage Sense works on the Windows system drive, which is normally the C: drive. If you have additional drives, Windows provides separate storage-management options for those drives.
How to Enable Storage Sense in Windows 11
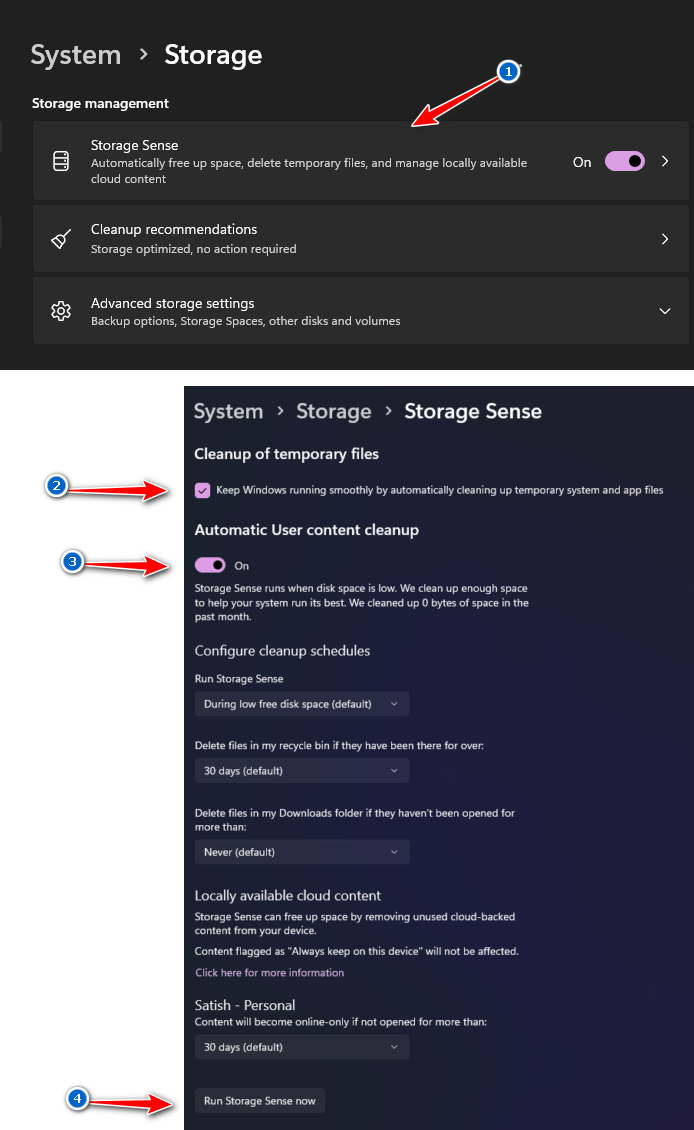
- Open Settings.
- Select System.
- Click Storage.
- Find Storage Sense.
- Turn the switch On.
Once enabled, you can customize how Windows handles automatic cleanup.
Configure Storage Sense Settings
Select Storage Sense to review its available settings.
You can configure options such as:
- Automatic cleanup: Choose how frequently Storage Sense runs.
- Temporary files: Allow Windows to remove unnecessary temporary data.
- Recycle Bin: Configure when items that have remained in the Recycle Bin are automatically removed.
- Downloads: Configure whether files that have not been opened for a specified period can be removed.
- OneDrive and cloud files: Configure when inactive locally stored cloud files can become online-only.
Be careful with the Downloads option because files you still need could be removed if they meet the configured criteria.
Does Storage Sense Delete Personal Files?
Storage Sense does not simply scan your PC and delete personal files at random. Its behavior depends on the cleanup options you configure.
By default, your Downloads folder and OneDrive cloud content are not managed unless you specifically configure Storage Sense to do so. Cloud files can also be changed to online-only rather than permanently deleted.
For example, an inactive OneDrive file can become online-only, allowing you to see it in File Explorer without keeping the complete file stored locally. You can download it again when you need it, provided you have an internet connection.
4. Run Disk Cleanup
Disk Cleanup is a long-standing Windows utility that can remove temporary and system files. Although Windows 11’s newer storage features should generally be your first choice, Disk Cleanup remains useful when you want to review additional system-file cleanup options.
How to Open Disk Cleanup
- Click the Search button on the Windows taskbar.
- Type Disk Cleanup.
- Select Disk Cleanup from the search results.
- Select the drive you want to clean, usually C:.
- Click OK.
Windows will calculate how much space can potentially be recovered.
How to Clean Up System Files
For a deeper cleanup:
- Open Disk Cleanup.
- Select your Windows drive.
- Click Clean up system files.
- Select the drive again if prompted.
- Review the available categories.
- Select the files you want to remove.
- Click OK.
- Confirm by selecting Delete Files.
Depending on your system, you may see options such as
- Windows Update Cleanup
- Delivery Optimization Files
- Temporary files
- Thumbnails
- Recycle Bin
- Previous Windows installations
The available categories vary depending on your Windows version, update history, and system configuration.
While modern SSDs handle data optimization automatically, mechanical hard drive users can also benefit from scheduling disk defragmentation in Windows alongside regular junk file cleanups.
Is Disk Cleanup Safe?
Yes, Disk Cleanup is a Microsoft-provided Windows utility, and the files it lists are specifically presented as cleanup candidates. However, you should still understand what each category does before deleting it.
The most important item to consider is Previous Windows installation(s). Removing it can delete Windows.old and prevent you from rolling back to the previous Windows installation.
If deep system bloat or corrupted update repositories prevent you from reclaiming space through standard settings, resetting your Windows 11 PC provides a fresh start while giving you the option to keep your personal files intact.
5. Empty the Recycle Bin
Deleting a file doesn’t necessarily free its disk space immediately. In most cases, Windows moves the file to the Recycle Bin, where it continues to consume storage until the bin is emptied.
To permanently remove the files:
- Open the Recycle Bin from your desktop.
- Review the files carefully.
- If you are certain you don’t need them, right-click inside the window.
- Select Empty Recycle Bin.
- Confirm the action if prompted.
Once the Recycle Bin is emptied, those files are permanently removed from the PC.
Important: Emptying the Recycle Bin is permanent. If you might need a deleted file later, restore it before emptying the bin.
6. Clean Up Your Downloads Folder
The Downloads folder is another common source of unnecessary storage usage. Files downloaded for one-time use can remain there for months or even years without being noticed.
Look for:
- Old software installers
- ZIP and RAR archives
- ISO files
- Large videos
- Duplicate files
- Old documents
- Files downloaded for temporary projects
Before deleting anything, open or inspect the file to make sure you don’t need it. If you want to keep it but don’t need it on your C: drive, move it to another drive or external storage instead.
Find the Largest Files in Downloads
To identify large downloads:
- Open File Explorer.
- Select Downloads.
- Change the folder view to Details if necessary.
- Right-click an empty area.
- Select Sort by > Size.
- Review the largest files first.
This makes it easier to find files that can provide a significant storage gain without spending time deleting hundreds of small files.
7. Uninstall Apps and Games You Don’t Use
Applications and games can consume far more storage than ordinary documents. Large PC games, creative software, virtual machines, and development tools can occupy tens or hundreds of gigabytes.
Instead of manually deleting application folders, use Windows’ built-in uninstall options.
Go to: Settings > Apps > Installed apps
You can review installed applications and, depending on the Windows version and app, sort or filter them to identify larger programs.
Consider removing:
- Apps you no longer use
- Old games
- Trial software
- Duplicate applications
- Software installed for a completed project
How to Uninstall Apps in Windows 11
- Open Settings.
- Select Apps.
- Click Installed apps.
- Find the application you no longer need.
- Click the three-dot menu next to it.
- Select Uninstall.
- Follow the application’s uninstall instructions.
Avoid manually deleting program folders from
C:\Program FilesorC:\Program Files (x86). Doing so can leave behind configuration files, registry entries, or broken application components. Use the application’s uninstaller or Windows’ Apps settings whenever possible.
8. Move Large Files to Another Drive
You don’t always have to delete personal files to free up disk space. If you have another storage location available, moving large files can reclaim space on your C: drive while allowing you to keep the files.
Possible destinations include:
- Secondary internal drive
- External HDD
- External SSD
- USB storage
- Network storage
- Cloud storage
Microsoft specifically recommends moving infrequently used personal files such as videos, music, photos, and documents to external storage when they consume significant space.
If you don’t want to keep large media or archives locally on your C: drive, explore the best cloud storage and backup solutions for Windows to keep your files secure off-site.
What Files Should You Move First?
Start with files that are large and that you don’t need to access every day:
- Videos: 4K recordings, movies, screen recordings, and completed projects
- Photos: Large photo libraries and RAW images
- Archives: ZIP, RAR, and 7Z files
- ISO files: Windows, Linux, or software installation images
- Backups: Older local backups that you still need but don’t need on the C: drive
- Large project files: Completed video, design, development, or other project folders
If you move important files to an external drive, keep a backup if the data is valuable. Also make sure the destination drive has enough free space before moving the files.
9. Use OneDrive Files On-Demand
If you use OneDrive, Files On-Demand can help you free up storage space on Windows without permanently deleting files from your OneDrive account.
Files On-Demand allows you to see your cloud files in File Explorer without requiring every file to be downloaded and stored locally. Online-only files don’t consume local disk space until you open or download them.
What Is OneDrive Files On-Demand?
Files On-Demand is a OneDrive feature that lets you access files stored in the cloud while keeping many of them online-only.
In File Explorer, you can see your OneDrive files even when their full contents aren’t stored on your PC.
How Files On-Demand Save Disk Space
An online-only file doesn’t use local storage for its full contents. When you open the file, OneDrive downloads it so you can work with it.
Afterward, you can make it online-only again when you need to reclaim the local storage.
This is particularly useful for large photo libraries, videos, archives, and older documents that you want to keep available but don’t need offline every day.
Make OneDrive Files Online-Only
To reclaim local storage:
- Open File Explorer.
- Open your OneDrive folder.
- Find a file or folder that you don’t need to keep locally.
- Right-click it.
- Select Free up space.
The file remains in OneDrive but becomes online-only. Microsoft indicates that online-only files don’t take up local disk space and can be downloaded again when needed.
You can also right-click an item and select Always keep on this device when you need it available offline.
Important: Online-only files require an internet connection when you want to open them. Files marked “Always keep on this device” continue to use local storage.
10. Change Where New Files Are Saved
If your C: drive repeatedly runs out of space, cleaning it up is only part of the solution. You should also consider changing where Windows stores new content.
In Windows 11, go to:
Settings > System > Storage > Advanced storage settings > Where new content is saved
From here, you can choose a different drive for supported types of new content, helping prevent your system drive from filling up again. Microsoft recommends changing the default storage location when another drive has more available space.
Depending on your Windows configuration, you may be able to choose storage locations for:
- New apps
- Documents
- Music
- Photos and videos
- Movies and TV shows
- Offline maps
Select the drive with sufficient free space from the appropriate drop-down menu.
Why Change the Default Save Location?
If your C: drive is relatively small and you have a larger D: or secondary drive, storing new files elsewhere can reduce the rate at which your Windows drive fills up.
For example, you could keep Windows and essential applications on the C: drive while storing large personal media files and projects on a secondary drive.
Tip: Changing the default save location doesn’t mean you have to use that drive every time. When saving an individual file, you can still choose a different location using Save or Save As.
By combining cleanup recommendations, temporary-file cleanup, Storage Sense, Disk Cleanup, large-file management, app removal, OneDrive Files On-Demand, and better storage locations, you can reclaim significant space while reducing the chances of your Windows drive becoming full again.
Advanced Ways to Free Up Disk Space in Windows 11
The methods above can usually recover a good amount of storage, but sometimes your C drive is still full even after deleting temporary files, unused apps, and large personal files. In that situation, Windows 11 provides several advanced options that can help you free up disk space.
These methods include removing the Windows.old folder, disabling hibernation to remove hiberfil.sys, adjusting System Restore storage, and using NTFS compression. Because some of these options affect Windows recovery or power features, use them only after reviewing what each setting does.
11. Delete Windows.old
The Windows.old folder can appear after upgrading Windows or installing a major Windows update. It contains files from the previous Windows installation and can occupy a significant amount of storage on your C: drive.
If you are looking for ways to free up space on your C drive, removing Windows.old can sometimes recover several gigabytes.
What Is the Windows.old Folder?
Windows creates the Windows.old folder when a previous Windows installation needs to be retained temporarily. It can contain files that allow you to return to the previous version of Windows after an upgrade.
Because the folder contains an earlier Windows installation, it can be much larger than an ordinary temporary folder. Microsoft recommends using Windows’ built-in storage cleanup options rather than manually deleting the folder.
You may see it listed as Previous Windows installation(s) under Windows 11’s temporary-file cleanup options.
When Is It Safe to Delete Windows.old?
You should delete Windows.old only when you are confident that:
- Your current Windows installation is working correctly.
- You don’t need to roll back to the previous Windows version.
- You have tested your important applications and hardware after the upgrade.
- You don’t need files stored only in the previous installation.
If you’ve recently upgraded Windows and want to keep the option of returning to the previous version, do not remove Windows.old yet.
Microsoft warns that deleting the previous Windows installation removes the files required to go back to the previous version, and the action cannot be undone through Windows’ normal rollback process.
How to Delete Windows.old
The safest approach is to use Windows 11’s built-in cleanup feature:
- Open Settings.
- Go to System > Storage.
- Select Cleanup recommendations.
- Look for Previous Windows installation(s).
- Select the checkbox next to it.
- Review the amount of storage that will be recovered.
- Click Clean up.
You can also find the previous installation under Temporary files on systems where Windows presents it there. Microsoft specifically documents Cleanup Recommendations as the supported way to remove the previous Windows installation in Windows 11.
Important: Don’t manually delete
C:\Windows.oldusing File Explorer. Use Windows’ storage cleanup tools so the operating system can properly handle the cleanup.
What Happens After Deleting Windows.old?
Deleting Windows.old can free up disk space on your system drive, but there is an important trade-off.
You will lose the ability to use the previous Windows installation files to roll back to the earlier version. If your current Windows installation is stable and you are happy with the upgrade, this may be a reasonable way to recover storage.
12. Disable Hibernation to Remove hiberfil.sys
If your Windows storage is full and you have already cleaned temporary files and personal data, the hiberfil.sys file may be another source of significant disk usage.
Windows uses this hidden system file to store system information when hibernation is used. It is located in the root directory of the drive where Windows is installed, normally the C: drive.
What Is hiberfil.sys?
hiberfil.sys is a protected Windows system file associated with hibernation and hibernation-based power features.
When Windows hibernates, it saves the system state to this file so the computer can restore the previous working session later. Windows can also use a hibernation file for Fast Startup.
Because the file is associated with system memory and power-state functionality, its size can be substantial on computers with larger amounts of RAM.
How Much Space Can hiberfil.sys Use?
The exact size depends on the Windows configuration and hibernation file type. Microsoft documentation notes that a full hibernation file is configured at a percentage of physical memory, while a reduced hibernation file uses less space and supports Fast Startup rather than full hibernation.
Therefore, you shouldn’t assume that every PC will have the same hiberfil.sys size.
If your computer has a relatively small SSD and you don’t use Hibernate, removing this file can be a useful advanced method to free up storage space in Windows 11.
How to Disable Hibernation
You cannot safely remove hiberfil.sys like an ordinary file. The supported approach is to disable the hibernation feature.
- Open Start.
- Search for Command Prompt.
- Right-click Command Prompt.
- Select Run as administrator.
- Enter the following command:
powercfg /hibernate off
- Press Enter.
Windows disables hibernation and removes the hibernation file. Microsoft documents powercfg /hibernate off as the supported command for making hibernation unavailable.
How to Enable Hibernation Again
If you later decide that you want Hibernate back, open Command Prompt as administrator and run:
powercfg /hibernate on
Press Enter, and Windows will enable hibernation again and recreate the required hibernation file.
Important Warning About Hibernation
Disabling hibernation is not simply a disk-cleanup trick. It changes how Windows handles certain power states.
When you disable hibernation:
- Hibernate is disabled.
- The
hiberfil.sysfile is removed. - Fast Startup is also affected because it relies on the hibernation file.
- Normal shutdown and sleep can continue to work.
Microsoft also warns that making hibernation unavailable can affect hybrid sleep behavior.
Tip: If you regularly use Hibernate or Fast Startup, keep hibernation enabled. Consider this method only when you genuinely need additional storage and understand the trade-off.
13. Reduce System Restore Disk Usage
System Restore can protect your Windows installation by creating restore points that contain snapshots of system settings, installed applications, Windows Registry information, and other system-related data.
These restore points can be extremely useful when a driver, application, update, or configuration change causes Windows to become unstable. Windows allows you to control how much disk space System Protection can use.
If your C drive storage is limited, reviewing the amount of space allocated to System Restore can help you manage disk usage.
What Is System Protection?
System Protection is the Windows feature responsible for creating and managing restore points.
A restore point can allow you to return system settings and other protected system information to an earlier state without normally affecting your personal documents, photos, and other personal files.
Restore points therefore provide an important recovery option, so they shouldn’t be treated as unnecessary files.
How Does System Restore Use Disk Space?
Windows can reserve part of a drive for restore points. As new restore points are created, they use the allocated storage.
The amount of space available for System Protection can be configured, so users with limited storage can reduce its maximum allocation rather than deleting every recovery feature.
How to Reduce System Restore Disk Usage
To review System Protection settings:
- Press Windows + R.
- Type
sysdm.cpl. - Press Enter.
- Open the System Protection tab.
- Select your Windows drive, usually C:.
- Click Configure.
- Review the current Max Usage setting.
- Reduce the maximum allocation if necessary.
- Click Apply and then OK.
The exact available options can vary depending on your Windows configuration.
Reducing the allocation can limit how much storage future restore points consume. However, don’t reduce it so aggressively that you lose a useful recovery buffer.
Should You Disable System Restore?
For most users, no.
If System Protection is available on your PC, keeping it enabled provides another way to recover from certain system problems. Microsoft recommends System Protection as a recovery feature and allows users to configure its disk-space usage.
If you need to free up disk space on a small SSD, reducing the allocated space is generally a better first step than completely disabling System Restore.
14. Compress Files to Save Disk Space
Another advanced option is NTFS compression, which can reduce the amount of physical storage required by compatible files and folders.
Windows can also compress the operating-system drive to help recover additional storage when you need space for important updates. Microsoft documents this as an option for gaining extra space without deleting the contents of the drive.
What Is NTFS Compression?
NTFS compression is a Windows file-system feature that stores supported files in a compressed form.
Instead of deleting files, compression attempts to reduce the physical space those files consume. Windows automatically handles compression and decompression when you access the files.
This can be useful when you have files that you need to keep but don’t access frequently.
How to Compress Individual Files or Folders
To compress a compatible folder:
- Open File Explorer.
- Locate the file or folder.
- Right-click it and select Properties.
- Click Advanced on the General tab.
- Select Compress contents to save disk space.
- Click OK.
- Click Apply.
Windows may ask whether you want to apply compression to the folder only or to its subfolders and files.
For large collections of relatively static files, compression can sometimes help free up storage space without deleting the data.
When Does File Compression Make Sense?
NTFS compression can be worth considering when:
- Your Windows drive has limited free space.
- You need to keep the files locally.
- The files are accessed relatively infrequently.
- You don’t want to move the data to another drive.
- You need a little additional storage rather than a major cleanup.
However, compression is not a replacement for deleting unnecessary files or moving large personal files to another storage device.
Potential Performance Considerations
Compressed files need to be decompressed when Windows or an application accesses them. Modern systems can handle this efficiently, but compression can introduce additional CPU and storage-processing overhead.
For that reason, don’t blindly compress every folder on your PC. Consider the type of files, how frequently you access them, and the performance requirements of the applications using them.
Should You Compress the Windows Drive?
Windows allows you to compress the OS drive, usually the C: drive, through File Explorer:
- Open File Explorer.
- Select This PC.
- Right-click your Windows drive, usually C:.
- Select Properties.
- On the General tab, select Compress this drive to save disk space.
- Select Apply.
- Follow the prompts to apply the setting.
Microsoft states that compressing the OS drive can help gain additional space for important updates and does not delete the contents of the drive.
Nevertheless, I recommend treating whole-drive compression as an advanced option, not the first solution for a full C: drive.
Before using it, try the safer methods in this guide—such as cleanup recommendations, Storage Sense, temporary-file cleanup, Disk Cleanup, removing unused apps, and moving large files.
Best practice: If you need to free up a large amount of storage, clean unnecessary files first. Use compression only when you need additional space and understand its potential performance implications.
These advanced methods can help when ordinary cleanup isn’t enough, but they should be used selectively. In particular, Windows.old, hiberfil.sys, System Restore, and NTFS compression affect important Windows features, so always understand the consequences before making changes.
How to Free Up Disk Space for a Windows Update
Windows needs additional free storage to download, prepare, and install updates. If your PC displays a message such as “Windows doesn’t have enough space to install an update,” you don’t need to delete everything from your hard drive. You only need to recover enough available storage for the specific update and its installation process.
The amount of space required varies depending on the type of update, your Windows configuration, installed optional features, and other factors. Microsoft notes that feature updates typically require 6 GB–11 GB or more, while quality updates generally require 2 GB–3 GB or more.
Before deleting personal files, start with Windows’ built-in storage tools. The following methods can help you free up disk space for Windows Update while minimizing the risk of removing important data.
1. Use Cleanup Recommendations
Cleanup Recommendations is one of the quickest ways to recover storage when Windows Update reports insufficient disk space. It analyzes your system and identifies categories such as temporary files, previous Windows installations, large or unused files, and rarely used apps.
To use it:
- Open Settings.
- Go to System > Storage.
- Select Cleanup recommendations.
- Review the suggested cleanup categories.
- Select the items you no longer need.
- Click Clean up.
Start with temporary files and other clearly unnecessary data. Review personal files carefully before deleting them.
If Previous Windows installation(s) is listed, remember that removing it can eliminate your ability to roll back to the previous Windows installation.
2. Remove Temporary Files
Temporary files are often one of the easiest ways to free up space for a Windows update. Windows creates temporary data while installing applications, downloading updates, generating thumbnails, reporting errors, and performing other system tasks.
To clean temporary files:
- Open Settings > System > Storage.
- Select Temporary files.
- Allow Windows to calculate the available cleanup space.
- Review the categories.
- Select the temporary files you want to remove.
- Click Remove files.
You may see categories such as:
- Temporary files
- Windows Update Cleanup
- Delivery Optimization Files
- Thumbnails
- Error reporting files
- Recycle Bin
- Previous Windows installation(s)
Be careful with Downloads or other categories containing personal data. Only remove files that you no longer need.
You can also enable Storage Sense to automatically remove certain unnecessary temporary files and help prevent future low-storage problems. Microsoft recommends Storage Sense and Cleanup Recommendations as built-in ways to prepare a PC for Windows updates.
3. Delete or Move Large Personal Files
If temporary-file cleanup isn’t enough, look for large personal files that are consuming space on your C: drive.
Common storage-heavy folders include:
- Downloads
- Videos
- Pictures
- Documents
- Desktop
Videos, high-resolution photos, ISO files, ZIP/RAR archives, backups, and large project files can quickly consume available disk space.
To find large files:
- Open File Explorer.
- Select a folder such as Downloads, Videos, or Documents.
- Switch to Details view.
- Right-click an empty area.
- Select Sort by > Size.
- Review the largest files first.
If you no longer need a file, you can delete it. If you want to keep it, move it to another location instead.
For example, you can move large files to:
- An external HDD
- An external SSD
- A USB drive
- An SD card
- A secondary internal drive
- Network storage
- OneDrive or another cloud-storage service
Microsoft specifically recommends deleting or moving large personal files when Windows doesn’t have enough space for an update. If you delete files, remember to empty the Recycle Bin afterward so the storage is actually reclaimed.
4. Uninstall Large Apps
Large applications and PC games can occupy tens or hundreds of gigabytes. If you’re trying to free up disk space on Windows 11 for an update, uninstalling software you no longer use can be much more effective than deleting hundreds of small files.
Go to:
Settings > Apps > Installed apps
Review your installed applications and identify:
- Large games
- Apps you no longer use
- Old trial software
- Duplicate applications
- Software installed for completed projects
- Large creative or development tools you no longer need
Select the application’s three-dot menu and choose Uninstall.
Tip: Don’t manually delete folders from
C:\Program FilesorC:\Program Files (x86)to remove an application. Use Windows’ uninstall option or the software’s own uninstaller.
Microsoft also recommends uninstalling apps you don’t use when there isn’t enough disk space for a Windows update.
5. Remove Previous Windows Installation Files
If you recently upgraded Windows, your PC may contain Previous Windows installation(s), commonly associated with the Windows.old folder.
These files can consume substantial storage, but they serve an important recovery purpose: they can allow you to return to the previous Windows installation for a limited period.
If you’re confident that your current Windows installation works correctly and you don’t need to roll back, you can remove the previous installation through Windows’ cleanup tools.
Go to:
Settings > System > Storage > Temporary files
or use:
Settings > System > Storage > Cleanup recommendations
Look for Previous Windows installation(s), select it, and choose Remove files.
Important: Don’t remove Windows.old simply because it is large. Once the previous installation is deleted, you may no longer be able to roll back to the previous Windows version.
6. Use External Storage When Necessary
If you’ve already cleaned unnecessary files and still don’t have enough free disk space for Windows Update, Windows 11 can allow you to temporarily use an external storage device.
Microsoft’s current guidance says the external storage device should have at least 10 GB of free space and an internet connection is also required.
To use external storage for an update:
- Connect an external storage device to your PC.
- Open Settings > Windows Update.
- If Windows detects insufficient space, look for Fix issues.
- Select Fix issues.
- Choose the connected external storage device when prompted.
- Follow the on-screen instructions to complete the update.
Windows may still require some free space on the internal system drive even when external storage is used. The amount of internal storage required varies depending on the update and your PC’s configuration.
Before using an external drive, make sure it contains enough free space and back up any important files stored on it. After the update is successfully installed, you can safely disconnect the external storage device.
7. How Much Space Do You Need for a Windows Update?
There isn’t a single amount of free space that applies to every Windows update. Microsoft explains that the required space varies based on the update type, installed optional features, languages, existing updates, and the update path used by your PC.
As a general reference:
- Quality updates: Often require around 2–3 GB or more
- Feature updates: Often require around 6–11 GB or more
These are not hard limits. Your PC may require more space depending on its configuration.
Best approach: Check the amount of additional storage. Windows says it needs it, then free up somewhat more than that amount if possible. This gives the update process some breathing room.
Once you’ve recovered enough storage, return to Settings > Windows Update and select Check for updates to try the installation again.
If the update still fails after you have sufficient free space, the problem may not be storage-related. Windows Update errors can also be caused by corrupted update files, incompatible drivers, connectivity problems, or other system issues.
Why Is C: Drive Still Full After Deleting Files? (Troubleshooting)
Have you deleted files, but your C drive is still full? This is a common Windows storage problem. Removing a few documents or clearing the Downloads folder may not recover as much space as expected because Windows also uses storage for system files, updates, cached data, restore points, hibernation, applications, and cloud-synced files.
If you’re trying to free up space on your C drive, don’t immediately start deleting files from Windows system folders. First, use Settings > System > Storage to identify which categories are consuming the most disk space.
Here are some of the most common reasons your Windows storage is full even after deleting files.
1. System and Reserved Storage Is Large
System and reserved storage contain files and storage space required by Windows to operate correctly. This can include Windows system files, reserved storage, virtual memory, hibernation-related data, update components, and other system resources.
You can check this category by going to:
Settings > System > Storage > System & reserved
The amount of storage used can vary significantly between computers depending on the Windows version, installed features, hardware configuration, applications, updates, and system settings.
Don’t manually delete files from Windows system folders to reduce this number. Doing so can cause Windows or installed applications to malfunction.
Instead, use Windows’ built-in tools such as Cleanup Recommendations, Storage Sense, and Disk Cleanup to remove unnecessary system data.
2. Windows Update Files Are Consuming Space
Windows Update can temporarily require additional storage to download, unpack, install, and complete updates. Previous update files and cached installation data can also remain on the system for some time.
If Windows Update is using too much disk space, check:
Settings > System > Storage > Temporary files
Look for cleanup options related to Windows Update.
You can also use Disk Cleanup > Clean up system files to check for Windows Update Cleanup and other system cleanup categories.
Tip: Don’t manually delete files from Windows Update folders. Use Microsoft’s built-in cleanup tools instead.
If your C drive becomes full after repeated updates, also check Cleanup Recommendations and System & reserved storage to identify other sources of disk usage.
3. OneDrive Files Are Stored Locally
If you use OneDrive, your cloud files may also be stored locally on your Windows PC. This means a large OneDrive library can consume significant C drive storage, even though the same files are also available in the cloud.
With OneDrive Files On-Demand, you can make files online-only when you don’t need them stored locally.
To reclaim local storage:
- Open File Explorer.
- Open your OneDrive folder.
- Right-click a file or folder you don’t need to keep locally.
- Select Free up space.
The file remains available in OneDrive but no longer occupies the same amount of local disk space. You can download it again when you need it.
Important: Don’t select Delete if your goal is simply to remove the local copy. Use Free up space so the file remains in your OneDrive account.
4. Hibernation Is Enabled
Windows can use a hidden system file called hiberfil.sys to support hibernation and fast startup. Depending on your system configuration, this file can consume a significant amount of storage.
If you’re looking for ways to free up disk space in Windows 11 and don’t use Hibernate, disabling the feature can remove the hibernation file.
Open Command Prompt as administrator and run:
powercfg /hibernate off
This disables Hibernate and removes hiberfil.sys.
However, this is an advanced option. Disabling hibernation also affects Fast Startup, which relies on the hibernation file.
If you want to restore the feature later, run:
powercfg /hibernate on
If you regularly use Hibernate or Fast Startup, it’s better to leave the feature enabled.
5. System Restore Is Using Disk Space
System Restore can use a portion of your C drive to store restore points. These restore points can help you recover from certain problems caused by software installations, drivers, Windows updates, or configuration changes.
If System Restore is consuming more storage than expected, you can review its allocation:
- Press Windows + R.
- Enter
sysdm.cpl. - Press Enter.
- Open the System Protection tab.
- Select the C: drive.
- Click Configure.
- Review the Max Usage setting.
If necessary, reduce the maximum amount of storage allocated to restore points.
For most users, don’t disable System Restore simply to free up disk space. Reducing its storage allocation is generally a better compromise because you retain an important recovery option.
6. Apps and Game Data Are Hidden in User Folders
Uninstalling an application doesn’t always remove every piece of data associated with it. Games and applications can store additional files in user folders, including cached data, saved games, configuration files, downloaded content, and other application data.
Some of this information may be stored in locations such as
%AppData%%LocalAppData%%ProgramData%DocumentsSaved Games
These folders can contain significant amounts of data, particularly if you use games, video-editing applications, development tools, or other software that generates large caches.
However, don’t randomly delete folders from AppData or ProgramData. Some files are required by installed applications, and removing them can reset settings or cause applications to stop working correctly.
Instead:
- Identify the application consuming the most storage.
- Check whether the application provides its own cache or cleanup feature.
- Use Windows’ uninstall option if you no longer need the application.
- Remove leftover data only when you understand what it contains.
For games, check the game’s launcher or settings for options to remove downloaded content, unused game components, or old installations.
7. Recycle Bin Has Not Been Emptied
If you’ve deleted a large number of files but your C drive storage hasn’t increased, check the Recycle Bin.
Windows normally moves deleted files to the Recycle Bin rather than permanently removing them. Those files continue to consume disk space until you empty the bin.
To recover the space:
- Open Recycle Bin.
- Review its contents.
- Restore anything you still need.
- Right-click inside the window.
- Select Empty Recycle Bin.
Warning: Emptying the Recycle Bin permanently removes its contents. Make sure you don’t need the files before confirming.
This is one of the simplest things to check when your Windows low disk space warning remains after deleting personal files.
8. Temporary and Cache Files Are Still Accumulating
Windows and applications continuously create temporary and cached files. Even after one cleanup, these files can accumulate again as you browse the web, install applications, download updates, stream media, edit photos or videos, and perform other tasks.
Common examples include:
- Windows temporary files
- Browser cache
- Application cache
- Windows Update files
- Delivery Optimization Files
- Thumbnail cache
- Error-reporting files
- Installer and setup leftovers
To check for temporary storage:
Settings > System > Storage > Temporary files
Review the categories and remove unnecessary files.
You can also enable Storage Sense so Windows can automatically perform certain cleanup tasks based on your configured settings.
How to Find What Is Really Filling Your C Drive
If your C drive is still full after deleting files, don’t keep deleting files randomly. Instead:
- Open Settings > System > Storage.
- Check which storage category is largest.
- Open the relevant category.
- Look for large or unnecessary files.
- Check Temporary files.
- Review Installed apps.
- Check your Downloads, Videos, Documents, and Desktop folders.
- Check OneDrive storage if you use it.
- Review System and reserved storage.
- Use Cleanup Recommendations and Disk Cleanup for system cleanup.
This approach helps you identify the actual cause of the storage problem and makes it much easier to free up disk space safely.
Important: Never try to solve a full C drive by manually deleting files from
C:\Windows,C:\Windows\System32,C:\Program Files, or other Windows system directories. Use Windows’ built-in storage and cleanup tools unless you know exactly what a particular file does.
What Should You NOT Delete to Free Up Disk Space?
When you’re trying to free up disk space in Windows 11, it can be tempting to delete anything that looks large or unfamiliar.
However, manually deleting the wrong files can damage Windows, break installed applications, or make your PC unstable.
The safest approach is to use Windows’ built-in tools, such as Storage, Cleanup Recommendations, Storage Sense, and Disk Cleanup, to identify and remove unnecessary files.
Before deleting anything manually, especially from the C: drive, make sure you know what the file does and whether it is required by Windows or an installed application.
1. Do Not Manually Delete Windows System Folders
Never manually delete or modify important Windows system folders simply because they appear to consume a lot of storage.
C:\Windows
The C:\Windows folder contains the core files required for the Windows operating system, including system components, drivers, configuration files, and update-related data.
Do not manually delete files or folders inside C:\Windows to reclaim storage.
If Windows needs to remove unnecessary system files, use Disk Cleanup, Cleanup Recommendations, Storage Sense, or other supported Windows maintenance tools.
C:\Windows\System32Despite its name, it System32 is an essential Windows system directory. It contains executable files, libraries, drivers, and other components required by Windows and installed software.
Deleting or modifying files inside C:\Windows\System32 can cause applications or Windows features to stop working and can potentially make Windows unbootable.
Never delete files from System32 just because they appear large or unfamiliar.
C:\Program FilesThe C:\Program Files folder contains installed applications and their supporting files.
If you no longer need an application, don’t simply delete its folder from Program Files. Instead, uninstall the application through:
Settings > Apps > Installed apps
Using the proper uninstaller gives Windows and the application an opportunity to remove associated files and configuration data correctly.
C:\Program Files (x86)On 64-bit versions of Windows, C:\Program Files (x86) is commonly used for 32-bit applications.
The same rule applies here: don’t manually delete application folders to free up storage.
If an application is no longer needed, uninstall it through Windows or use the application’s official uninstaller.
WinSxSThe WinSxS folder, located under C:\Windows\WinSxS, is part of the Windows component store. It contains files required to support Windows components, updates, recovery, and servicing.
The folder can appear unusually large when viewed in File Explorer, partly because Windows uses hard links and the apparent folder size doesn’t always represent the amount of additional physical disk space being consumed.
Do not manually delete files from WinSxS.
If the Windows component store needs cleanup, use supported Windows servicing and cleanup mechanisms rather than deleting files manually.
Important: Never use File Explorer to manually remove files from Windows system directories simply because you’re trying to solve a Windows low disk space problem.
2. Don’t Delete Unknown Files From System Folders
You may occasionally discover a large file with an unfamiliar name while investigating what is consuming your C drive storage.
An unfamiliar filename doesn’t mean the file is unnecessary.
System and application files can have technical names that don’t make their purpose obvious. Deleting them can cause:
- Windows features to stop working
- Applications to crash
- Drivers to malfunction
- Updates to fail
- Programs to lose configuration data
- Windows startup or recovery problems
If you don’t know what a file does, don’t delete it just to free up disk space.
Instead, identify which application or Windows component created it. Use Windows Storage settings, the application’s own cleanup options, or Microsoft’s documentation to determine whether it can safely be removed.
3. Don’t Delete Personal Files Without a Backup
Your personal files are often the safest category to clean up, but they’re also the files you may regret deleting.
Before permanently removing:
- Photos
- Videos
- Documents
- Work projects
- Financial records
- Backups
- Downloads
- Personal archives
- Important email exports
Make sure you have another copy if the data is important.
For large files that you want to keep but don’t need on your C: drive, consider moving them to another drive, an external SSD/HDD, network storage, or cloud storage.
For OneDrive users, Files On-Demand can also help reduce local storage usage without permanently deleting files from your OneDrive account.
Offloading heavy archives and media off your local C: drive is much safer with an off-site archive; check out our comprehensive guide to understanding cloud storage to choose between local external drives and remote sync services.
Tip: If your goal is simply to free up space on the C drive, moving a large personal file to another storage device is often safer than permanently deleting it.
4. Don’t Use Random “PC Cleaner” Programs
You may find third-party programs promising to clean your PC, remove junk files, fix registry problems, and free up disk space with a single click.
For routine Windows storage cleanup, you usually don’t need them.
Windows already includes several built-in tools designed for this purpose:
- Storage settings
- Cleanup Recommendations
- Storage Sense
- Temporary Files cleanup
- Disk Cleanup
- Installed app management
These tools are integrated with Windows and understand many of the system files and storage categories they are designed to manage.
Third-party “PC cleaner” applications can vary significantly in quality. Some may identify legitimate temporary files, while others may encourage unnecessary registry cleaning, remove files you intended to keep, display aggressive warnings, or offer features you don’t actually need.
5. Why Windows Built-In Cleanup Tools Are Usually Better
For most users, start with Microsoft’s own storage-management features because they provide a safer and more predictable way to manage Windows storage.
A good cleanup process is
- Check Settings > System > Storage.
- Review Cleanup Recommendations.
- Remove unnecessary Temporary files.
- Enable Storage Sense if automatic cleanup is useful.
- Run Disk Cleanup when additional system cleanup is needed.
- Uninstall applications you no longer use.
- Find and move or delete unnecessary large personal files.
- Empty the Recycle Bin after confirming its contents are no longer needed.
Only move to advanced methods such as deleting Windows.old, disabling hibernation, adjusting System Restore, or using NTFS compression when you understand the consequences.
6. The Golden Rule for Freeing Up Disk Space
If you don’t know what a file or folder does, don’t delete it.
A full C: drive can usually be addressed without touching critical Windows system folders. Start with Windows’ built-in cleanup recommendations and storage tools, then focus on large personal files, unused applications, temporary data, and other clearly unnecessary content.
This approach lets you free up disk space safely while reducing the risk of damaging Windows or losing important data.
7. Avoid Overusing Aggressive Optimizer Tools (Use Official Options Carefully)
While you should steer clear of third-party cleaner utilities, you might come across Microsoft’s own utility designed to streamline maintenance.
If you prefer a centralized dashboard for quick cleanups without touching risky registry tweaks, Microsoft PC Manager is an official, lightweight tool that consolidates temporary file removal, startup app management, and background process monitoring.
Even when using official maintenance tools, avoid running deep-clean routines blindly.
Always review the files flagged for deletion—especially downloaded installers, thumbnail caches, and recently unpacked update packages—so you don’t inadvertently remove files or cached assets you still actively use.
Safe Ways to Free Up Disk Space at a Glance
Not every disk-cleanup method carries the same level of risk. The safest options are usually Windows’ built-in storage tools, while advanced methods can affect system features or recovery options.
Use the table below as a quick reference when deciding how to free up disk space in Windows 11.
| Method | Difficulty | Best For | Risk |
|---|---|---|---|
| Cleanup Recommendations | Easy | Quick cleanup | Low |
| Storage Sense | Easy | Automatic cleanup | Low |
| Temporary Files | Easy | Windows junk | Low |
| Disk Cleanup | Easy | System files | Low |
| Recycle Bin | Easy | Deleted files | Low |
| Downloads cleanup | Easy | Personal files | Medium |
| Uninstall apps | Easy | Large programs and games | Low |
| Large file cleanup | Easy | Videos, archives, ISO files | Medium |
| OneDrive Files On-Demand | Medium | Cloud-synced files | Low |
| Windows.old removal | Medium | Previous Windows installation | Medium |
| Disable hibernation | Advanced | hiberfil.sys | Medium |
| System Restore adjustment | Advanced | Restore-point storage | Medium |
| NTFS compression | Advanced | Additional storage | Medium |
Which Method Should You Try First?
If you’re dealing with a Windows low disk space warning or a nearly full C: drive, start with the low-risk options:
- Cleanup Recommendations — Review Windows’ suggestions and remove unnecessary files.
- Temporary Files — Remove temporary data and Windows cleanup files.
- Storage Sense — Enable automatic storage cleanup.
- Disk Cleanup — Remove additional system files.
- Recycle Bin — Permanently remove files you have already deleted.
- Downloads cleanup — Remove unnecessary installers, archives, and downloaded files.
- Uninstall unused apps and games — Recover space occupied by large programs.
- Find large files — Move or delete unnecessary videos, backups, and archives.
If these methods don’t provide enough space, consider OneDrive Files On-Demand, moving files to another drive, or the advanced options covered earlier in this guide.
Important: The “Risk” column refers to the potential consequences of using the method incorrectly. Always review personal files before deleting them, and understand the effect of advanced options such as removing Windows.old, disabling hibernation, changing System Restore storage, or enabling compression.
Frequently Asked Questions About Freeing Up Disk Space
How do I free up disk space quickly in Windows 11?
To free up disk space quickly in Windows 11, go to Settings > System > Storage > Cleanup recommendations and remove unnecessary temporary files, large files, and unused apps. Then empty the Recycle Bin and clean your Downloads folder. If you still need more space, uninstall large programs or games and move large personal files to another drive.
How do I free up space on my C drive?
To free up space on your C drive, open Settings > System > Storage to identify what’s consuming storage. Delete unnecessary temporary files, empty the Recycle Bin, remove unused apps, clean Downloads, and move large videos or archives elsewhere. Storage Sense can also automatically manage temporary data and help prevent your Windows drive from becoming full again.
What is taking up space on my Windows 11 hard drive?
Windows 11 storage can be consumed by system files, temporary files, Windows Update files, installed apps, games, Downloads, photos, videos, OneDrive files, Windows.old, hiberfil.sys, and System Restore. Go to Settings > System > Storage to see a category-by-category breakdown. This helps you identify the biggest storage consumers before deleting anything unnecessarily.
How do I delete temporary files in Windows 11?
To delete temporary files in Windows 11, open Settings > System > Storage > Temporary files. Allow Windows to calculate the available cleanup space, select the categories you want to remove, and click Remove files. You may see temporary files, Windows Update Cleanup, Delivery Optimization Files, thumbnails, error-reporting files, and other removable data.
Is Disk Cleanup safe to use?
Yes, Disk Cleanup is a built-in Windows utility designed to remove unnecessary files safely. You can use it to clean temporary files, Windows Update Cleanup, Delivery Optimization Files, thumbnails, and other system data. However, review Previous Windows installation(s) carefully because deleting Windows.old can remove your ability to roll back to the previous Windows installation.
Is Storage Sense safe?
Yes, Storage Sense is a Windows feature designed to automatically free up storage space. It can remove certain temporary files and manage Recycle Bin contents according to your settings. Storage Sense doesn’t randomly delete your files. However, review its Downloads and OneDrive settings carefully because configured cleanup rules can remove or make older files online-only.
Does Storage Sense delete personal files?
Storage Sense does not randomly delete personal files. By default, it focuses on temporary files and other cleanup categories. However, you can configure it to manage files in the Downloads folder and OneDrive. Before enabling automatic cleanup, review these settings carefully so important downloads or locally stored cloud files aren’t removed or changed unexpectedly.
Can I delete Windows.old?
Yes, you can delete Windows.old when you’re confident that your current Windows installation works correctly and you no longer need to roll back. Use Settings > System > Storage > Cleanup recommendations or Temporary Files rather than manually deleting the folder. Removing it can free significant disk space, but you may lose the ability to return to the previous Windows version.
How do I remove hiberfil.sys?
To remove hiberfil.sys, disable Windows hibernation using an elevated Command Prompt. Run powercfg /hibernate off and press Enter. Windows will disable Hibernate and remove the hibernation file, potentially freeing disk space. However, this also affects Fast Startup. To restore hibernation later, run powercfg /hibernate on as an administrator.
Why is my C drive full after deleting files?
Your C drive may remain full after deleting files because deleted files can still be stored in the Recycle Bin, while Windows Update files, temporary files, OneDrive content, hiberfil.sys, System Restore, apps, caches, and system-reserved storage may continue consuming space. Check Settings > System > Storage to identify which category is actually using your disk space.
How much free space should I leave on my Windows drive?
There is no single amount that applies to every Windows PC, but keeping at least 10–20% of your system drive free is a practical target. Windows needs available storage for updates, temporary files, applications, virtual memory, and normal system operations. Avoid completely filling an SSD because maintaining free capacity can support more consistent storage performance.
How do I free up space for a Windows Update?
To free up space for a Windows Update, start with Settings > System > Storage > Cleanup recommendations and remove temporary files. You can also uninstall unused apps, delete unnecessary Downloads, move large videos and archives, and remove previous Windows installation files if you no longer need rollback. If necessary, Windows may allow compatible updates to use external storage.
Why is System and Reserved storage so large?
System and Reserved storage includes space required by Windows for system components, updates, virtual memory, hibernation, recovery features, and other operations. Its size varies between computers. Instead of manually deleting files from system folders, use Storage Sense, Cleanup Recommendations, Disk Cleanup, and appropriate System Restore settings to manage unnecessary storage safely.
How can I free up disk space without deleting personal files?
You can free up disk space without deleting personal files by removing temporary files, Windows Update cleanup data, unused applications, and Recycle Bin contents. You can also use OneDrive Files On-Demand to make cloud files online-only, move large files to an external or secondary drive, enable Storage Sense, or change where new content is saved.
Final Thoughts
Freeing up storage is just one part of routine maintenance; for a full performance boost, check out our complete guide on speeding up and optimizing Windows 11 to disable unnecessary background processes and visual overhead.
Learning how to free up disk space in Windows 11 doesn’t mean you need to delete important personal files or make risky changes to Windows system folders. In most cases, you can recover plenty of storage by working through Windows’ built-in cleanup tools and targeting the largest sources of unnecessary disk usage.
For the safest and most effective approach, follow this order:
- Check Storage — Open Settings > System > Storage to see what’s consuming your disk space.
- Use Cleanup Recommendations — Review Windows’ suggestions for temporary files, large files, unused apps, and other removable data.
- Delete temporary files — Remove unnecessary temporary data, Windows Update cleanup files, thumbnails, and other safe cleanup categories.
- Enable Storage Sense — Let Windows automatically manage certain unnecessary files and help prevent low-storage problems.
- Run Disk Cleanup — Use the built-in tool to find additional system files that can be safely removed.
- Empty the Recycle Bin — Permanently remove deleted files that are still consuming storage.
- Clean Downloads — Remove old installers, ZIP files, ISO images, duplicate downloads, and other files you no longer need.
- Remove unused apps — Uninstall large applications and games you no longer use instead of manually deleting their folders.
- Find large files — Check Videos, Pictures, Documents, Desktop, and other folders for files consuming significant storage.
- Move files to another drive or cloud storage — Keep important personal files while freeing up space on your C: drive.
- Use advanced options only when necessary — Consider Windows.old cleanup, disabling hibernation, adjusting System Restore storage, or compression only after understanding the consequences.
The best long-term strategy is to clean up unnecessary data and prevent the C: drive from filling up again. Enable Storage Sense, periodically review large files and Downloads, uninstall software you no longer use, and keep important personal data backed up.
If your Windows drive is still nearly full after following these steps, don’t start deleting files from C:\Windows, System32, WinSxS, or other system folders. Instead, return to Settings > System > Storage and identify the category responsible for the remaining storage usage. This is a safer and more reliable way to keep your Windows PC running smoothly while maintaining enough free space for applications, system operations, and future Windows updates.