Are you experiencing Wi-Fi connectivity problems on your Windows 11 laptop or desktop? Issues such as Wi-Fi not working, slow internet, frequent disconnections, missing wireless networks, and being connected without internet access can interrupt your daily work.
Windows 11 Wi-Fi problems can occur for several reasons, including outdated network drivers, incorrect network configurations, disabled wireless adapters, router issues, and Windows updates. Fortunately, most of these problems can be resolved without reinstalling Windows or visiting a computer repair shop.
In this guide, you’ll learn how to fix Windows 11 Wi-Fi problems using 15 practical troubleshooting methods. We’ll also explain how to resolve specific connectivity errors, update wireless drivers, reset network settings, and use Command Prompt to diagnose internet connection problems.
Whether your Windows 11 computer cannot connect to Wi-Fi or keeps disconnecting from the internet, follow these solutions to restore your wireless connection.
If your computer is experiencing performance problems alongside Wi-Fi connectivity issues, follow our guide on how to speed up Windows 11 to improve overall system responsiveness.
If your computer also freezes or becomes unresponsive while troubleshooting network problems, read our guide on how to fix Windows 11 freezing issues for additional troubleshooting methods.
If you are experiencing other Windows problems alongside connectivity issues, explore our complete Windows 11 troubleshooting guide for solutions to performance issues, update errors, freezing, and system problems.
Why Is Wi-Fi Not Working in Windows 11?
Before trying different troubleshooting methods, it’s important to understand why your wireless internet connection might not be working.
Windows 11 uses network adapters, wireless drivers, and networking services to establish and maintain Wi-Fi connections. If any of these components experience problems, your computer may fail to connect to the internet.
Here are some common reasons behind Windows 11 Wi-Fi connectivity problems:
- Outdated Wi-Fi drivers: Old or incompatible network drivers can prevent your wireless adapter from connecting properly.
- Disabled Wi-Fi adapter: Your wireless network adapter might be disabled in Device Manager or Windows settings.
- Incorrect network configuration: Incorrect IP addresses, DNS settings, or TCP/IP configurations can interrupt internet connectivity.
- Router or modem problems: Your wireless router might be experiencing temporary connectivity issues or an internet service outage.
- Windows updates: Certain driver or operating system updates may introduce wireless connectivity problems.
- Power management settings: Windows may turn off the wireless adapter to save battery power.
- Weak Wi-Fi signals: Distance from the router, walls, and wireless interference can reduce signal strength.
- Corrupted network settings: Damaged wireless profiles or networking configurations can prevent successful connections.
Identifying the cause makes it easier to select the right troubleshooting method.
How to Fix Wi-Fi Problems in Windows 11
Try the following solutions in order. Start with basic troubleshooting methods before moving to advanced network configurations.
1. Check Your Wi-Fi Connection and Airplane Mode
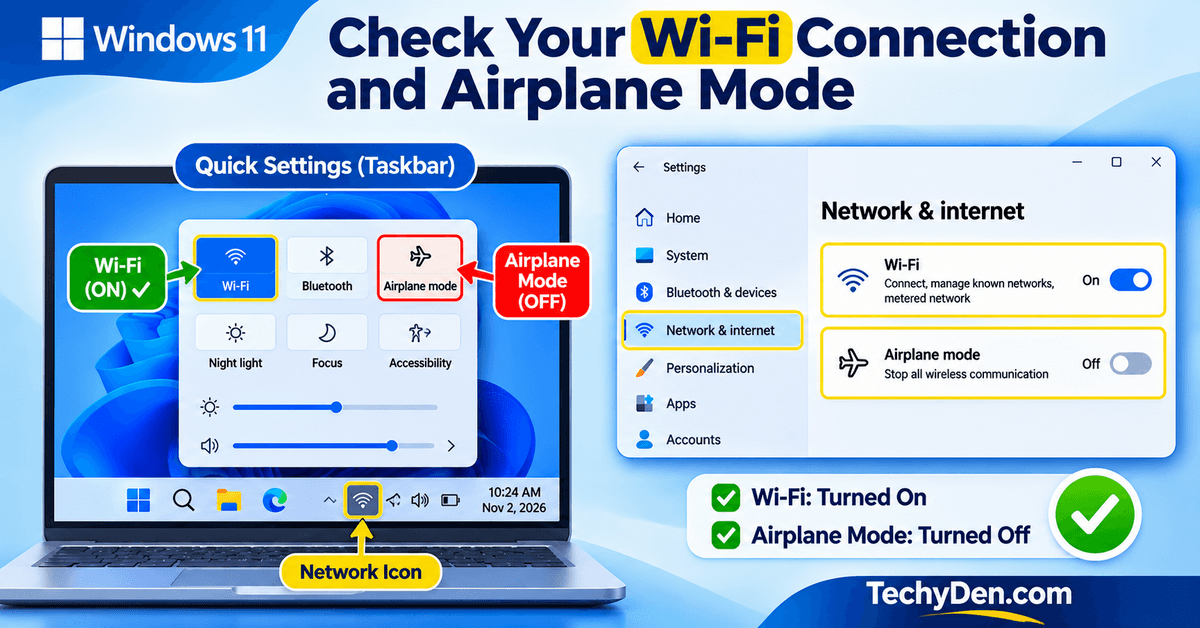
Sometimes, Windows 11 Wi-Fi problems occur because the wireless connection is accidentally disabled or Airplane mode is enabled.
Start by checking your computer’s wireless connection status.
Steps to check Wi-Fi:
- Click the network icon on the right side of the Windows 11 taskbar.
- Locate the Wi-Fi option in the Quick Settings panel.
- Make sure Wi-Fi is turned on.
- Check whether Airplane mode is disabled.
- Select your wireless network from the available connections.
- Click Connect and enter your Wi-Fi password if required.
You can also check these settings through Windows Settings.
- Press Windows + I to open Settings.
- Select Network & internet.
- Check whether Wi-Fi is enabled.
- Open Airplane mode and make sure it is turned off.
If Wi-Fi is already enabled and your computer still cannot connect, proceed to the next solution.
For additional troubleshooting instructions, refer to Microsoft’s official guide to fixing Wi-Fi connection issues in Windows, which covers common connectivity problems, network resets, and wireless adapter troubleshooting.
2. Restart Your Windows 11 PC and Wi-Fi Router
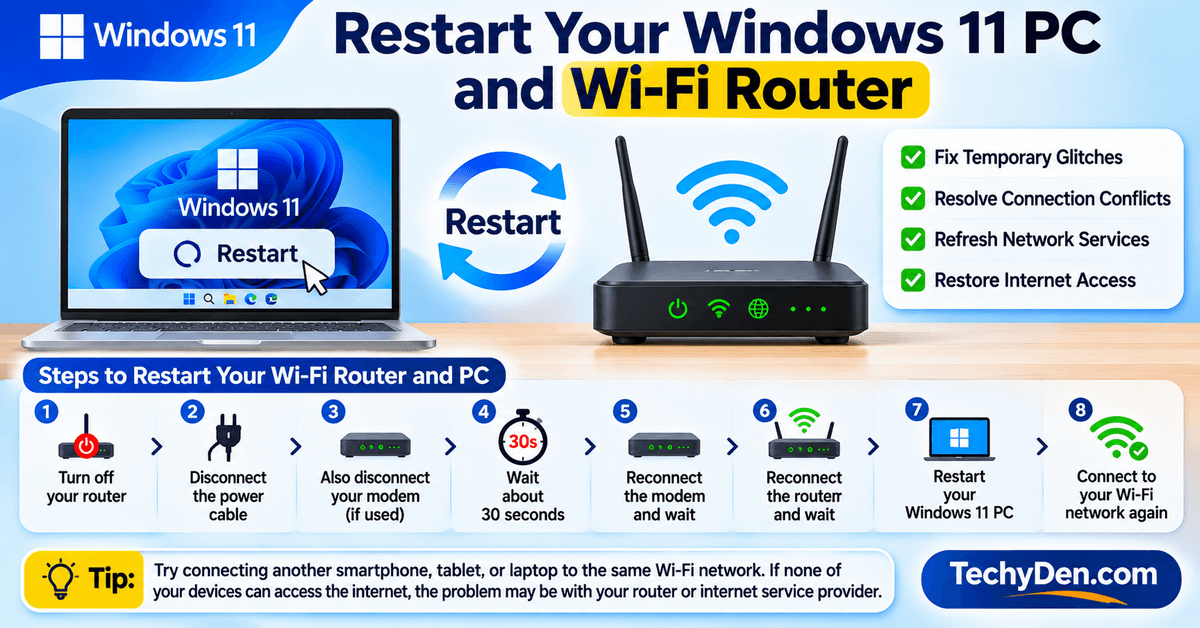
Restarting your computer and wireless router is one of the simplest ways to resolve temporary network connectivity problems.
Your router may experience temporary software glitches, connection conflicts, or memory-related issues. Similarly, restarting Windows can refresh network services and wireless connections.
How to restart your Wi-Fi router:
- Turn off your wireless router.
- Disconnect its power cable.
- If you use a separate modem, disconnect its power cable as well.
- Wait approximately 30 seconds.
- Reconnect the modem and wait for it to initialize.
- Reconnect the router and allow it to establish an internet connection.
- Restart your Windows 11 computer.
- Connect to your Wi-Fi network again.
Check whether the internet connection works.
Tip: Try connecting another smartphone, tablet, or laptop to the same Wi-Fi network. If none of your devices can access the internet, the problem may be with your router or internet service provider rather than Windows 11.
3. Run the Network and Internet Troubleshooter
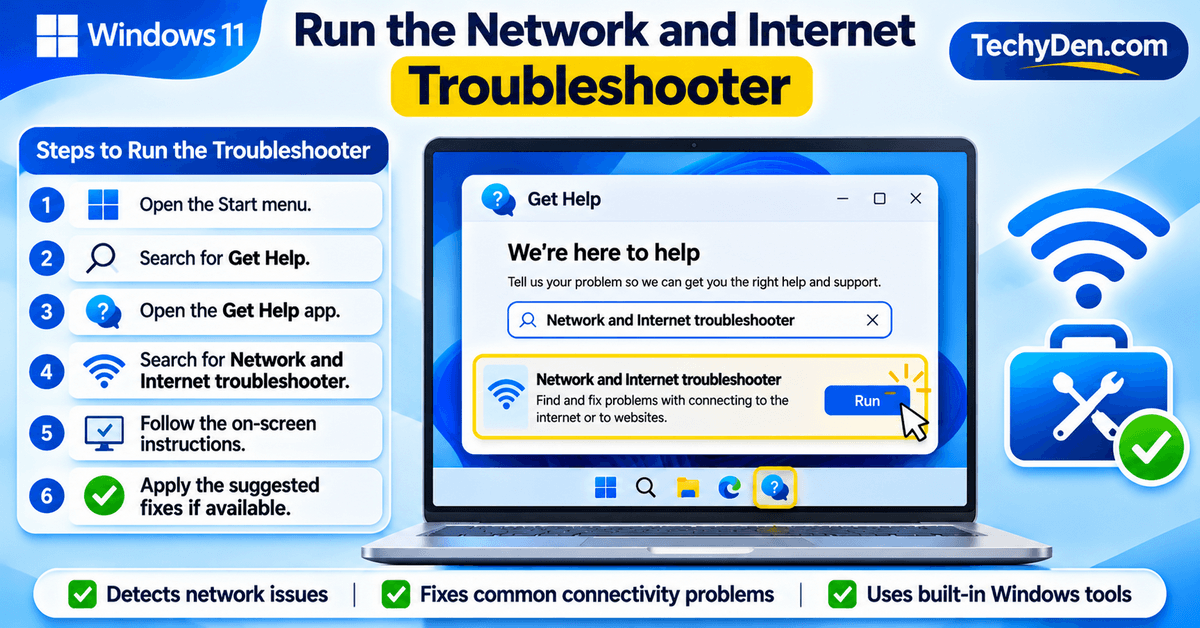
Windows 11 includes automated troubleshooting tools that can identify and help resolve common network connectivity problems.
Microsoft recommends using the Network and Internet troubleshooter through the Get Help app.
Steps to run the troubleshooter:
- Open the Start menu.
- Search for Get Help.
- Open the Get Help application.
- Search for Network and Internet troubleshooter.
- Follow the on-screen diagnostic instructions.
- Apply the suggested fixes if available.
The troubleshooter can help identify problems related to network configuration, connectivity, and other Windows networking components.
After completing the diagnostic process, restart your computer if recommended and test your Wi-Fi connection.
A successful ping indicates that your computer can reach the specified IP address. It does not confirm that DNS resolution or every website is working correctly. If the ping succeeds but websites fail to load, investigate DNS, proxy, browser, and firewall settings.
4. Forget and Reconnect to Your Wi-Fi Network
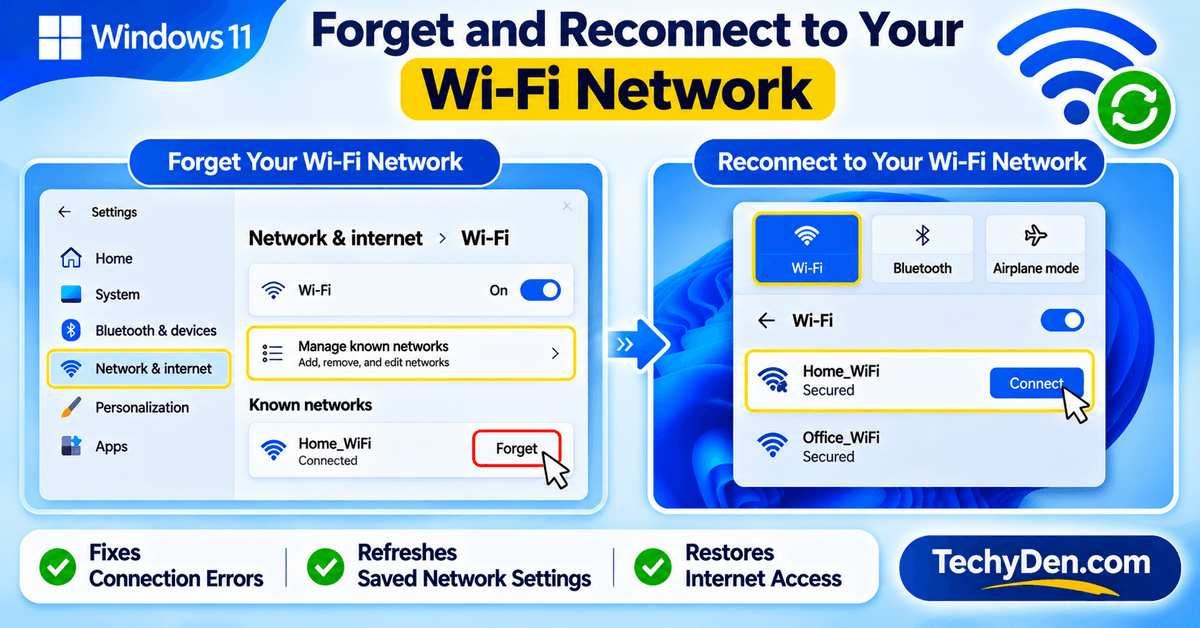
Windows stores previously connected wireless network information, including network names and authentication settings.
Sometimes, a saved Wi-Fi profile becomes outdated or corrupted. Forgetting the network and reconnecting can resolve authentication errors and connection problems.
Steps to forget a Wi-Fi network:
- Press Windows + I to open Settings.
- Select Network & internet.
- Click Wi-Fi.
- Select Manage known networks.
- Find your wireless network.
- Click Forget.
Reconnect to the Wi-Fi network:
- Open the Quick Settings panel from the taskbar.
- Click the arrow next to the Wi-Fi option to view available networks.
- Select your wireless network.
- Click Connect.
- Enter your Wi-Fi password.
- Wait for Windows to establish the connection.
If the problem was caused by an outdated saved network profile, this method may restore your internet connection.
5. Update the Wi-Fi Network Adapter Driver
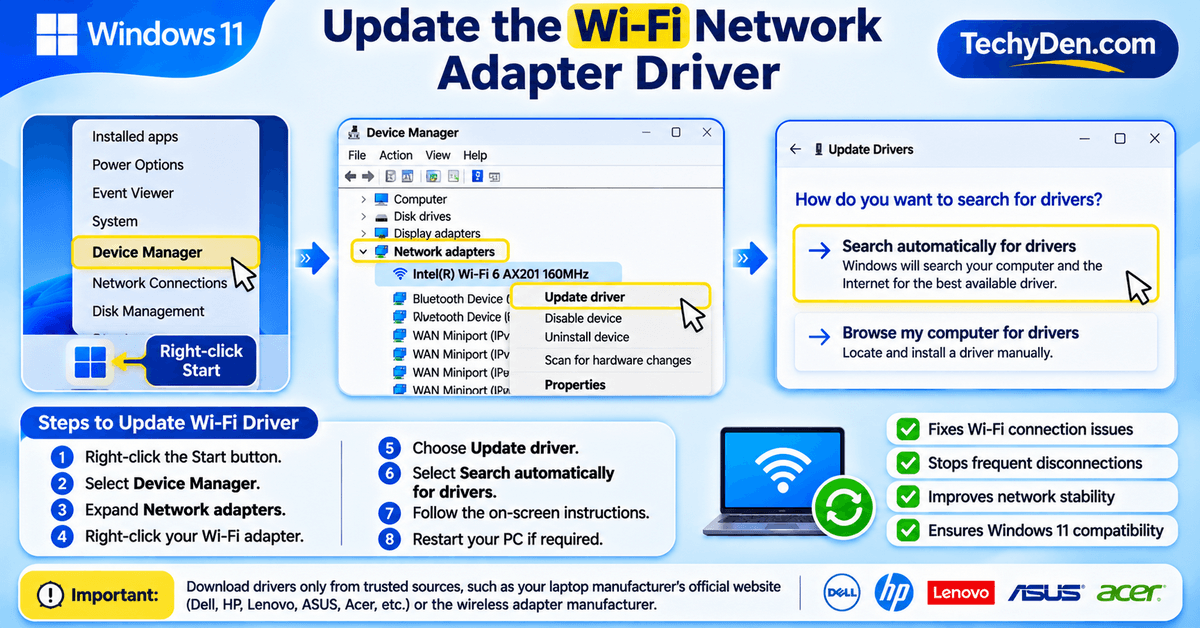
An outdated, incompatible, or corrupted wireless network driver is another common reason for Windows 11 Wi-Fi problems.
Network adapter drivers allow Windows to communicate with your computer’s wireless hardware. Updating them can resolve connection failures, frequent disconnections, and compatibility issues.
Steps to update your Wi-Fi driver:
- Right-click the Start button.
- Select Device Manager.
- Expand the Network adapters section.
- Find your wireless network adapter.
- Right-click the adapter.
- Select Update driver.
- Choose Search automatically for drivers.
- Follow the instructions if Windows finds an available driver.
If Windows cannot find an appropriate driver, visit your laptop or motherboard manufacturer’s official website.
For example, check the support pages of Dell, HP, Lenovo, ASUS, Acer, or your wireless adapter manufacturer.
Download the correct Windows 11-compatible Wi-Fi driver for your computer model.
Important: Always download drivers from trusted manufacturer websites. Avoid downloading unknown driver-updater applications from third-party websites.
6. Disable and Re-enable the Wi-Fi Adapter
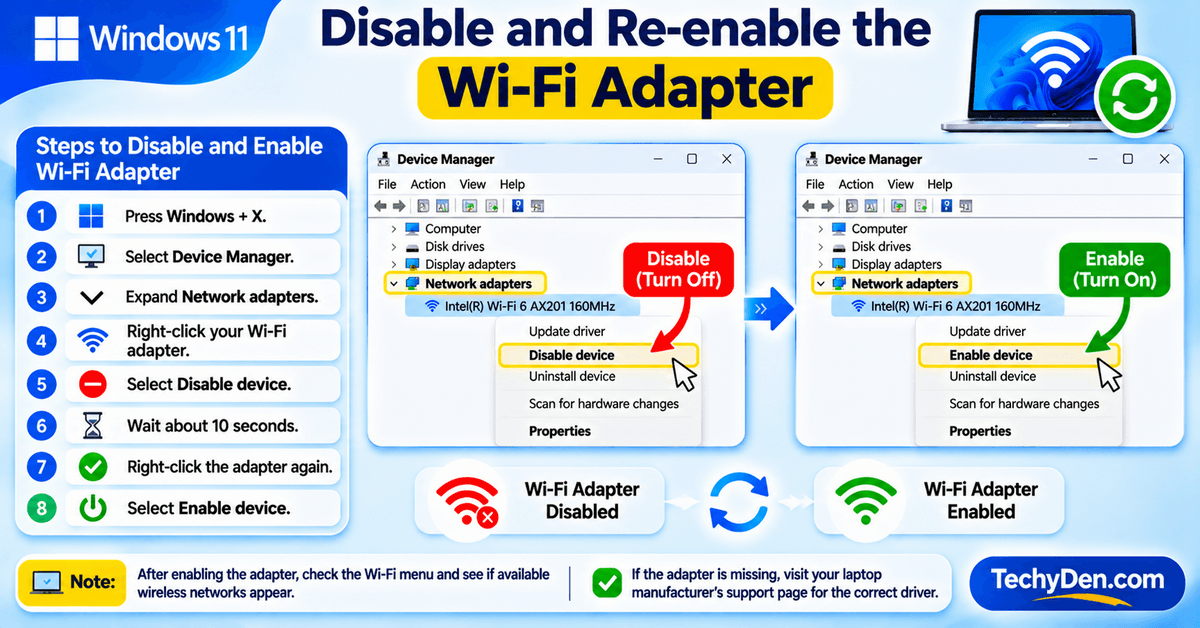
Sometimes, the wireless network adapter becomes temporarily unresponsive. Disabling and enabling it can refresh the connection between Windows and the wireless hardware.
Steps to disable and enable the Wi-Fi adapter:
- Press Windows + X.
- Select Device Manager.
- Expand Network adapters.
- Locate your wireless network adapter.
- Right-click it and select Disable device.
- Wait approximately 10 seconds.
- Right-click the same adapter again.
- Select Enable device.
Windows will reactivate the wireless adapter.
Open the Wi-Fi menu and check whether available wireless networks appear.
If the adapter is missing from Device Manager, check the manufacturer’s driver support page and your computer’s hardware documentation.
7. Restart the WLAN AutoConfig Service
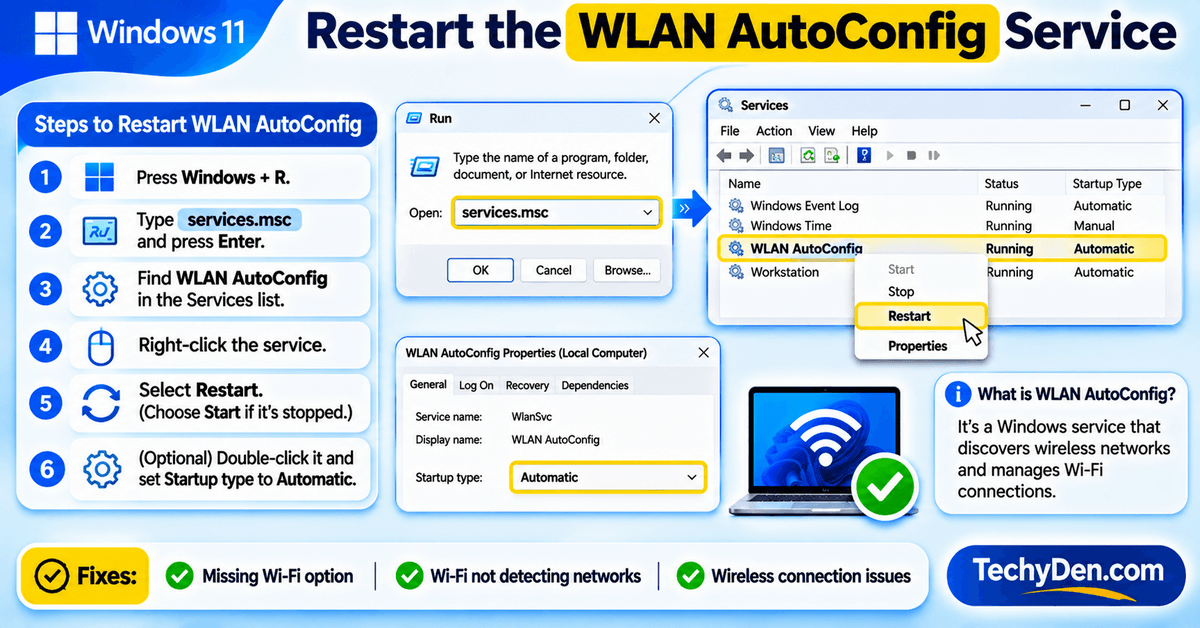
WLAN AutoConfig is a Windows service responsible for discovering wireless networks and managing Wi-Fi connections.
If this service stops working, the Wi-Fi option may disappear from Windows Settings, or your computer may fail to detect available wireless networks.
Restarting the service can help resolve these problems.
Steps to restart WLAN AutoConfig:
- Press Windows + R.
- Type
services.msc. - Press Enter.
- Find WLAN AutoConfig in the Services list.
- Right-click the service.
- Select Restart.
If the service is stopped, select Start instead.
You can also double-click WLAN AutoConfig and check its Startup type. It should normally be set to Automatic.
Close the Services window and check whether your wireless network is available.
8. Reset TCP/IP and Flush DNS Using Command Prompt
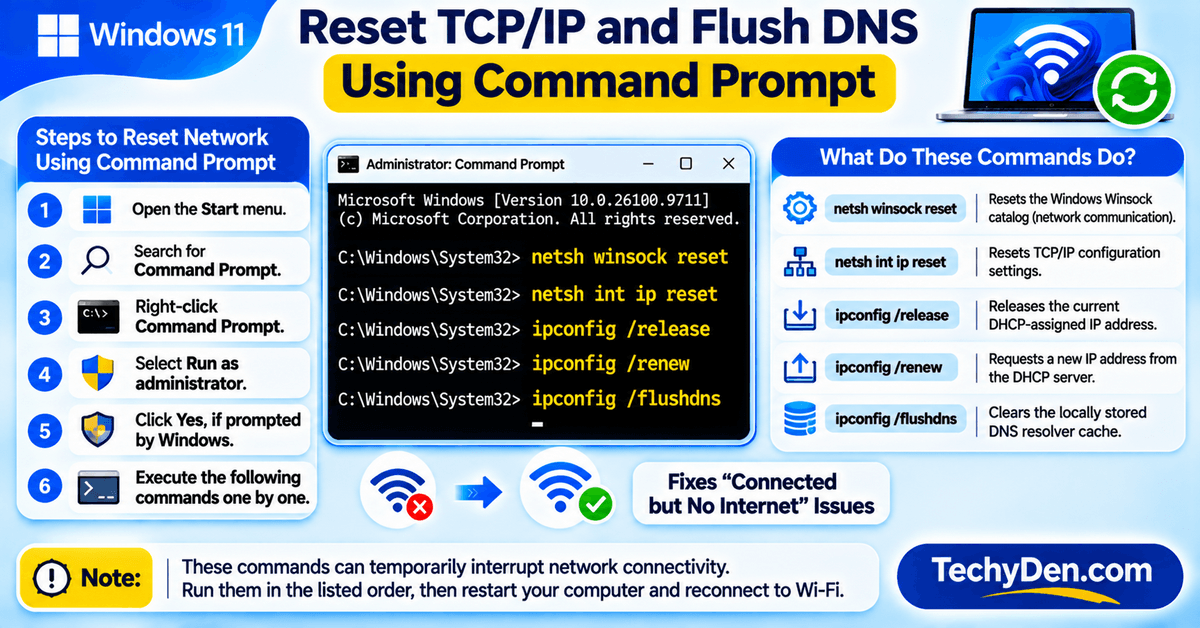
Incorrect TCP/IP configurations and DNS-related problems can prevent Windows 11 from accessing the internet.
Windows includes several Command Prompt commands that can reset networking components, renew your IP address, and clear the DNS cache.
This method is particularly useful when your computer connects to Wi-Fi but cannot access websites.
Steps to reset network configurations:
- Click the Start menu.
- Search for Command Prompt.
- Right-click Command Prompt.
- Select Run as administrator.
- Click Yes if Windows asks for permission.
- Execute the following commands one at a time.
netsh winsock reset
netsh int ip reset
ipconfig /release
ipconfig /renew
ipconfig /flushdns
What do these commands do?
netsh winsock reset– Resets the Windows Winsock catalog, which manages network communication between applications and network services.netsh int ip reset– Resets TCP/IP configuration settings.ipconfig /release– Releases the current DHCP-assigned IP address.ipconfig /renew– Requests a new IP address from the DHCP server.ipconfig /flushdns– Clears the locally stored DNS resolver cache.
After executing all five commands, restart your computer and reconnect to Wi-Fi.
Note: These commands can temporarily interrupt network connectivity. Run them in the listed order from an administrator Command Prompt.
9. Disable Wi-Fi Adapter Power Saving
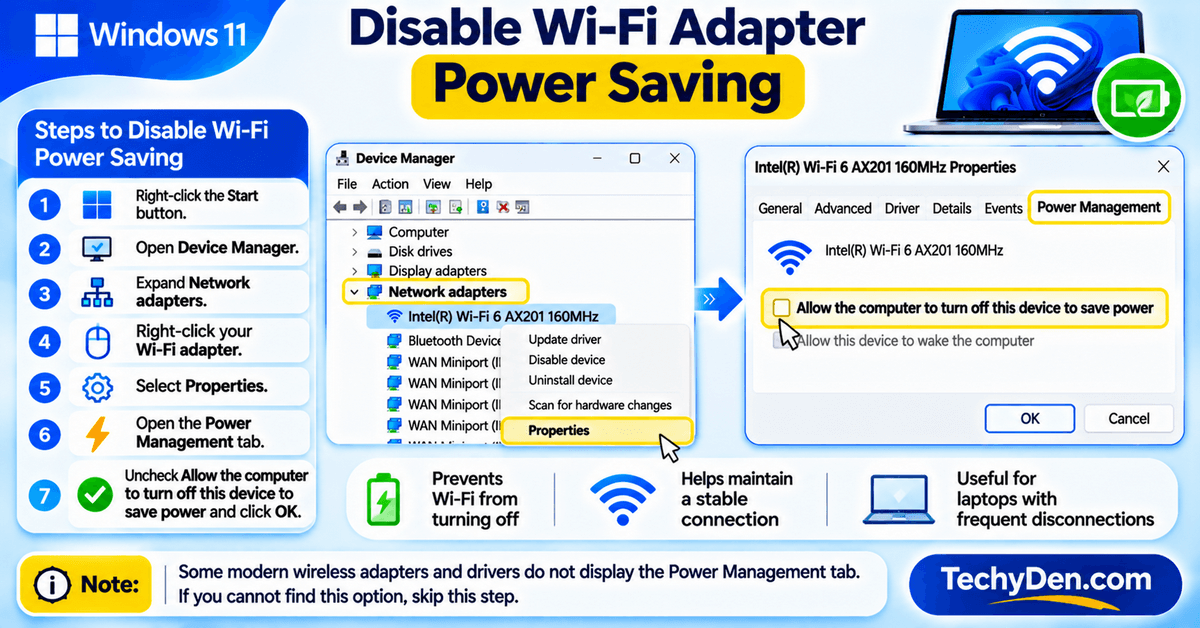
Windows 11 includes power management features that can reduce power consumption by turning off certain hardware components.
In some cases, wireless adapter power management settings may contribute to frequent Wi-Fi disconnections, especially on laptops.
You can check whether Windows is allowed to turn off your wireless adapter to save power.
Steps to change Wi-Fi power settings:
- Right-click the Start button.
- Open Device Manager.
- Expand Network adapters.
- Right-click your wireless network adapter.
- Select Properties.
- Open the Power Management tab, if available.
- Uncheck Allow the computer to turn off this device to save power.
- Click OK.
Restart your computer and check whether the wireless connection remains stable.
Note: Some modern wireless adapters and drivers do not display the Power Management tab. If you cannot find this option, skip this step.
10. Change the Wi-Fi Frequency Band (2.4 GHz or 5 GHz)
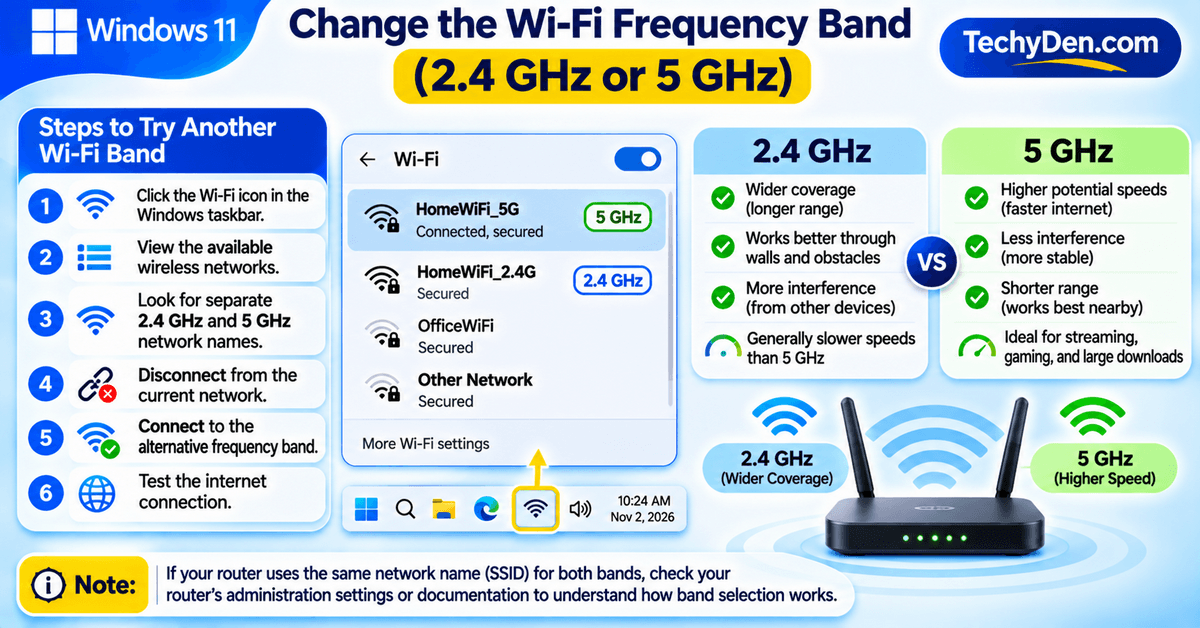
Most modern wireless routers support multiple frequency bands, including 2.4 GHz and 5 GHz.
The two frequency bands offer different advantages.
- 2.4 GHz: Provides wider coverage and generally works better over longer distances, but can experience more interference.
- 5 GHz: Usually offers higher potential speeds and less interference, but has a shorter effective range.
If your Windows 11 laptop experiences slow internet or frequent disconnections, switching to another available frequency band may help.
Steps to try another Wi-Fi band:
- Click the Wi-Fi icon in the Windows taskbar.
- View the available wireless networks.
- Look for separate 2.4 GHz and 5 GHz network names, if your router provides them.
- Disconnect from the current network.
- Connect to the alternative frequency band.
- Test the internet connection.
If your router uses the same network name for both bands, check its administration settings or documentation to understand how band selection works.
You can also check your wireless adapter’s supported bands through its manufacturer specifications.
11. Check Proxy and DNS Settings
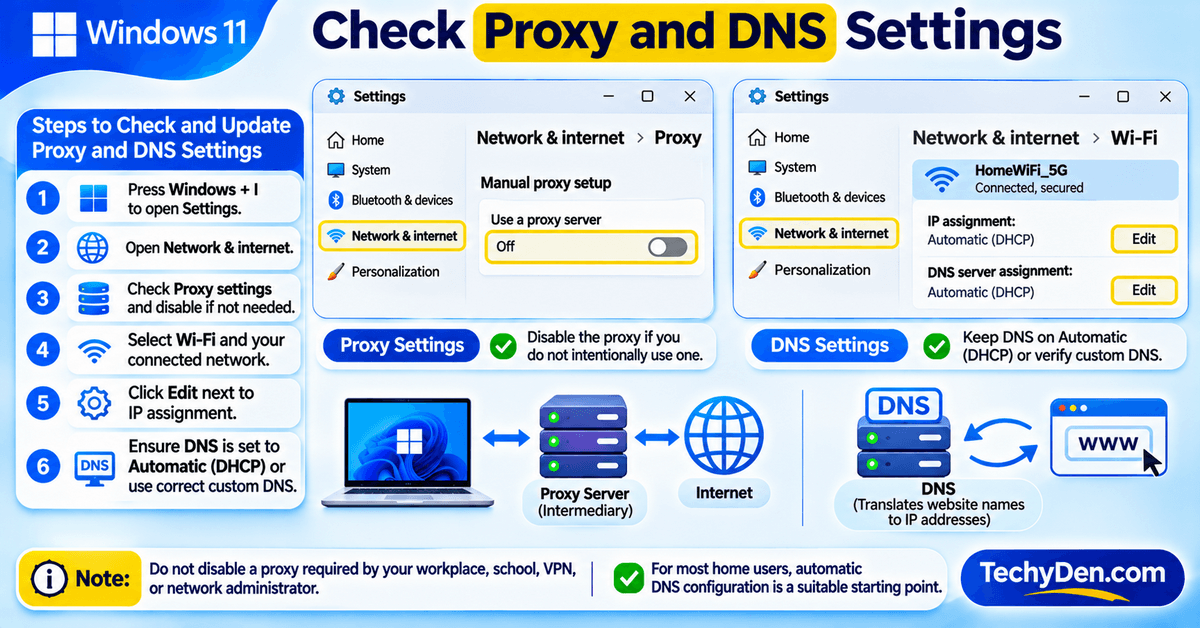
Incorrect proxy or DNS settings can prevent Windows 11 from accessing websites even when the wireless connection is established.
A proxy server acts as an intermediary between your computer and the internet, while DNS translates website names into IP addresses.
If these settings are incorrectly configured, internet access may become unavailable.
Check your proxy settings:
- Press Windows + I.
- Open Network & internet.
- Select Proxy.
- Review the available proxy configuration.
- Disable manually configured proxy settings if you do not intentionally use them.
Do not disable a proxy required by your workplace, school, VPN, or network administrator.
Check your DNS settings:
- Open Settings.
- Select Network & internet.
- Click Wi-Fi.
- Select your connected wireless network.
- Find DNS server assignment.
- Click Edit next to DNS server assignment.
- Choose Automatic (DHCP) or enter your preferred DNS server addresses.
- Click Save.
If you use custom DNS servers, verify that their addresses are correct and reachable.
For most home users, automatic DNS configuration is a suitable starting point.
12. Check for Windows Updates
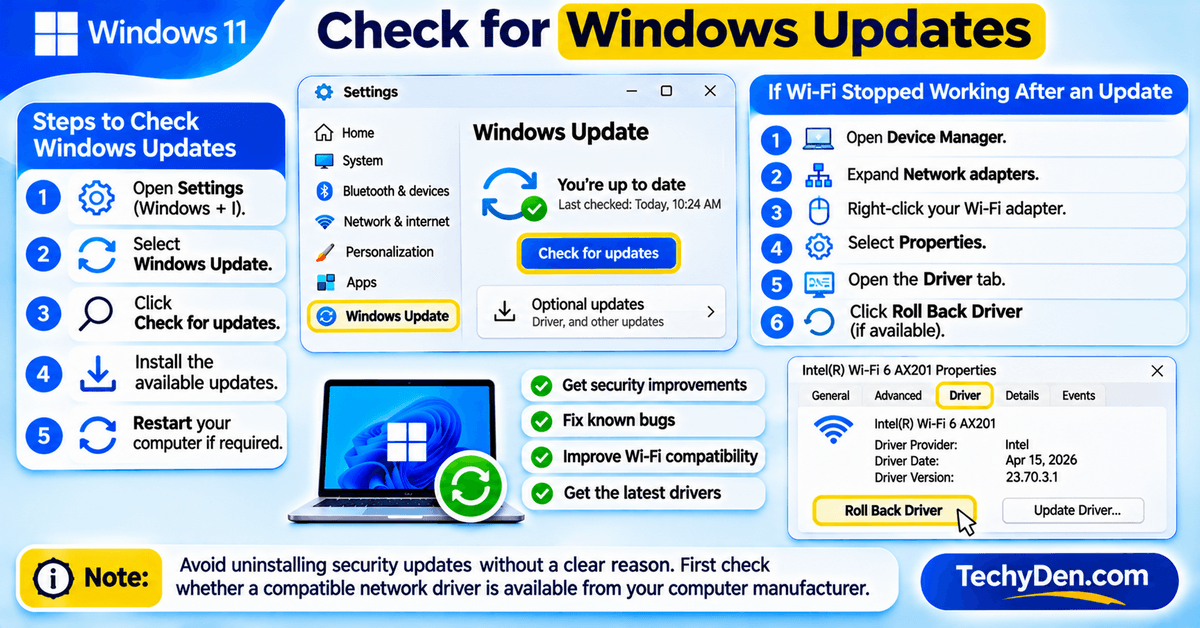
Microsoft regularly releases Windows updates containing security improvements, bug fixes, and compatibility updates.
If your Windows 11 Wi-Fi stopped working after an update, check whether a newer driver or Windows update is available.
Steps to check Windows updates:
- Open Settings.
- Select Windows Update.
- Click Check for updates.
- Install available updates.
- Restart your computer if required.
Also check the Optional updates section for available driver updates.
What if Wi-Fi stopped working after a Windows update?
If the problem started immediately after installing a particular driver or update, check the wireless adapter’s driver properties.
- Open Device Manager.
- Expand Network adapters.
- Right-click your wireless adapter.
- Select Properties.
- Open the Driver tab.
- Select Roll Back Driver if the option is available and appropriate.
Restart your computer and test the connection.
Avoid uninstalling security updates without a clear reason. First check whether a compatible network driver is available from your computer manufacturer.
If your Wi-Fi problems started after installing a recent update, read our guide to the Windows 11 October 2026 update to review its changes, fixes, and reported issues.
13. Uninstall and Reinstall the Wi-Fi Driver
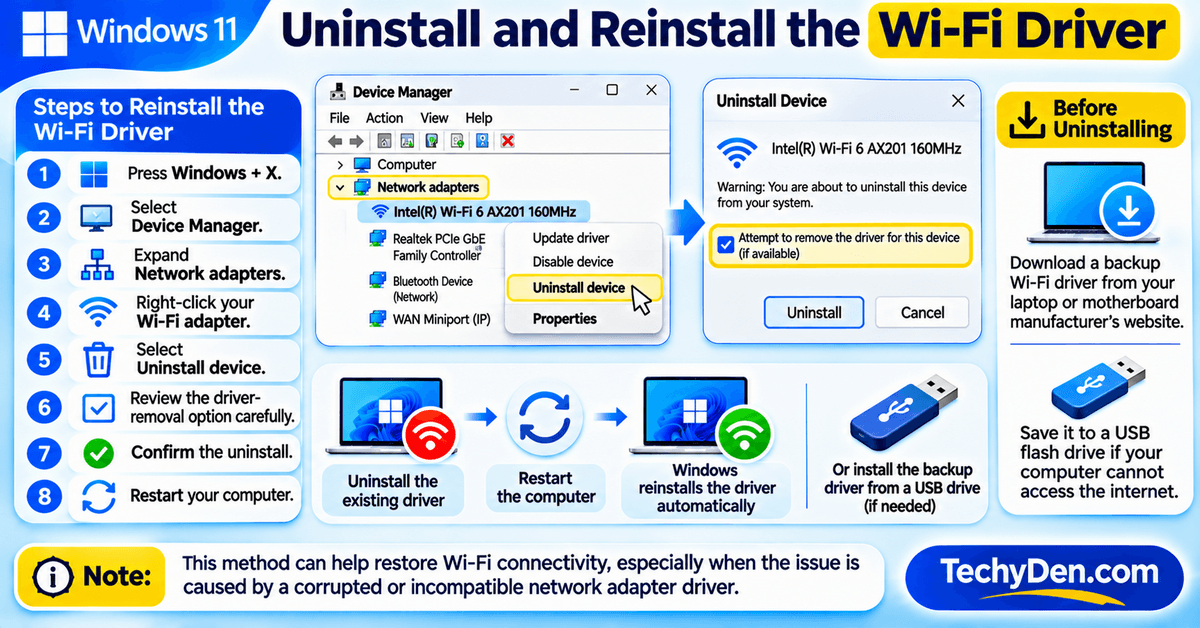
If updating or restarting the wireless adapter does not resolve the problem, the installed driver may be corrupted or incompatible.
Uninstalling the existing driver and allowing Windows to reinstall it can help restore wireless connectivity.
Before uninstalling the driver: Download a backup Wi-Fi driver from your laptop or motherboard manufacturer’s website. Save it to a USB flash drive if your computer cannot access the internet.
Steps to reinstall the Wi-Fi driver:
- Press Windows + X.
- Select Device Manager.
- Expand Network adapters.
- Right-click your wireless network adapter.
- Select Uninstall device.
- Review the available driver-removal option carefully.
- Confirm the uninstall.
- Restart your computer.
Windows may automatically detect the wireless adapter and reinstall a compatible driver.
If the driver is not automatically installed, use the backup driver saved on your USB drive.
This method can be particularly helpful when Wi-Fi stops working because of a corrupted or incompatible network adapter driver.
14. Perform a Network Reset in Windows 11
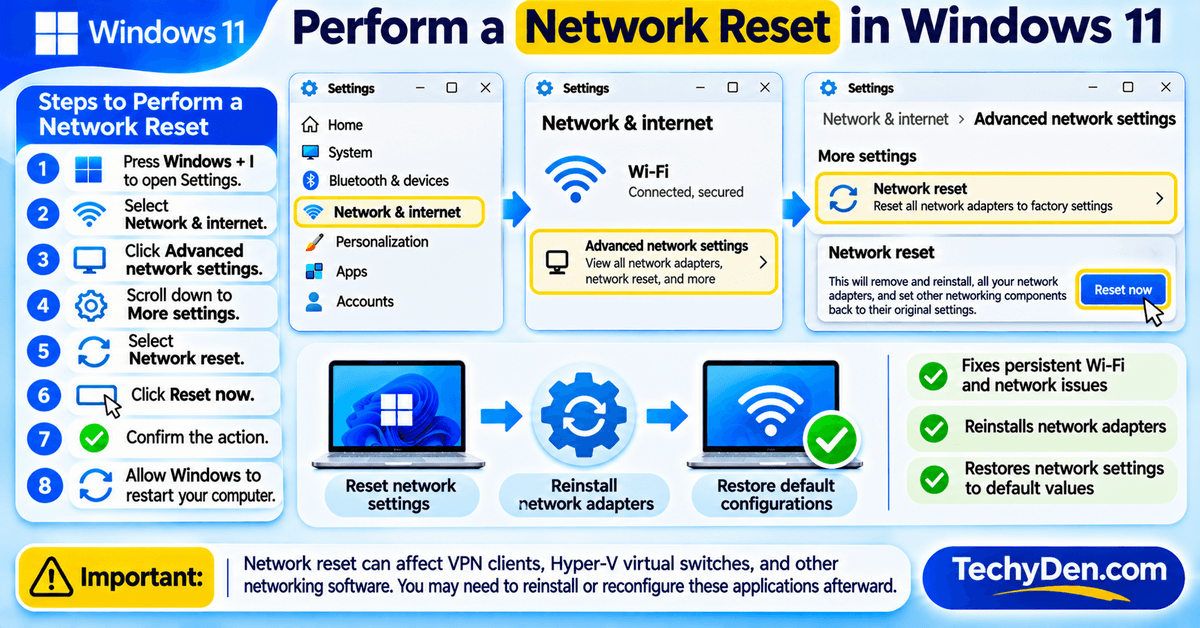
Network reset is an advanced troubleshooting option that removes installed network adapters and resets networking settings to their default configurations.
It can help resolve persistent connectivity problems that remain after trying the previous solutions.
However, Microsoft recommends using network reset as one of the last troubleshooting steps.
Steps to perform a network reset:
- Press Windows + I to open Settings.
- Select Network & internet.
- Click Advanced network settings.
- Scroll down to More settings.
- Select Network reset.
- Click Reset now.
- Confirm the action.
- Allow Windows to restart your computer.
After restarting, Windows will reinstall the network adapters and restore their settings to default values.
You may need to reconnect to your Wi-Fi network and enter your password again.
Important: Network reset can affect VPN clients, Hyper-V virtual switches, and other networking software. You may need to reinstall or reconfigure these applications afterward.
15. Check Your Wi-Fi Router and Internet Service Provider
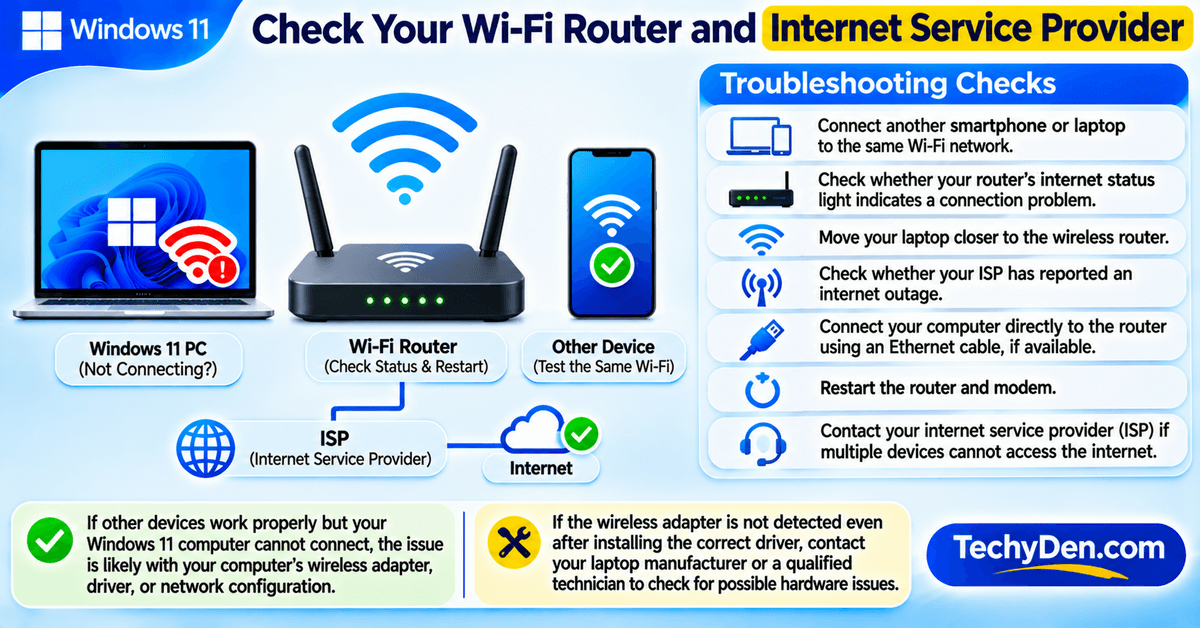
If none of the previous solutions works, the problem may not be related to Windows 11.
Your router, modem, internet service provider, or wireless hardware could be responsible for the connectivity issue.
Try the following checks:
- Connect another smartphone or laptop to the same Wi-Fi network.
- Check whether your router’s internet status light indicates a connection problem.
- Move your laptop closer to the wireless router.
- Check whether your ISP has reported an internet outage.
- Connect your computer directly to the router using an Ethernet cable, if available.
- Restart the router and modem.
- Contact your internet service provider if multiple devices cannot access the internet.
If other devices work properly but your Windows 11 computer cannot connect, the problem is more likely related to your computer’s wireless adapter, driver, or network configuration.
If the wireless adapter is not detected even after installing the correct driver, contact your laptop manufacturer or a qualified technician to check for possible hardware problems.
How to Fix Specific Windows 11 Wi-Fi Problems
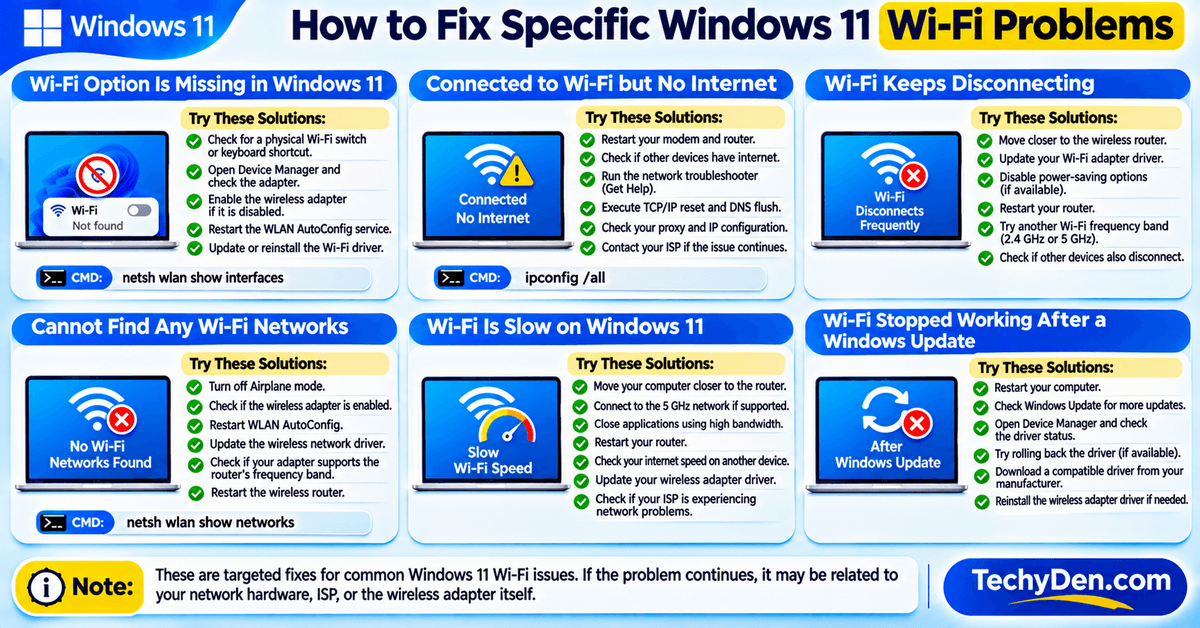
The general troubleshooting methods above can resolve many connectivity issues. However, some users experience specific problems that require a more targeted solution.
Here are some additional fixes based on common Windows 11 Wi-Fi symptoms.
Wi-Fi Option Is Missing in Windows 11
If the Wi-Fi option is missing from the Windows 11 taskbar or Network & internet settings, Windows may not be detecting the wireless adapter correctly.
Try these solutions:
- Check whether your laptop has a physical wireless switch or keyboard Wi-Fi shortcut.
- Open Device Manager and expand Network adapters.
- Check whether the wireless adapter is disabled.
- Enable the adapter if necessary.
- Restart the WLAN AutoConfig service.
- Update or reinstall the wireless network driver.
You can also execute this command in Command Prompt to check whether Windows detects your wireless adapter:
netsh wlan show interfacesIf no wireless interface is detected, check the driver installation and hardware status.
Wi-Fi Adapter Missing from Device Manager in Windows 11
If your wireless network adapter does not appear in Device Manager, Windows may not be detecting the Wi-Fi hardware correctly.
This can happen because of a missing or corrupted driver, disabled wireless hardware, BIOS/UEFI settings, or a hardware problem.
Try the following solutions to identify the issue.
1. Show hidden devices in Device Manager
Sometimes, Windows lists previously installed devices as hidden entries.
- Press Windows + X.
- Select Device Manager.
- Click View in the menu.
- Select Show hidden devices.
- Expand Network adapters.
- Check whether your wireless adapter appears in the list.
If the adapter appears with a down-arrow icon, right-click it and select Enable device.
2. Check the Other devices section
Expand Other devices in Device Manager.
Look for entries such as Network Controller or Unknown device.
A network controller listed without a proper name or driver may indicate that Windows does not have the correct wireless adapter driver installed.
Check your laptop or motherboard manufacturer’s support website for the appropriate driver.
3. Check the adapter’s hardware status
If your wireless adapter appears in Device Manager, right-click it and select Properties.
Open the General tab and review the Device status message.
If Windows displays an error code, note it before attempting further troubleshooting.
You can use the error information to identify whether the problem involves a missing driver, disabled device, or hardware issue.
4. Download the correct Wi-Fi driver
Visit the official support website of your laptop or motherboard manufacturer.
For example, check the driver support pages of Dell, HP, Lenovo, ASUS, Acer, or your computer manufacturer.
Find your exact computer model and download the Windows 11-compatible wireless network driver.
If your computer cannot access the internet, download the driver using another device and transfer it using a USB flash drive.
5. Check BIOS/UEFI wireless settings
If Windows still cannot detect the wireless adapter after installing the correct driver, check your computer’s BIOS/UEFI settings.
Some computers provide options to enable or disable built-in wireless hardware.
Check your manufacturer’s documentation for the correct procedure. Avoid changing unrelated BIOS settings.
If the wireless adapter remains undetected, contact the computer manufacturer or a qualified technician to investigate a possible hardware problem.
Windows 11 Connected to Wi-Fi but No Internet
Sometimes, Windows 11 successfully connects to a wireless network but displays a No Internet message.
This means your computer may be connected to the local router without having access to the wider internet.
Try these troubleshooting steps:
- Restart your modem and router.
- Check whether other devices have internet access.
- Run the network troubleshooter through Get Help.
- Execute the TCP/IP reset and DNS flush commands.
- Check your proxy and IP configuration.
- Contact your ISP if the connection remains unavailable.
You can also use the following command to check your IP configuration:
ipconfig /allLook for your IPv4 address, default gateway, and DNS server information.
If your IPv4 address starts with 169.254, Windows may not have received a valid IP address from your router through DHCP. Restart your router, check its DHCP settings, and run the following commands in an administrator Command Prompt:
ipconfig /release
ipconfig /renew
If the IPv4 address begins with 169.254, Windows may not have received a valid address from the router through DHCP.
Wi-Fi Connected but Says “No Internet, Secured” in Windows 11
If Windows 11 displays the message “No Internet, Secured” while connected to Wi-Fi, your computer may have successfully connected to the wireless router but cannot access the internet.
This problem can occur because of incorrect IP configuration, DHCP failures, DNS problems, proxy settings, router issues, or an internet service provider outage.
Try the following troubleshooting steps to identify the cause.
1. Check whether other devices have internet access
Connect your smartphone, tablet, or another laptop to the same Wi-Fi network.
- If other devices can access the internet, the problem may be related to your Windows 11 computer.
- If no devices can access the internet, check your router, modem, and internet service provider.
2. Check your IP address and default gateway
You can use Command Prompt to inspect your computer’s network configuration.
- Open the Start menu.
- Search for Command Prompt.
- Open the application.
- Execute the following command:
ipconfig /allLook for the following information under your wireless network adapter:
- IPv4 Address
- Subnet Mask
- Default Gateway
- DHCP Enabled
- DNS Servers
If your IPv4 address starts with 169.254, Windows may not have received a valid IP address from your router through DHCP.
A missing or incorrect default gateway can also prevent your computer from communicating with networks outside your local connection.
3. Renew your IP address
If your computer has an IP address configuration problem, try releasing and renewing its DHCP-assigned address.
Open Command Prompt and execute these commands one at a time:
ipconfig /release
ipconfig /renew
Wait for Windows to request a new IP address from the router.
Then check whether your internet connection works.
4. Check DNS and proxy settings
Incorrect DNS or proxy settings can prevent websites from loading even when your computer is connected to Wi-Fi.
Open Settings and navigate to Network & internet.
- Select Proxy and check whether an unwanted manually configured proxy is enabled.
- Open Wi-Fi and select your connected network.
- Review DNS server assignment.
- Check whether DNS is configured through Automatic (DHCP) or correctly configured custom DNS servers.
Do not disable proxy settings required by your workplace, school, VPN, or network administrator.
5. Restart your router and computer
Finally, restart your wireless router and Windows 11 computer. Reconnect to your Wi-Fi network and check whether internet access has been restored.
If the problem continues, contact your internet service provider or investigate the wireless adapter and network configuration.
The wireless network report summarizes Wi-Fi activity from the last three days, including connection sessions, adapter details, connection failures, and disconnection reasons.
Windows 11 Wi-Fi Keeps Disconnecting
Frequent wireless disconnections can interrupt video calls, online classes, downloads, and streaming.
The problem may be caused by weak signal strength, wireless interference, outdated drivers, or power management settings.
Try these solutions:
- Move closer to the wireless router.
- Update your Wi-Fi adapter driver.
- Disable wireless adapter power-saving options if available.
- Restart your router.
- Try another Wi-Fi frequency band.
- Check whether other devices also disconnect.
If the problem occurs only on your Windows 11 computer, focus on the wireless adapter driver and network configuration.
Windows 11 Cannot Find Any Wi-Fi Networks
If your laptop cannot detect available wireless networks, first check whether Wi-Fi is enabled.
Then try these steps:
- Turn off Airplane mode.
- Check whether the wireless adapter is enabled.
- Restart WLAN AutoConfig.
- Update the wireless network driver.
- Check whether your adapter supports the router’s frequency band.
- Restart the wireless router.
You can use this command to display nearby wireless networks:
netsh wlan show networksIf Windows does not detect any wireless networks, check the adapter, driver, and wireless hardware.
Wi-Fi Is Slow on Windows 11
Slow wireless internet can result from weak signals, network congestion, background downloads, router limitations, or ISP problems.
Try these methods:
- Move your computer closer to the router.
- Connect to the 5 GHz network if supported and the signal is strong enough.
- Close applications consuming excessive bandwidth.
- Restart your router.
- Check your internet speed on another device.
- Update your wireless adapter driver.
- Check whether your ISP is experiencing network problems.
If other devices also experience slow internet, investigate your router or internet service before changing Windows network settings.
Wi-Fi Stopped Working After a Windows Update
A Windows update may sometimes introduce compatibility problems with existing network adapter drivers.
If Wi-Fi stopped working immediately after installing an update, try these steps:
- Restart your computer.
- Check Windows Update for additional updates.
- Open Device Manager.
- Check the wireless adapter’s driver status.
- Try rolling back the driver if the option is available.
- Download a compatible driver from your computer manufacturer’s website.
- Reinstall the wireless adapter driver if necessary.
Avoid assuming that every Wi-Fi issue is caused by Windows Update. First check whether other devices can connect to the same router.
How to Generate and Read a Wi-Fi Network Report in Windows 11
Windows 11 includes a built-in wireless network reporting tool that can help identify connection failures and frequent Wi-Fi disconnections.
The netsh wlan show wlanreport command generates an HTML report containing recent wireless network sessions, adapter information, and connection-related errors.
This report is particularly useful when your laptop repeatedly disconnects from Wi-Fi or cannot connect to a wireless network.
1. Open Command Prompt
- Click the Start menu.
- Search for Command Prompt.
- Right-click the application.
- Select Run as administrator.
- Click Yes if Windows requests permission.
2. Generate the Wi-Fi network report
Enter the following command and press Enter:
netsh wlan show wlanreportWait for Windows to complete the report generation.
Command Prompt displays the location of the generated HTML report.
3. Locate the generated HTML report
The report is normally saved at the following location:
C:\ProgramData\Microsoft\Windows\WlanReport\wlan-report-latest.htmlYou can also open File Explorer, paste the following path into its address bar, and press Enter:
%ProgramData%\Microsoft\Windows\WlanReportFind the file named wlan-report-latest.html.
4. Open the report in a web browser
Double-click wlan-report-latest.html to open it in your default web browser.
The report provides information about recent wireless activity and connection sessions.
5. Review the wireless connection information
Pay attention to the following details:
- Wireless sessions: Shows recent Wi-Fi connection and disconnection activity.
- Connection errors: Helps identify failed connection attempts and reported disconnection reasons.
- Network adapters: Displays information about the wireless hardware and installed driver.
- Session details: Helps you investigate when connectivity problems occurred.
If you notice repeated connection failures, record the relevant error details and check your wireless adapter driver, router, and network configuration.
You can also share the report with your computer manufacturer’s support team or a qualified technician for further investigation.
Tip: Record the approximate time when a Wi-Fi disconnection occurs. Comparing that time with the report’s session and error information can make troubleshooting easier.
If your connectivity problems started after installing a recent system update, check our coverage of the Windows 11 September 2026 update to learn about its changes, fixes, and reported issues.
How to Diagnose Wi-Fi Problems Using Windows Commands
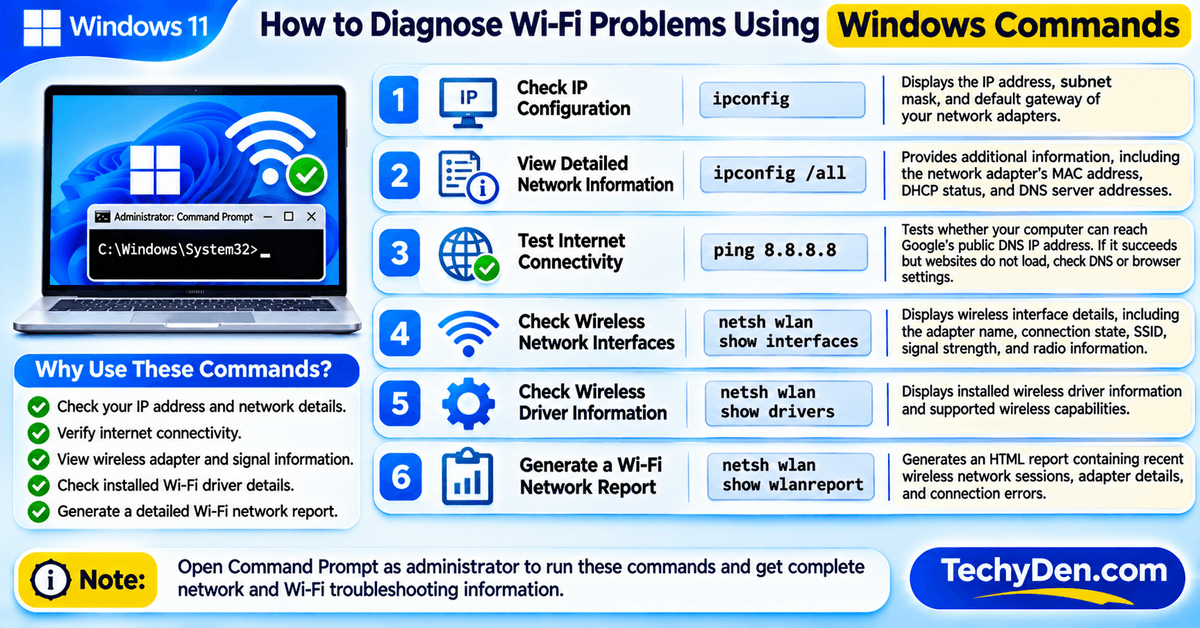
Windows 11 includes several command-line networking tools that help identify wireless connectivity problems.
These commands can provide useful information about your network adapter, wireless signal, IP configuration, and available networks.
Open Command Prompt as administrator and try the following commands.
1. Check IP configuration
ipconfigThis command displays the IP address, subnet mask, and default gateway of your network adapters.
2. View detailed network information
ipconfig /allThis command provides additional information, including the network adapter’s MAC address, DHCP status, and DNS server addresses.
3. Test internet connectivity
ping 8.8.8.8This command tests whether your computer can reach Google’s public DNS IP address.
If the ping succeeds but websites do not load, investigate DNS or browser-related problems.
4. Check wireless network interfaces
netsh wlan show interfacesThis command displays wireless interface details, including the adapter name, connection state, SSID, signal strength, and radio information.
5. Check wireless driver information
netsh wlan show driversThis command displays installed wireless driver information and supported wireless capabilities.
6. Generate a Wi-Fi network report
netsh wlan show wlanreportWindows generates an HTML report containing recent wireless network sessions, adapter details, and connection errors.
This report can help identify why a Wi-Fi connection disconnects or fails to connect.
For advanced diagnostics, read Microsoft’s advanced wireless network connectivity troubleshooting guide to learn more about wireless adapter diagnostics, connection failures, WLAN AutoConfig, and network troubleshooting commands.
When Should You Contact Your Internet Service Provider or Laptop Manufacturer?
If you have tried all the troubleshooting methods and Wi-Fi still does not work, you may need professional assistance.
Contact your internet service provider if:
- Multiple devices cannot connect to the internet.
- Your router displays an internet connection error.
- Your broadband connection frequently disconnects.
- Your ISP reports an outage in your area.
Contact your laptop manufacturer or a qualified technician if:
- Your wireless network adapter is missing from Device Manager.
- The adapter displays persistent hardware errors.
- Installing the correct driver does not resolve the problem.
- Your laptop cannot detect any wireless networks even when other devices can.
- You suspect the internal Wi-Fi card or antenna is damaged.
A hardware replacement or professional diagnosis may be necessary if the wireless adapter has physically failed.
Frequently Asked Questions About Windows 11 Wi-Fi Problems
Why is my Wi-Fi not working in Windows 11?
Wi-Fi may stop working in Windows 11 because of outdated network drivers, disabled wireless adapters, incorrect network settings, router problems, or Windows updates. Start by checking whether Wi-Fi and Airplane mode are configured correctly. Then restart your router, run the network troubleshooter, and update your wireless adapter driver.
How do I reset Wi-Fi settings in Windows 11?
To reset Wi-Fi settings, open Settings and navigate to Network & internet > Advanced network settings > Network reset. Click Reset now and confirm the action. Windows will restart and reinstall your network adapters with default settings. You may need to reconnect to your wireless network and reconfigure VPN or other networking software.
Why does Windows 11 say connected but no internet?
This message means your computer is connected to the wireless router but cannot access the internet. Possible causes include router problems, ISP outages, incorrect IP configurations, or DNS issues. Restart your router, test another device, and run the network commands ipconfig /release, ipconfig /renew, and ipconfig /flushdns.
How do I fix a missing Wi-Fi option in Windows 11?
If the Wi-Fi option is missing, check whether your wireless adapter is enabled in Device Manager. Expand Network adapters and enable the wireless device if it is disabled. Also restart WLAN AutoConfig through the Services application. If the adapter is still missing, check its driver installation and hardware status.
How do I update my Wi-Fi driver in Windows 11?
Press Windows + X and open Device Manager. Expand Network adapters, right-click your wireless adapter, and select Update driver. Choose Search automatically for drivers. If Windows cannot find a suitable update, download the latest compatible driver from your laptop or motherboard manufacturer’s official support website.
Why does my Windows 11 laptop keep disconnecting from Wi-Fi?
Frequent Wi-Fi disconnections can result from weak signals, wireless interference, outdated network drivers, or adapter power-saving settings. Move closer to your router, update your wireless driver, and check available power management settings. You can also try another frequency band and restart your router to improve connection stability.
Does resetting network settings delete saved Wi-Fi passwords?
Network reset removes installed network adapters and restores networking settings to their defaults. You should be prepared to reconnect to saved wireless networks and enter their passwords if required. It can also affect VPN clients and virtual network switches, which may need to be reinstalled or configured again.
How can I fix slow Wi-Fi on Windows 11?
To fix slow Wi-Fi, move closer to your router, restart your modem, and check whether other devices experience similar speed problems. Try the 5 GHz frequency band if supported and available. Also close bandwidth-consuming applications, update your network adapter driver, and contact your ISP if speeds remain unusually low.
Can a Windows update cause Wi-Fi problems?
Yes, a Windows update or network driver update can sometimes introduce wireless compatibility problems. If Wi-Fi stops working after an update, restart your computer and check for newer driver updates. You can also try rolling back the wireless adapter driver if available or reinstalling a compatible driver from your manufacturer’s website.
How do I troubleshoot Wi-Fi without an internet connection?
You can troubleshoot Wi-Fi without internet access using Device Manager, Command Prompt, and Windows networking settings. Check whether your adapter is enabled, restart WLAN AutoConfig, and reset TCP/IP settings. If you need a driver, download it using another internet-connected computer and transfer it to your Windows 11 PC using a USB drive.
Why does Windows 11 show Wi-Fi connected but no internet?
Windows 11 may connect to your router without receiving internet access. This can happen because of DHCP failures, incorrect DNS settings, router problems, or an ISP outage. Check other devices, inspect your IP configuration, and restart your router before changing advanced network settings.
How do I fix a missing Wi-Fi adapter in Windows 11?
Open Device Manager and expand Network adapters. Check whether your wireless adapter is disabled or showing an error. If it is missing, check hidden devices, install the correct manufacturer driver, and investigate possible hardware or BIOS settings issues.
Why does my Windows 11 laptop keep disconnecting from Wi-Fi?
Frequent Wi-Fi disconnections can result from weak signal strength, wireless interference, outdated drivers, router problems, or power management settings. Move closer to your router, update your wireless driver, check adapter power settings, and test whether other devices experience the same issue.
How do I generate a Wi-Fi report in Windows 11?
Open Command Prompt and execute netsh wlan show wlanreport. Windows generates an HTML report containing wireless connection sessions, adapter information, and connection errors. Open the report using the file path displayed in Command Prompt to investigate recent Wi-Fi problems.
Final Thoughts
Windows 11 Wi-Fi problems can be frustrating, especially when you need a stable internet connection for work, online classes, video calls, or entertainment.
Fortunately, most wireless connectivity issues can be resolved through simple troubleshooting methods. Start by checking Wi-Fi settings, restarting your router, and running the Windows network troubleshooter. If these methods do not work, update your wireless driver, reset TCP/IP settings, or investigate your router configuration.
For persistent connectivity problems, reinstalling the Wi-Fi driver or performing a Windows 11 network reset may help restore normal functionality.
My recommendation: Don’t immediately reset Windows or reinstall your operating system when Wi-Fi stops working. Try the troubleshooting methods in this guide first. In most cases, identifying the actual network problem and applying the appropriate fix is enough to restore your wireless internet connection.
For more practical Windows tutorials, troubleshooting tips, and technology guides, explore the Windows 11 guides on TechyDen.